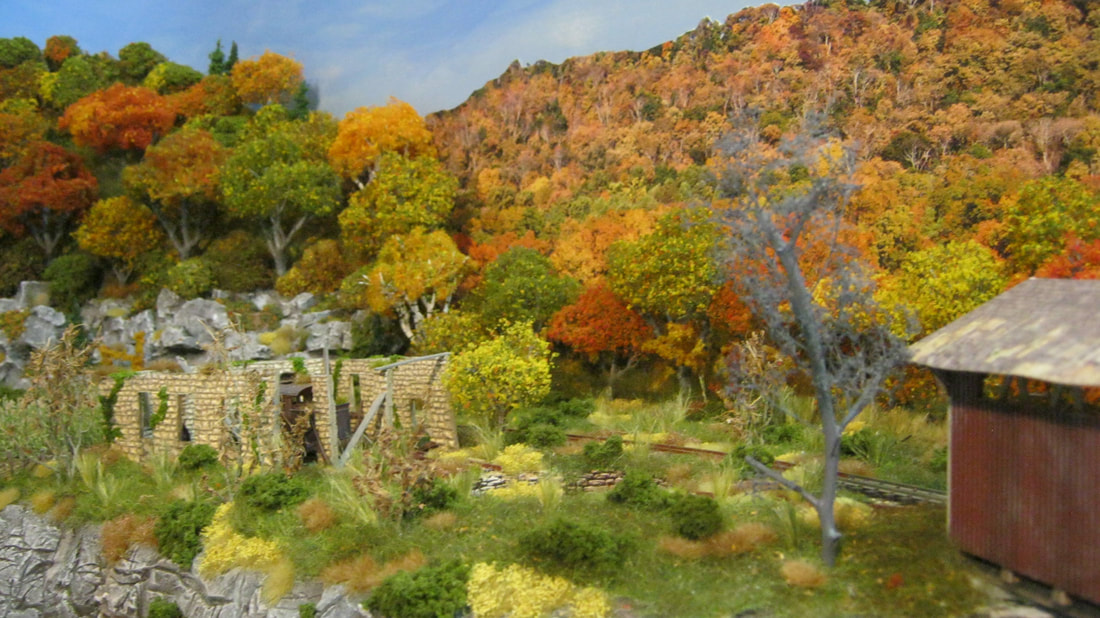
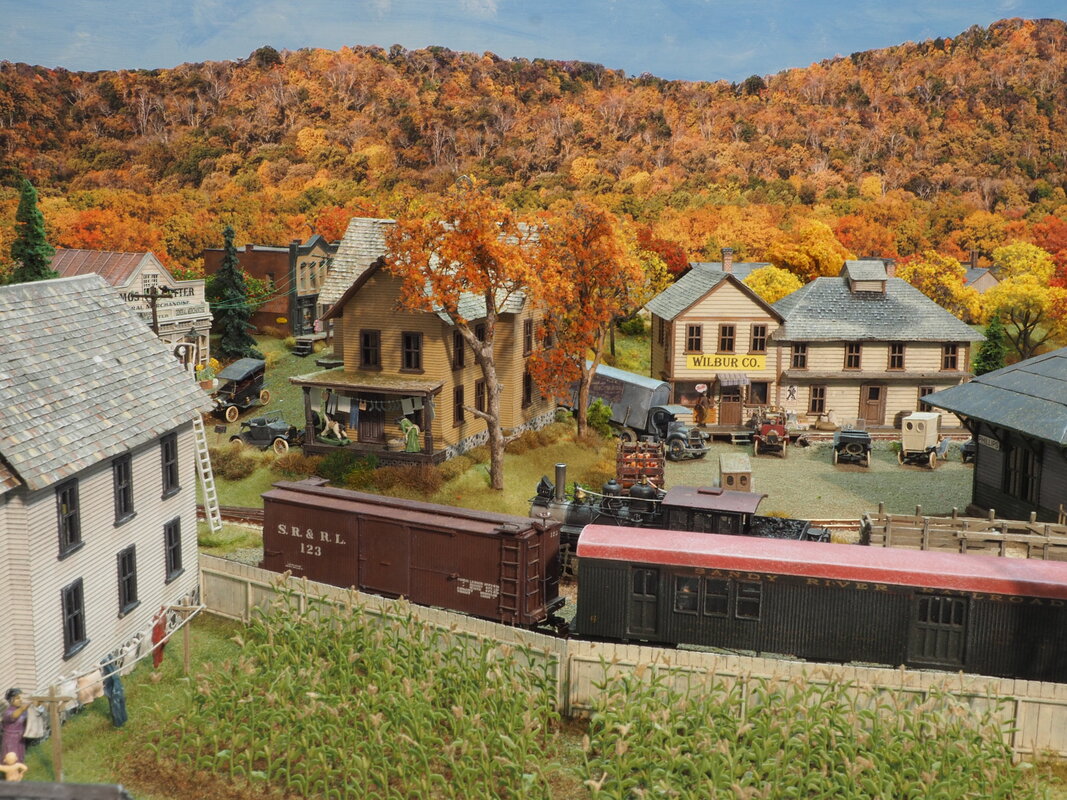
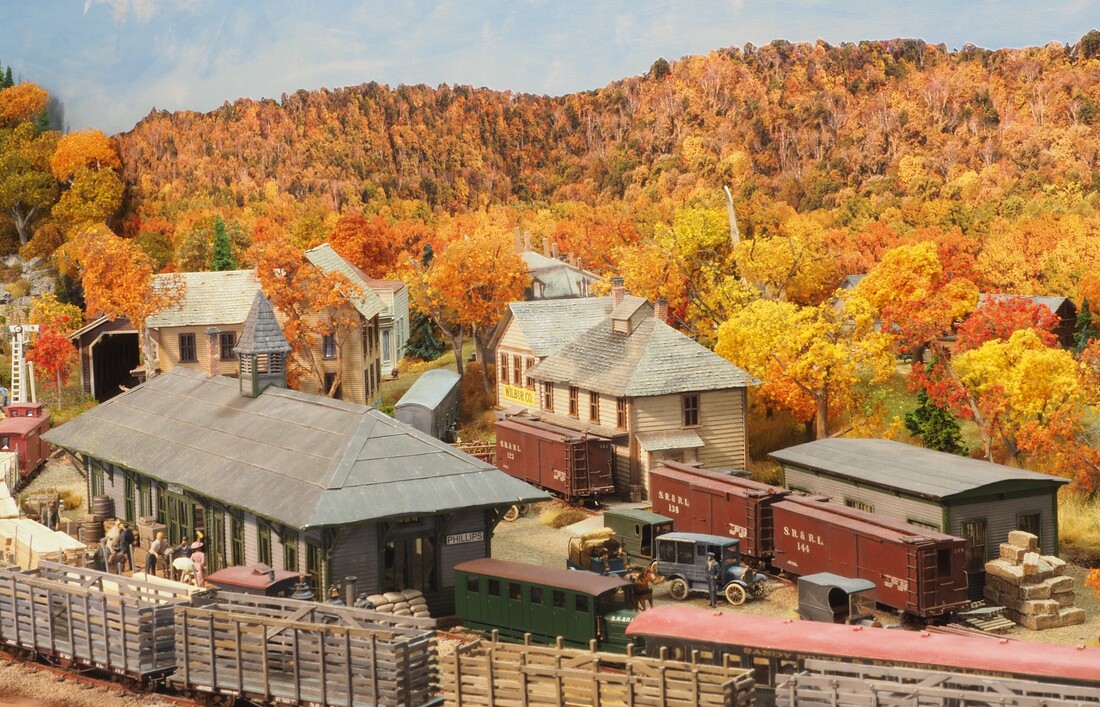
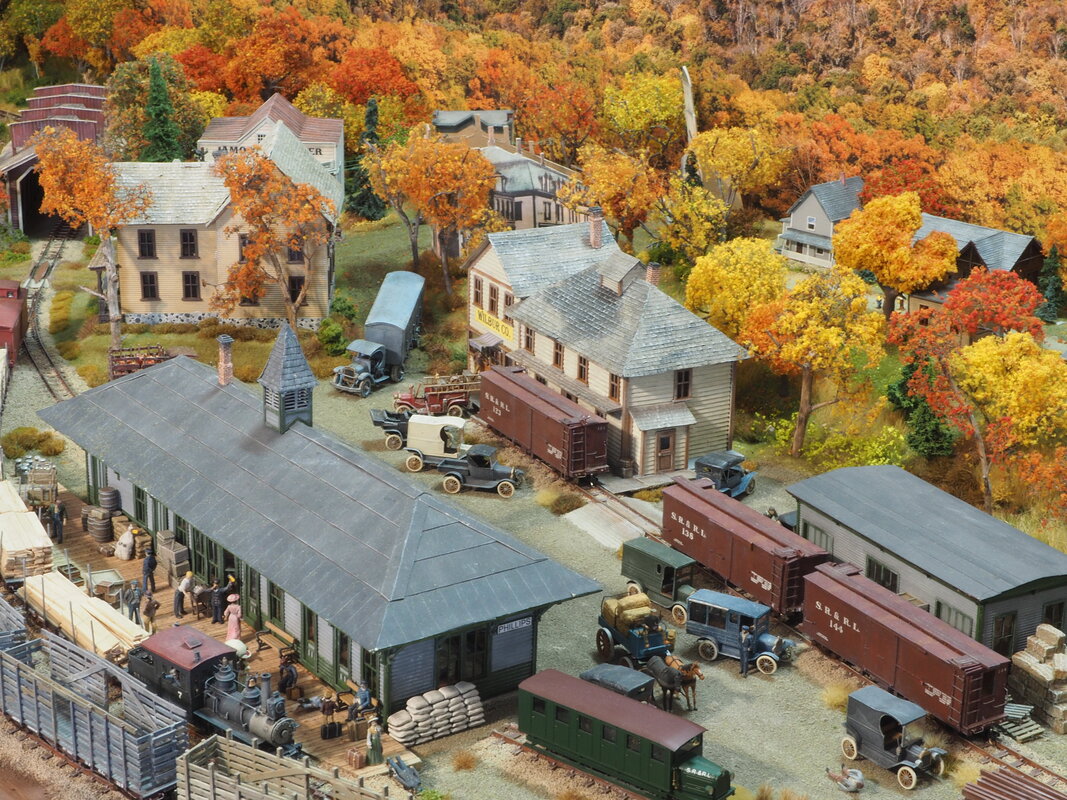
Phillips
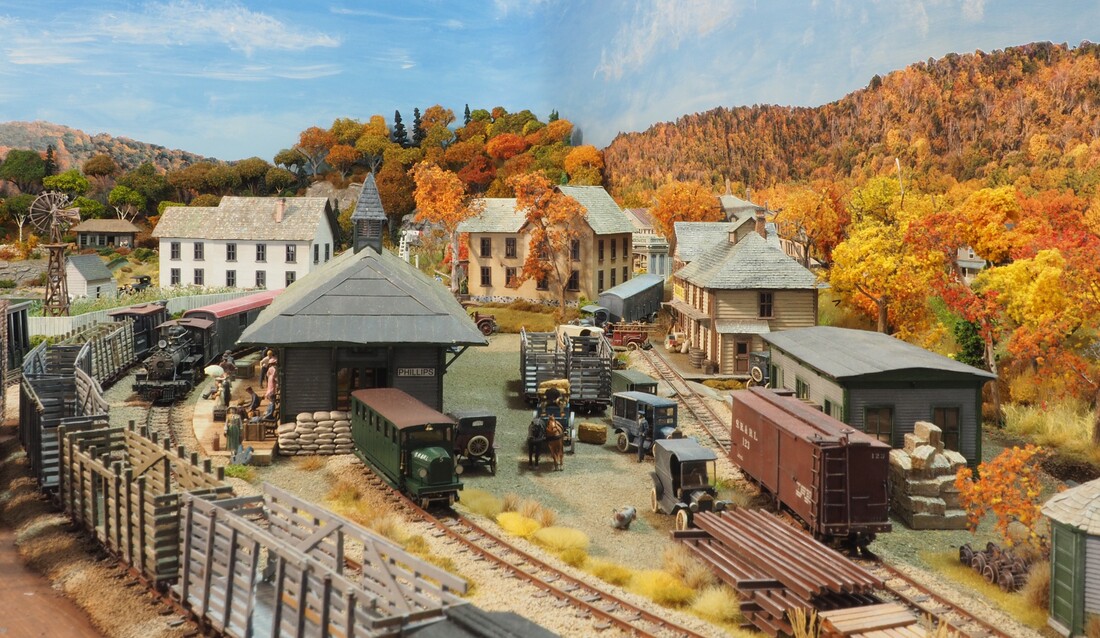
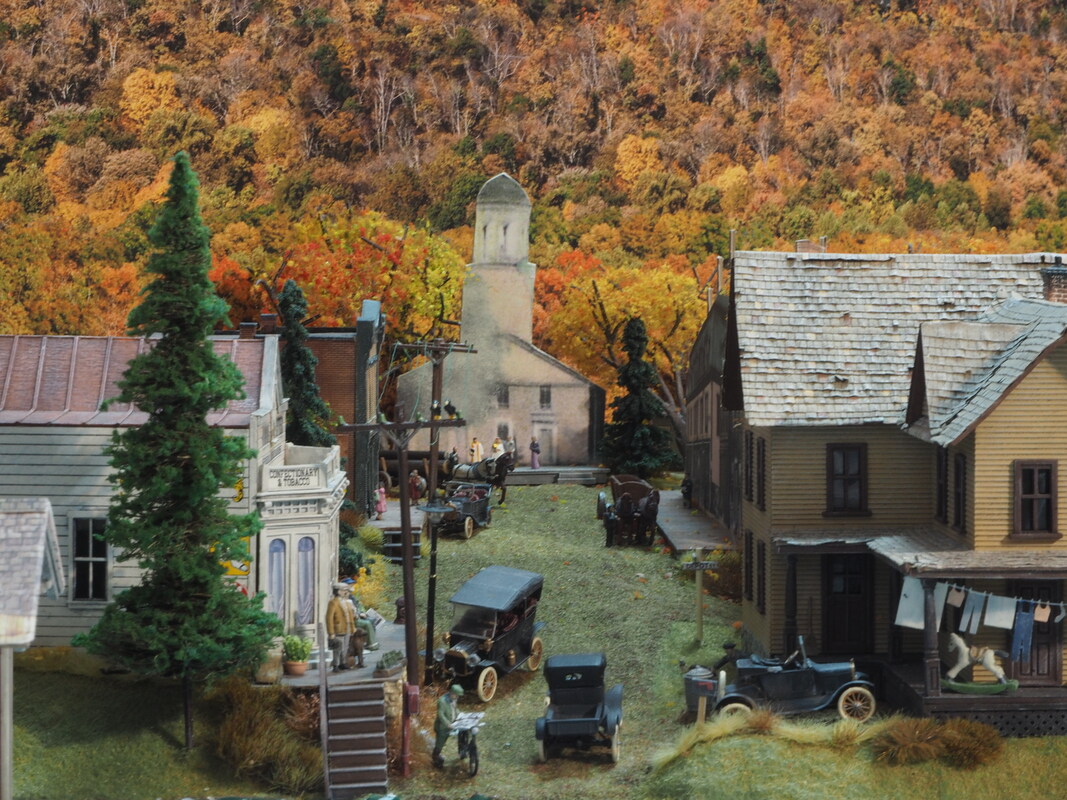
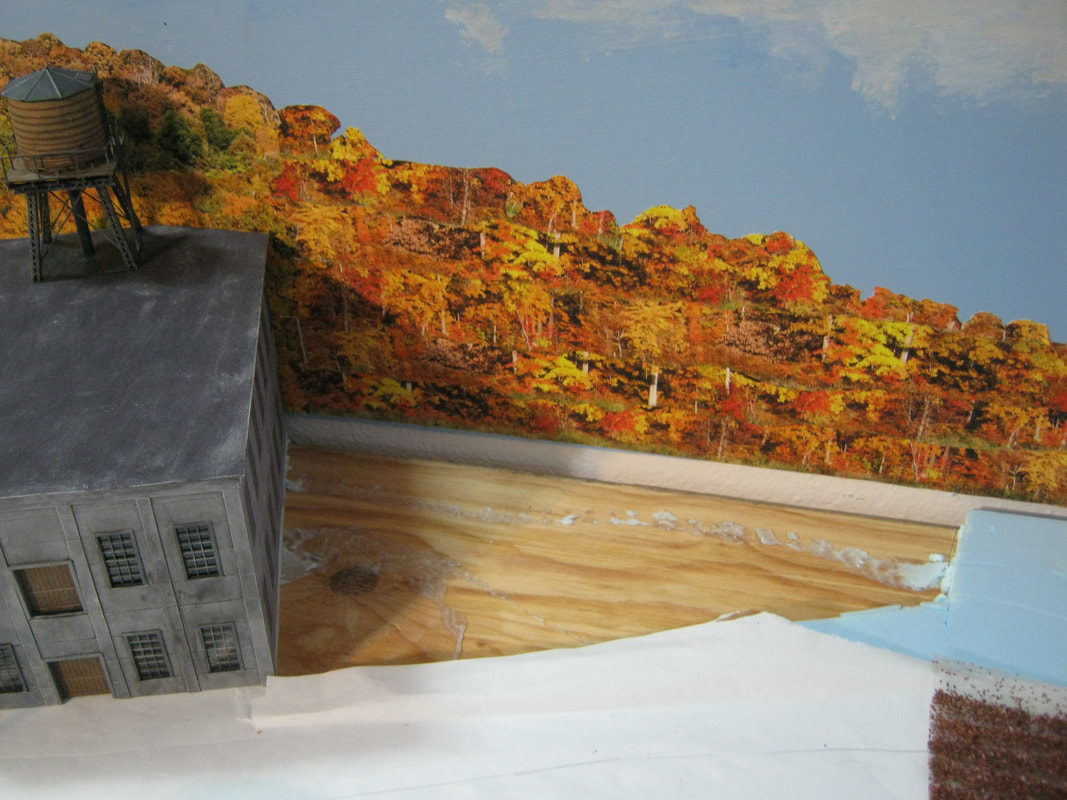
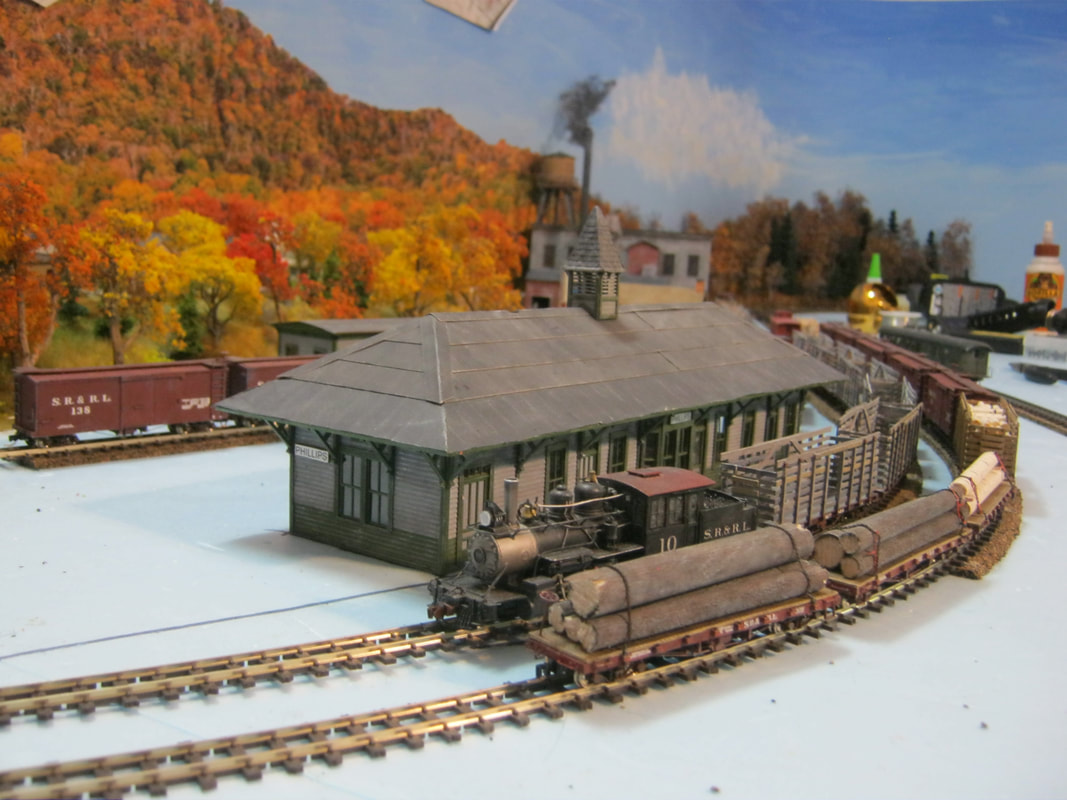
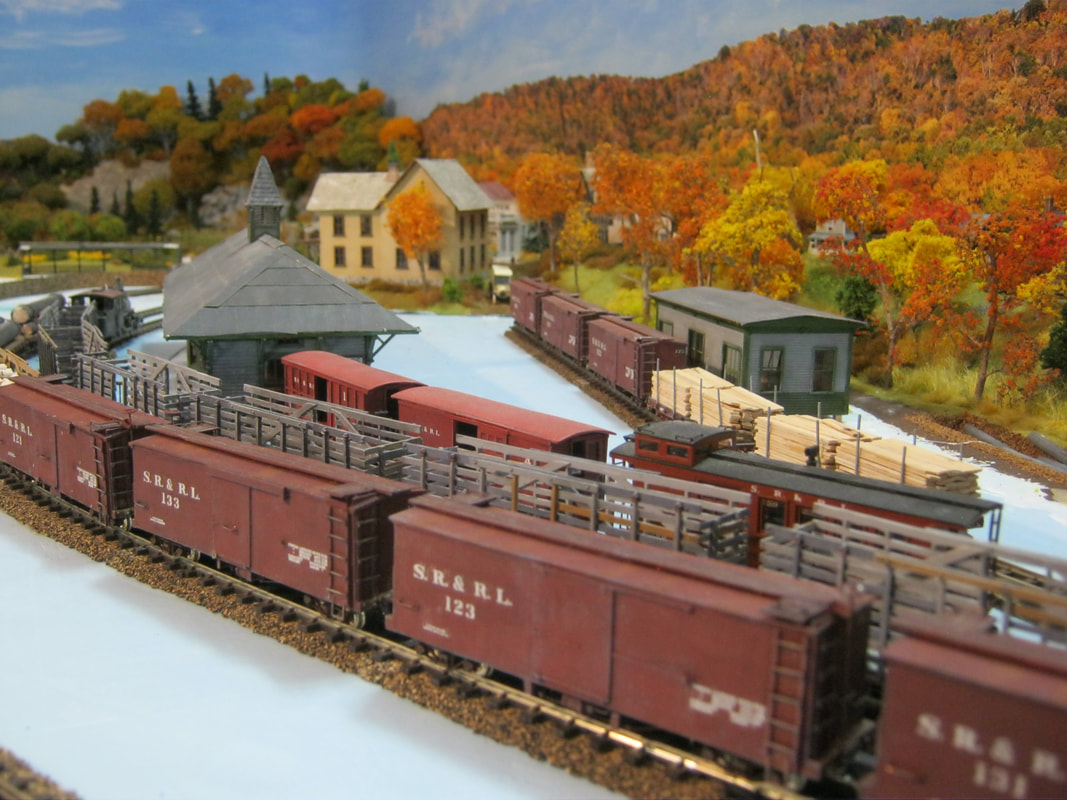
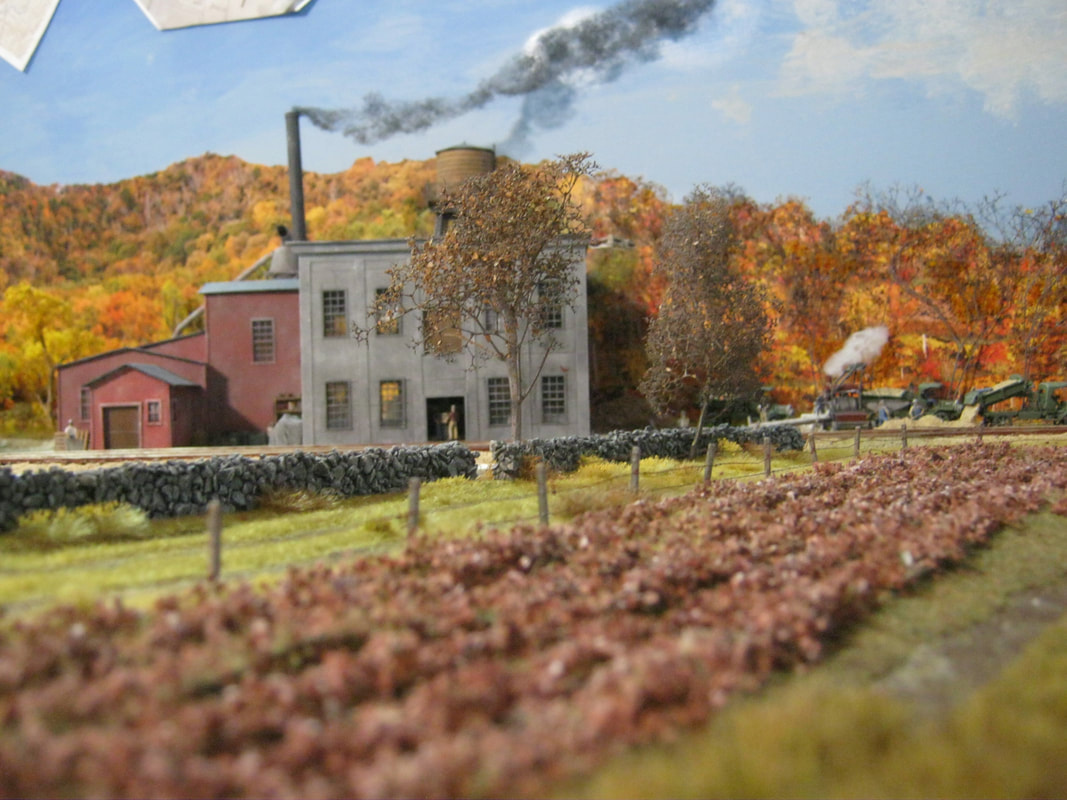
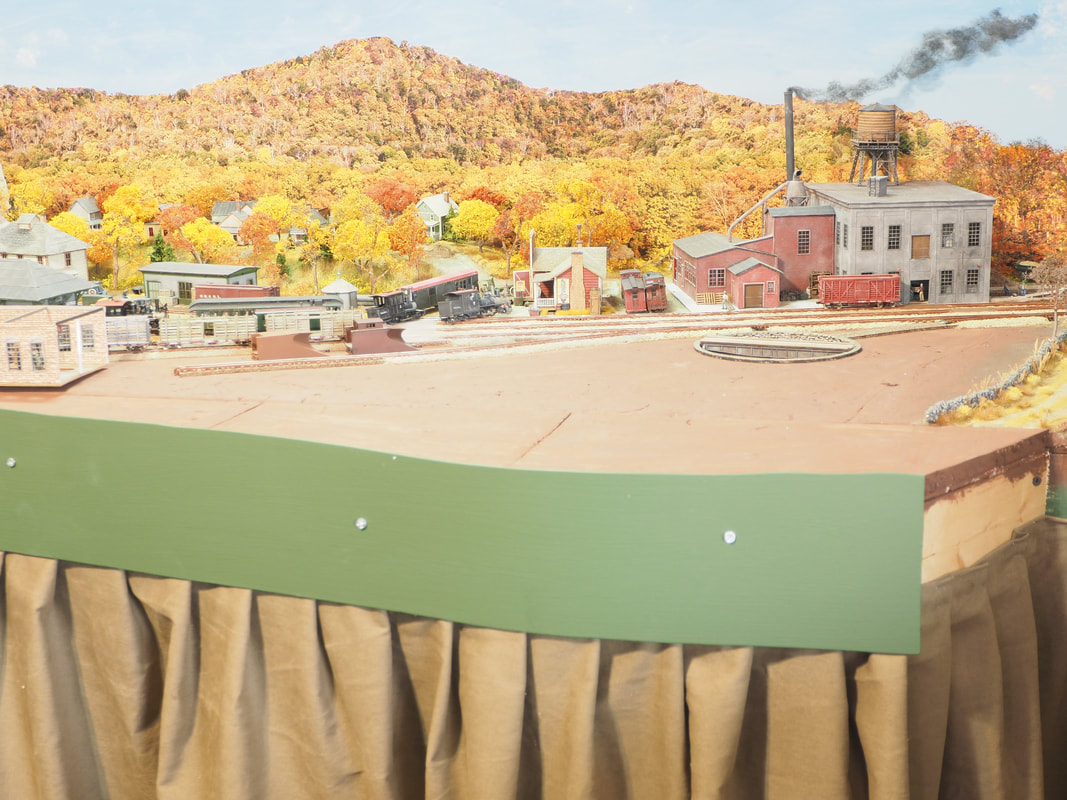
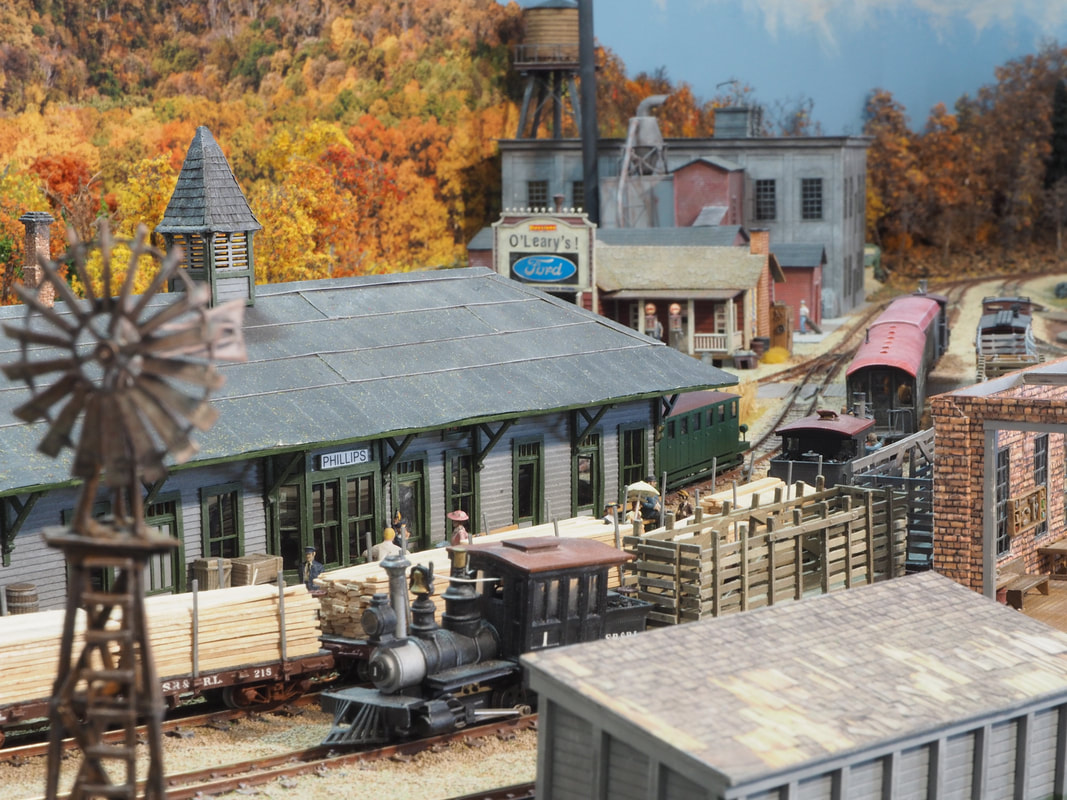
Phillips was the home of the main yard and offices of the Sandy River and Rangeley Lakes Railroad, located northwest of Strong on the way to Rangeley, Phillips yard contained a ten stall roundhouse, turntable, workshop and car shop, as well as the depot and freight house. Along with the main yard, there was an upper yard, which consisted of more coal storage and a paint shop that were leftovers from the days of the Phillips and Rangeley Railroad. Revenue for the railroad in Phillips was generated by five different mills manufacturing wood products, as well as various sources of LCL (Less than Carload) freight.
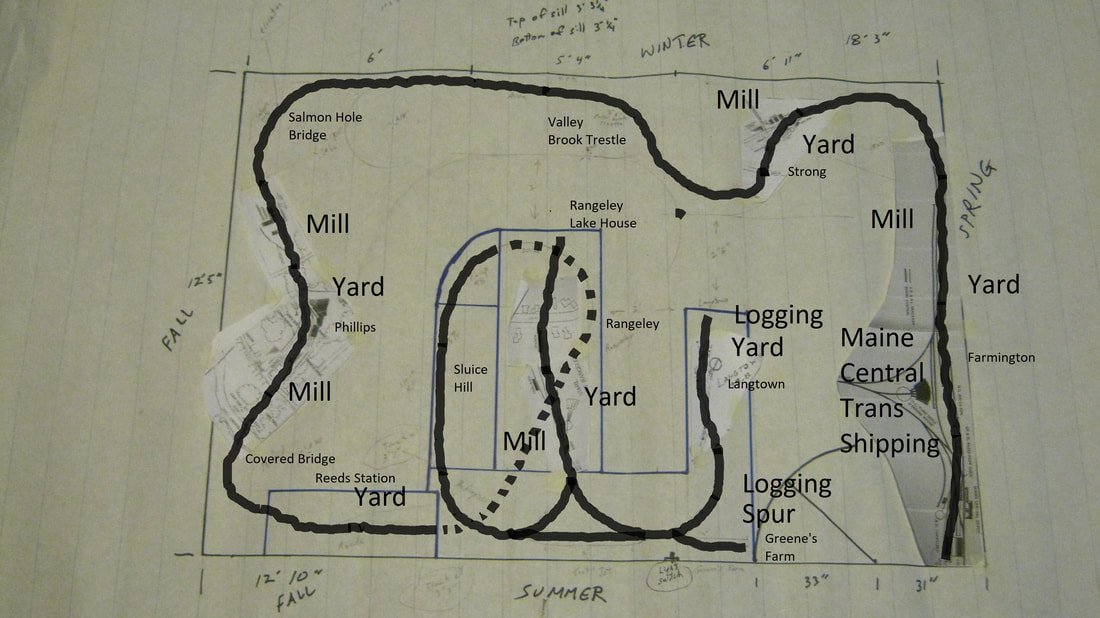
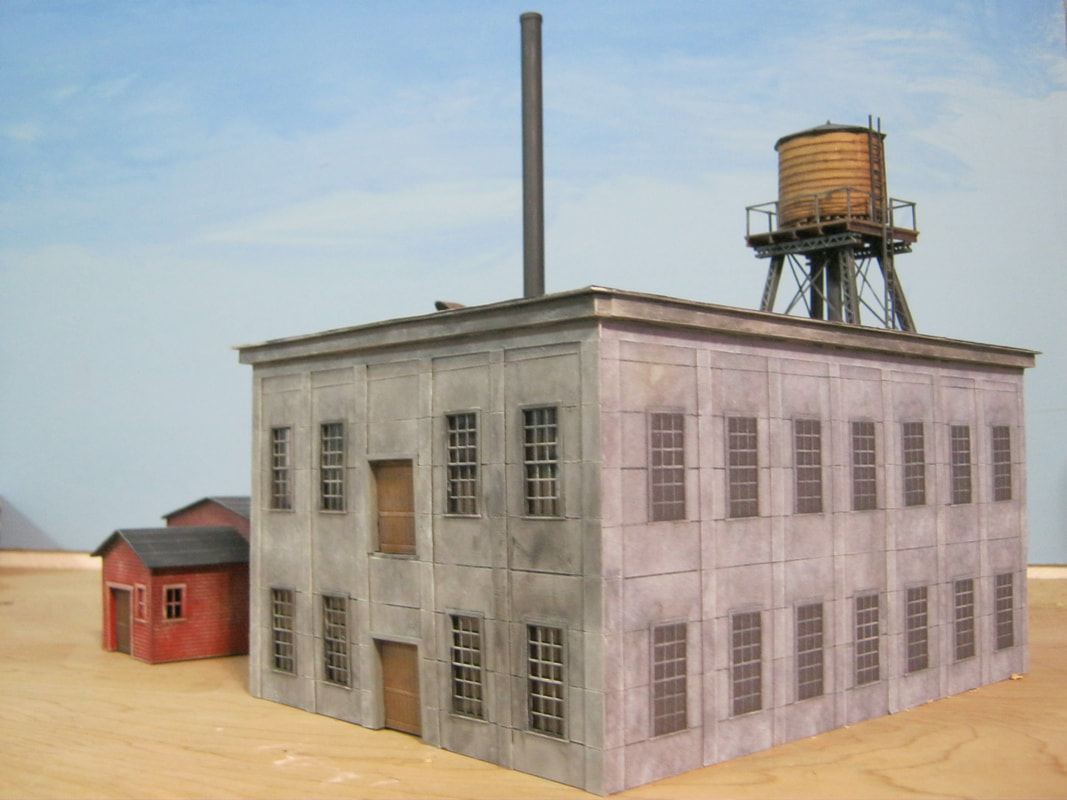
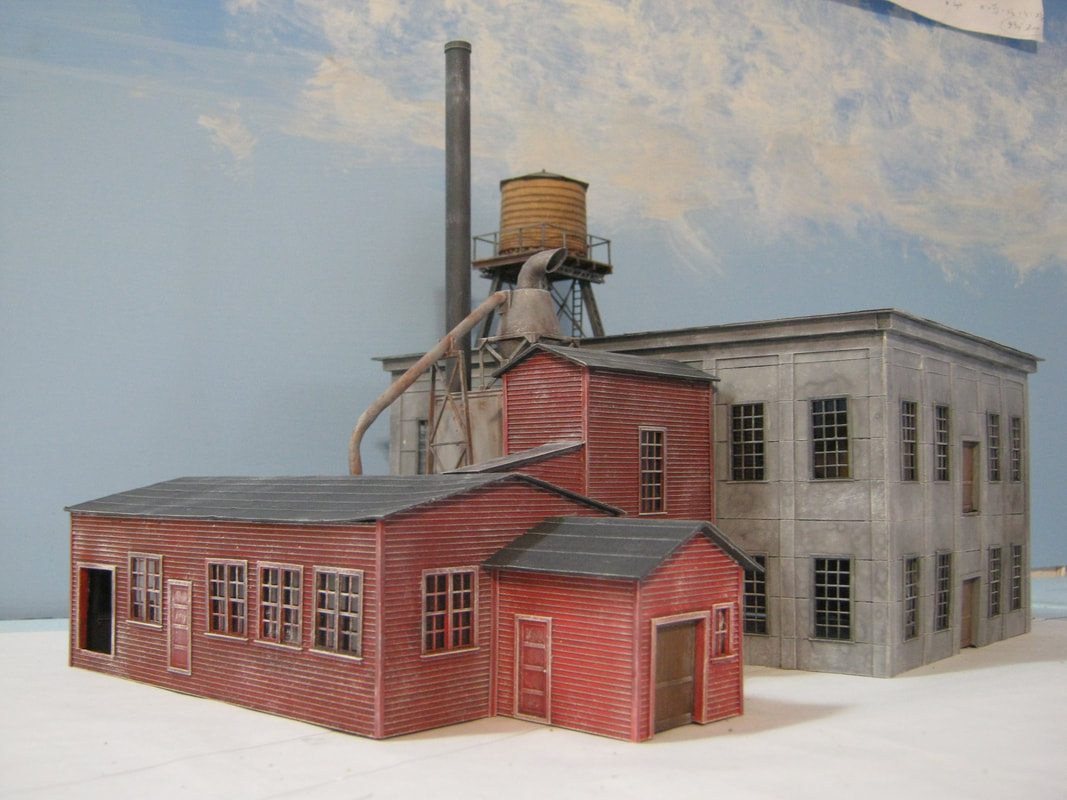
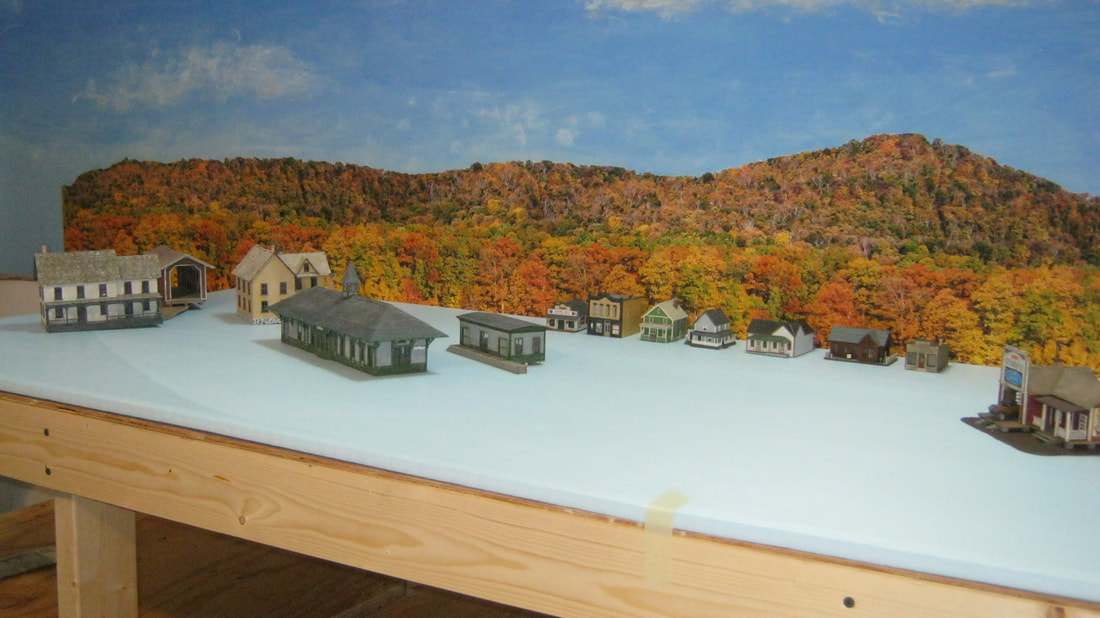
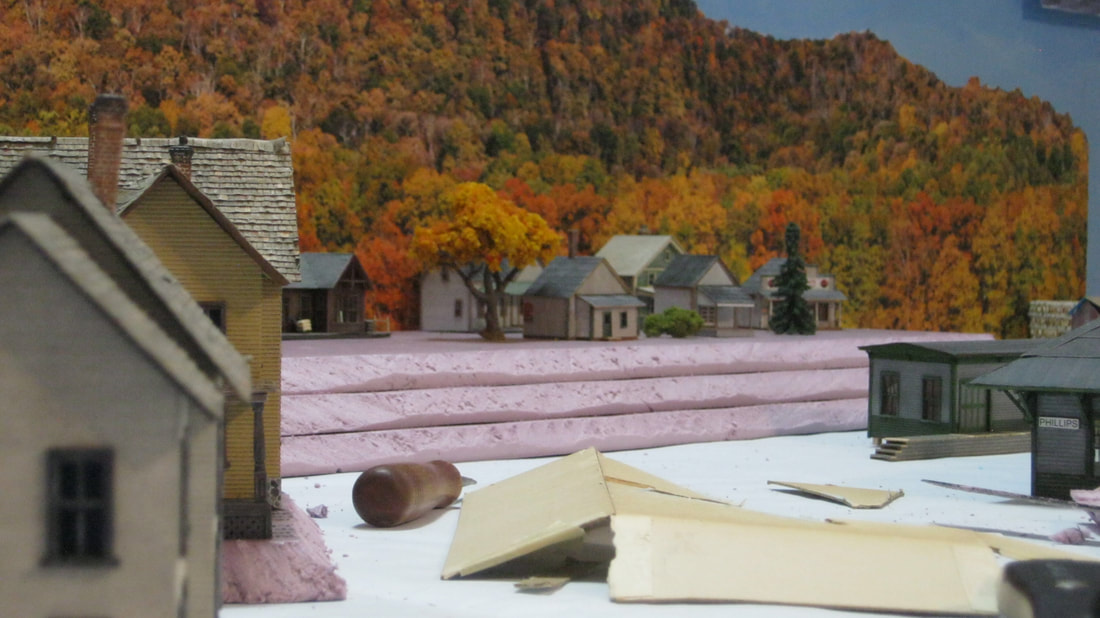
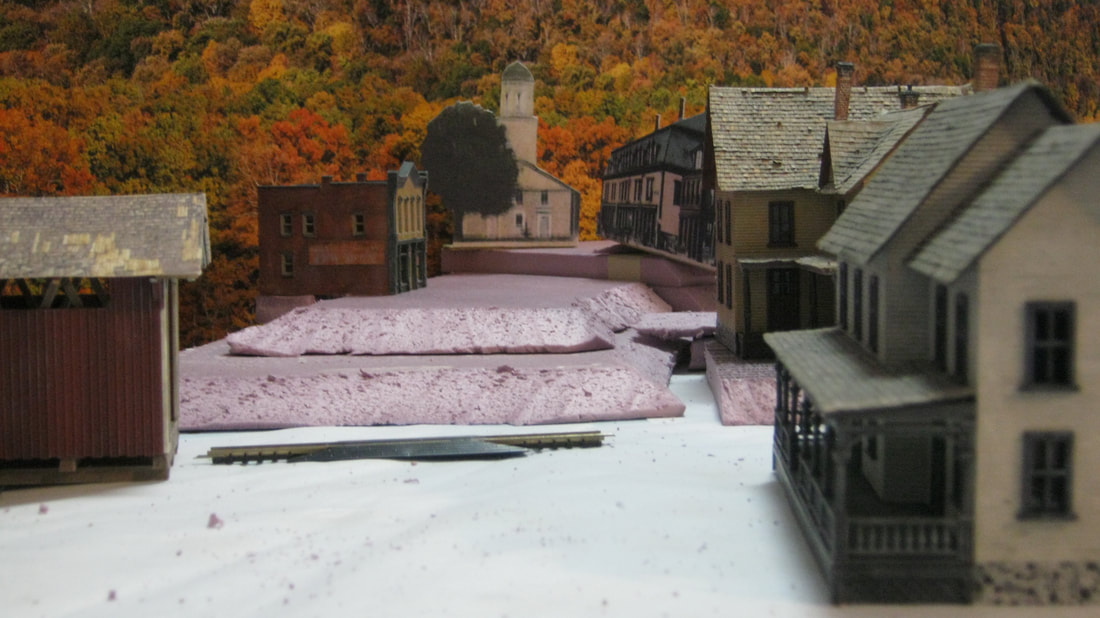
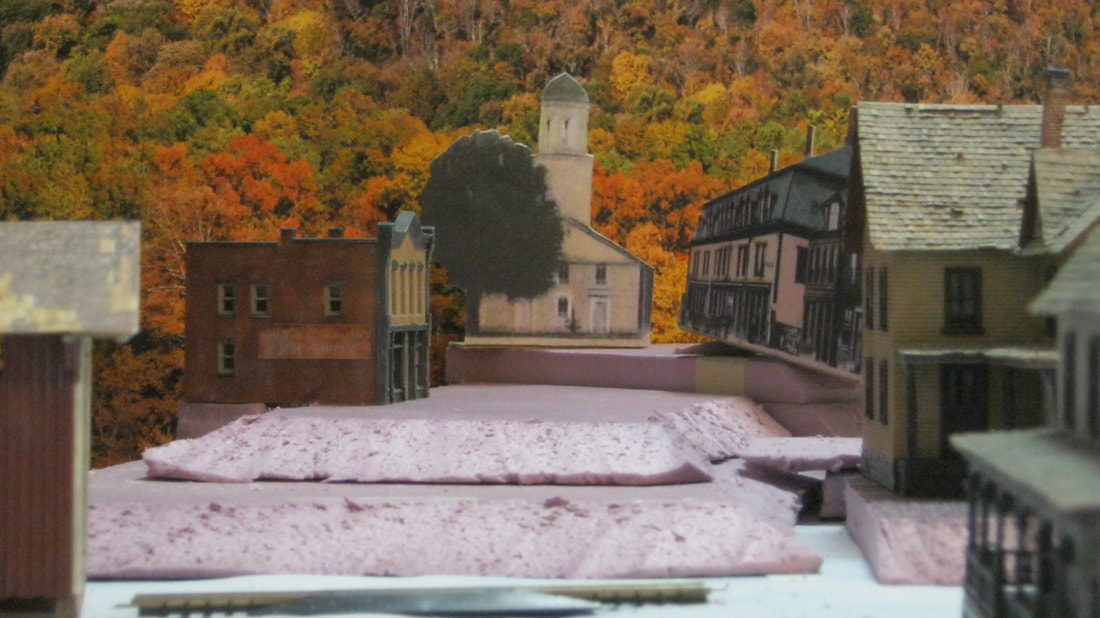
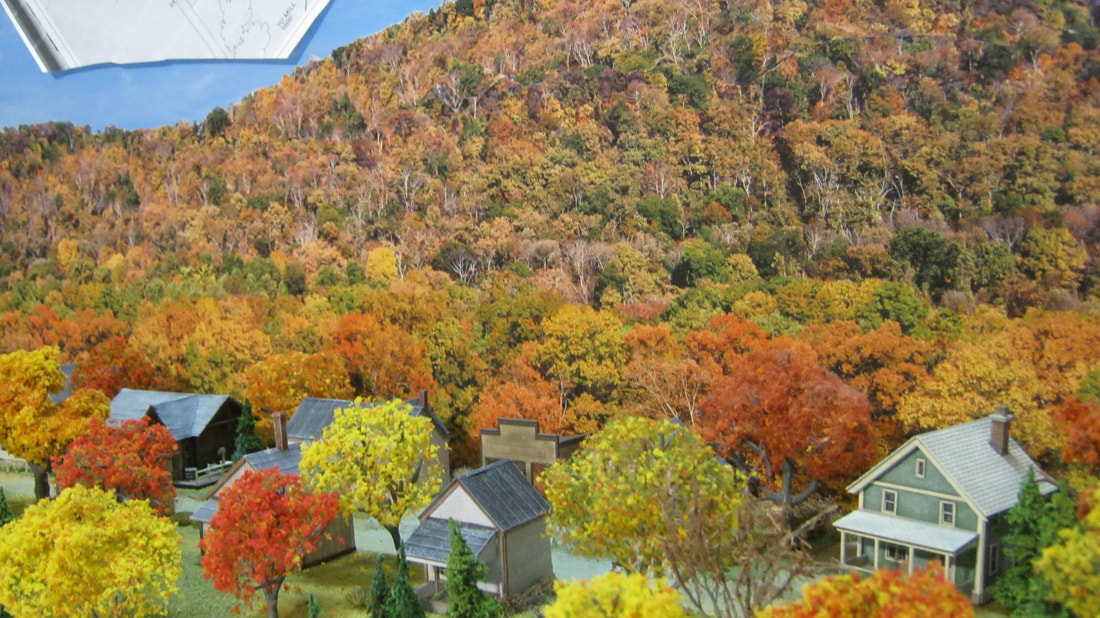
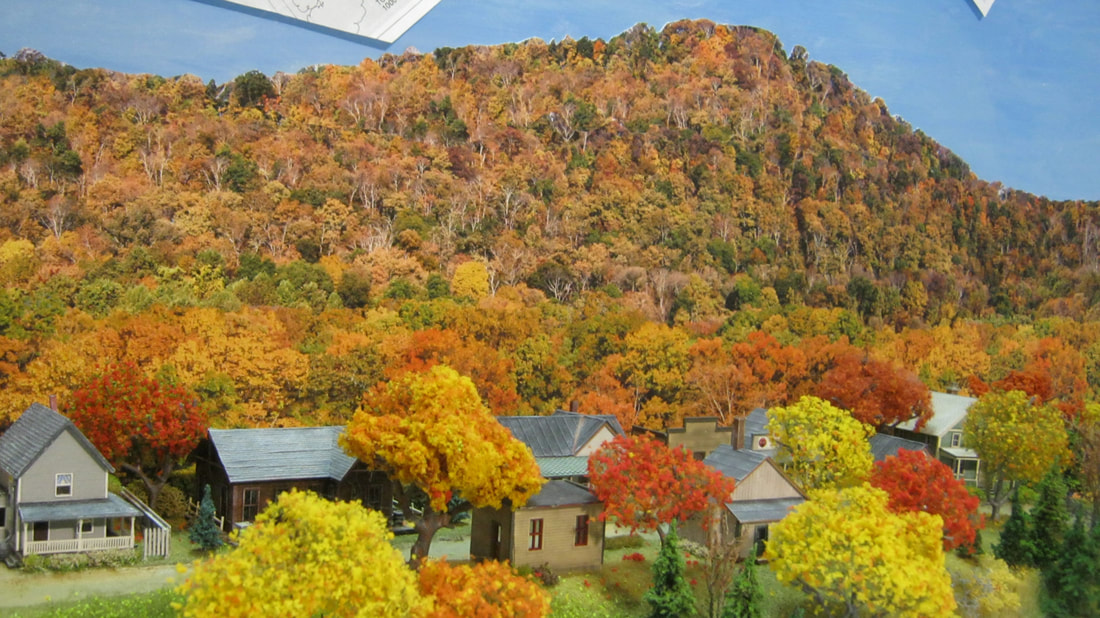
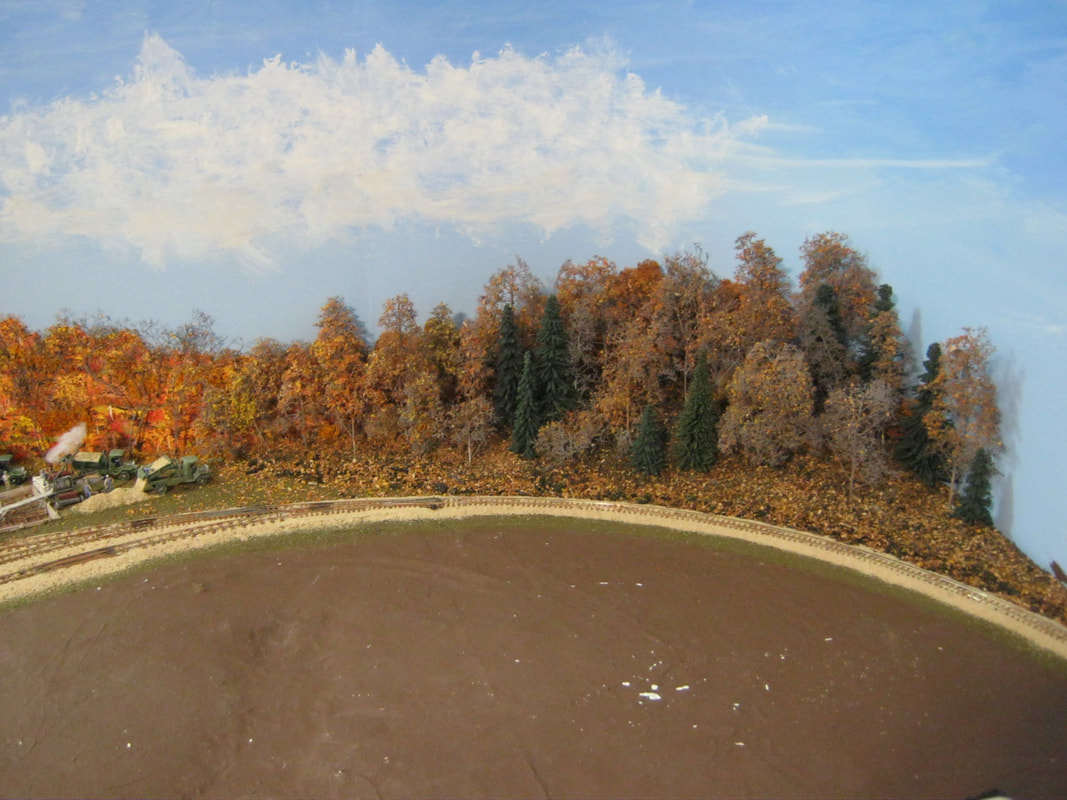
Above is a shot of the diagram of the Phillips on my master planning sheet, taken from the book Ride the Sandy River. It shows the main yard, upper yard, the covered bridge, and the International mill to the east of the main yard. All of these design elements will be modeled on the Phillips module.
|
|
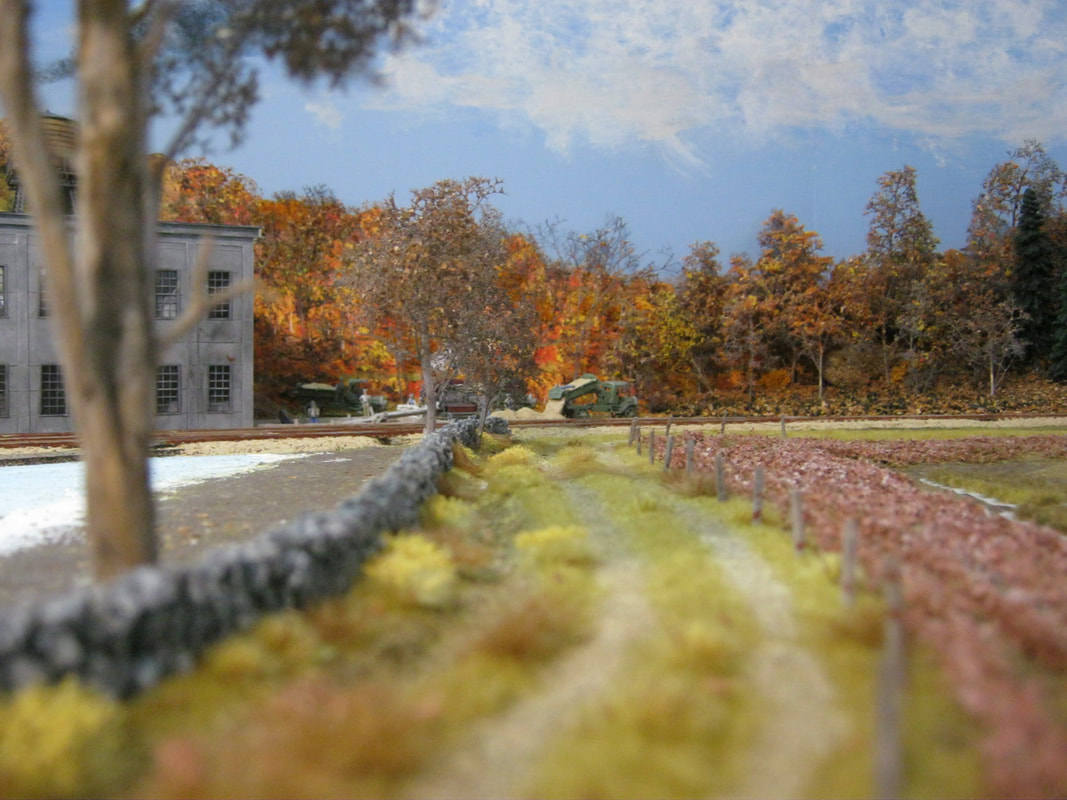
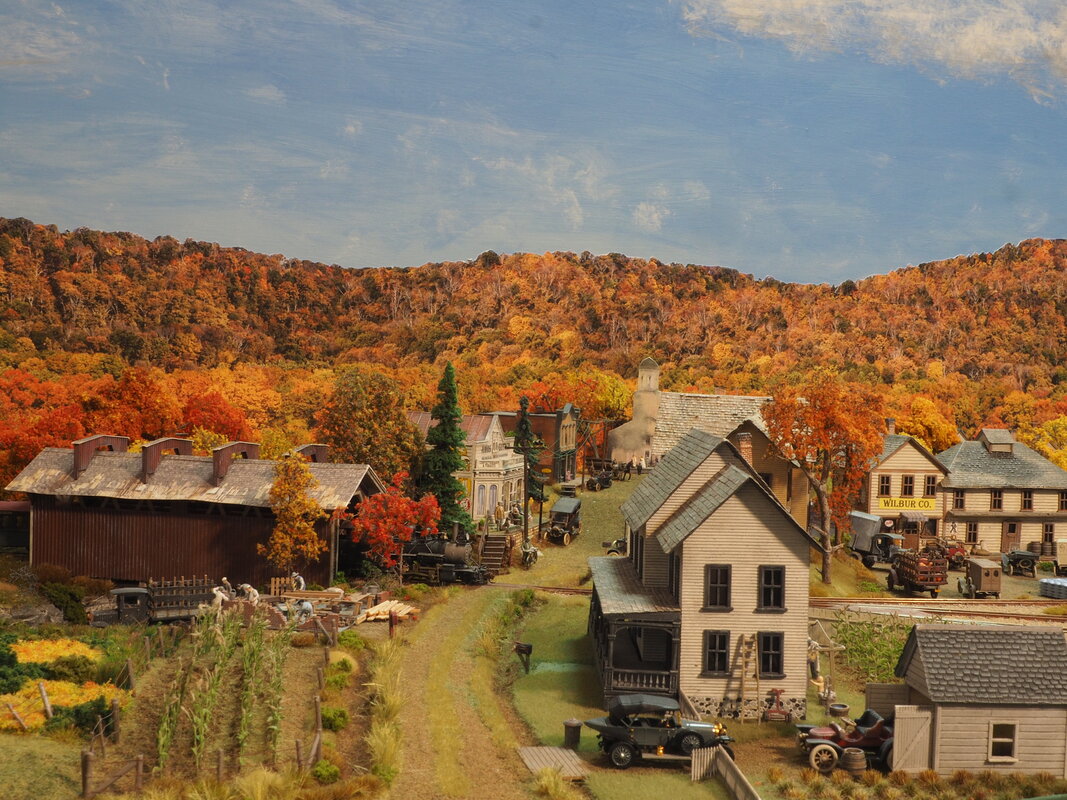
The above left photo is Reeds. The mainline heads 'south' off to the right of Reeds, and will curve around the corner of the wall onto the next wall to the right. If you look at the above right photo, Reeds is down at the lower left of the diagram, and Phillips is on the wall on the left of the diagram. The mainline will come around that corner from Reeds, go through the covered bridge over the Sandy River, and cross Main Street heading into the yard. I won't be able to do any of the upper yard or the old P&R yard. As soon as you go through the bridge and cross Main Street, you'll pass the Phillips Depot, the shops, the roundhouse and the turntable. You'll then cross Pleasant Street, pass the International Mill, cross the Salmon Hole Bridge, and then go around the room corner again onto the next wall. So I have that whole 12-5" wall for Phillips. I've already got the covered bridge 90% done, the Phillips Depot done, some of the buildings for Main Street, and all the buildings for Pleasant Street done. I've got the freight shed for Strong done, and that will sit in Phillips in place of the Phillips freight shed until I get around to building that. I've got the ball signal kit for Phillips on hand, drawings of the semaphore signal from Gary, and the Central Models kit for the Salmon Hole bridge. I've already got the International Mill about 50% done with a scratch build.
The buildings for Pleasant Street are all N scale, so I'll be using forced perspective to make Phillips look deeper than it really is. I've settled on 33" deep for the deepest part of the module, which will be where you see the round house on the third photo diagram. I'm using the diagram from the book Ride the Sandy River for the track plan and general layout of everything on the module. The thing that I haven't decided on yet is how exactly I'm going to do the Beal Block. It was a very long building, I have to scratch it however I do it, and I'm thinking of doing it at about something like 1/110 scale on the left/west end of it, tapering it to something like 1/140 scale on the right/east end of it, transitioning from the 1/87 scale structures along the aisle to the 1/160 N structures at the back along Pleasant Street. Depending on how well, or not well, it comes out, depends on how much foliage and other 'camouflage' I use to blend it into the scenery to help the effect of the transition. I'll get to use my drafting equipment from school again for that one. Foliage will transition the right/south end of Pleasant Street between the N structures and the RR crossing on the way to the International Mill.
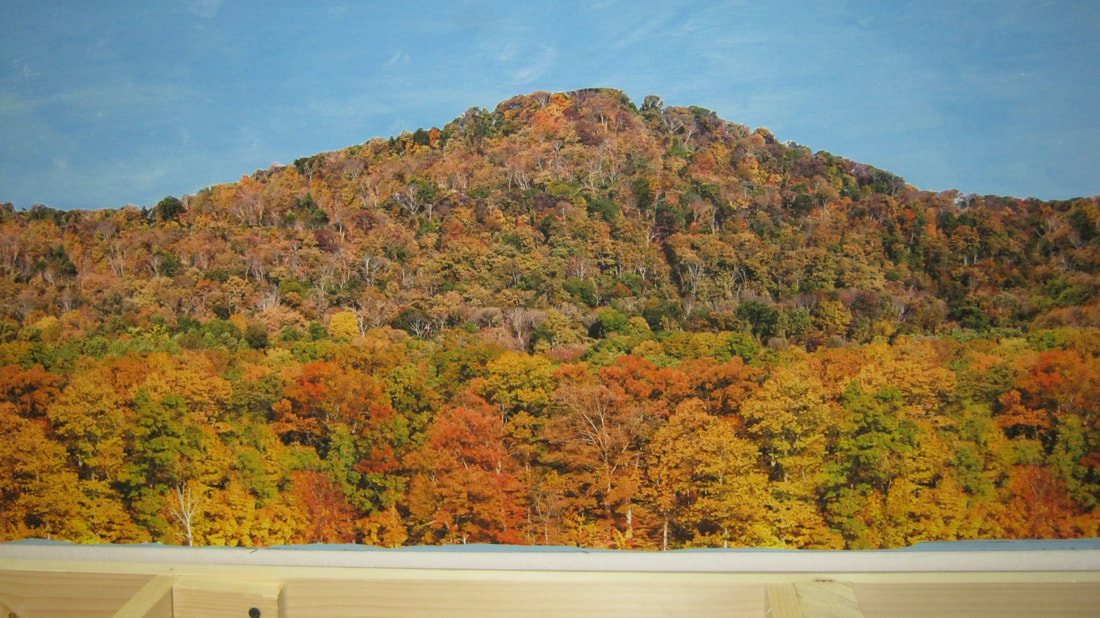
The foliage will transition from early Fall on the left side of the module to full-blown colors in the middle, to late Fall with bare trees by the time you get to Salmon Hole. The backdrop will be 1/8" masonite, blended into the end of the masonite behind Reeds, coved (bent) around the corner like I did behind the RLH House and the Langtown module, extending all the way down the wall behind Phillips, and then curving around the corner on the right heading for Strong. I'm not happy with the blisters that have formed in the photo backdrop sky behind Rangeley, so I'll be hand painting the sky the way I did on the Sluice Hill module, getting an Autumn photo backdrop from Trainjunkies, cutting the sky off of it, and then gluing the photo terrain onto the sky-painted masonite. I tried it as an experiment on that little stretch of photo hill that you see behind the Abomination Pass spot I'm finishing up now, and I like it better than the full sky photo backdrop.
So that's the plan anyway. I'll have to scratch build the roundhouse and shops. I haven't decided on the turntable yet. I'll scratch the coal shed. I have the water crane kit, and the vehicles and figures will be no later than 1925. I will have the gas pump next to the depot for the rail cars, since I have Dave Hoffman's Railbus #3 kit and the Sango Railbus #4 kit on the shelf.
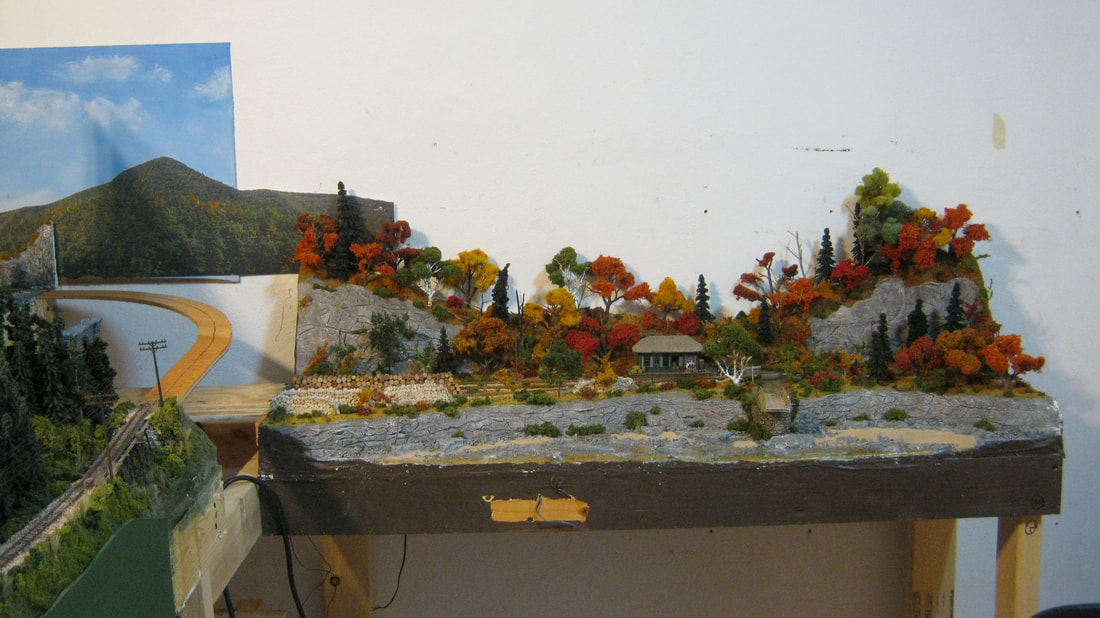
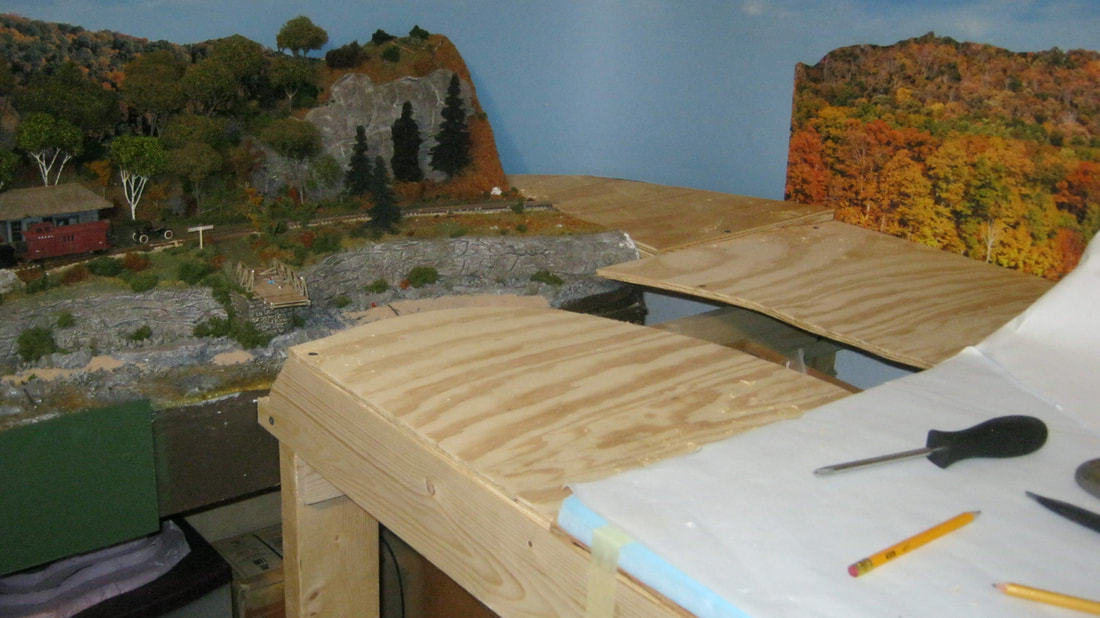
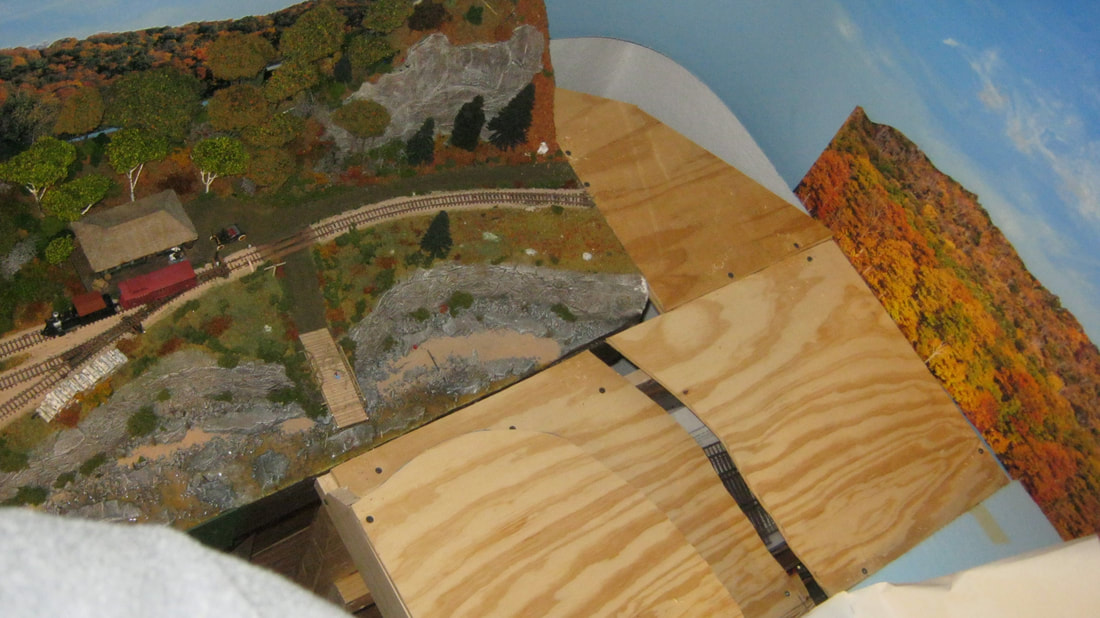
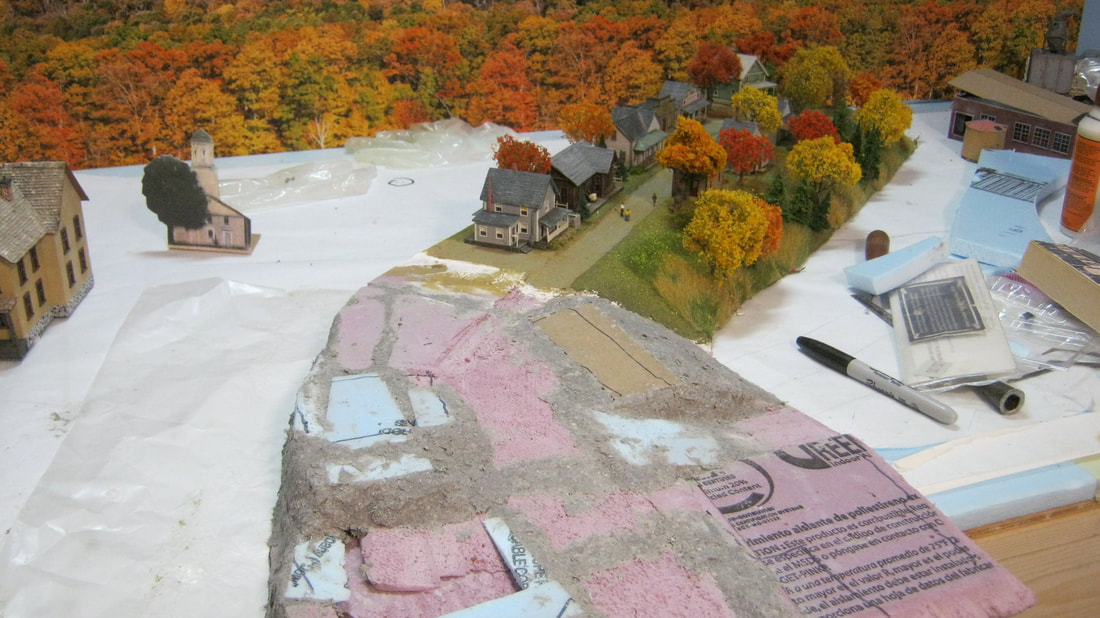
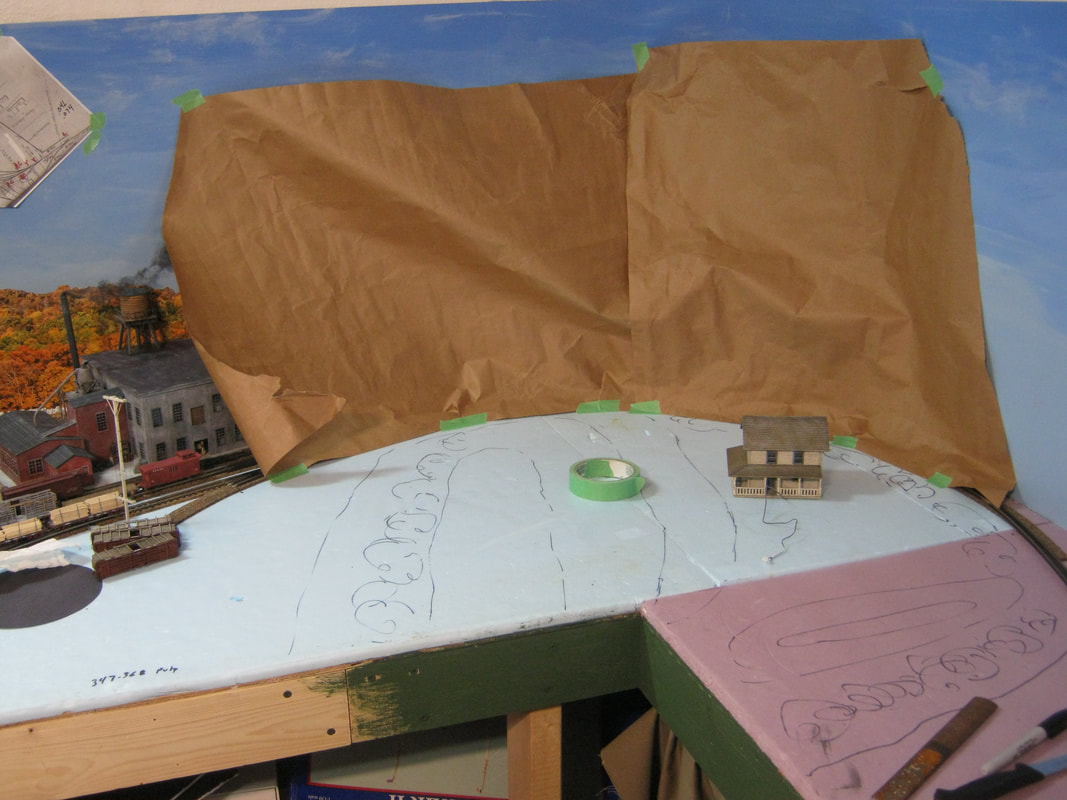
Below is the future home of the Phillips module. After the shelving is ripped out, the track will be extended from the Reeds Station module (covered in protective plastic in the left of the left photo) along the wall to the right. Phillips will include most of everything in the above diagram and take up most of the wall.
The buildings for Pleasant Street are all N scale, so I'll be using forced perspective to make Phillips look deeper than it really is. I've settled on 33" deep for the deepest part of the module, which will be where you see the round house on the third photo diagram. I'm using the diagram from the book Ride the Sandy River for the track plan and general layout of everything on the module. The thing that I haven't decided on yet is how exactly I'm going to do the Beal Block. It was a very long building, I have to scratch it however I do it, and I'm thinking of doing it at about something like 1/110 scale on the left/west end of it, tapering it to something like 1/140 scale on the right/east end of it, transitioning from the 1/87 scale structures along the aisle to the 1/160 N structures at the back along Pleasant Street. Depending on how well, or not well, it comes out, depends on how much foliage and other 'camouflage' I use to blend it into the scenery to help the effect of the transition. I'll get to use my drafting equipment from school again for that one. Foliage will transition the right/south end of Pleasant Street between the N structures and the RR crossing on the way to the International Mill.
The foliage will transition from early Fall on the left side of the module to full-blown colors in the middle, to late Fall with bare trees by the time you get to Salmon Hole. The backdrop will be 1/8" masonite, blended into the end of the masonite behind Reeds, coved (bent) around the corner like I did behind the RLH House and the Langtown module, extending all the way down the wall behind Phillips, and then curving around the corner on the right heading for Strong. I'm not happy with the blisters that have formed in the photo backdrop sky behind Rangeley, so I'll be hand painting the sky the way I did on the Sluice Hill module, getting an Autumn photo backdrop from Trainjunkies, cutting the sky off of it, and then gluing the photo terrain onto the sky-painted masonite. I tried it as an experiment on that little stretch of photo hill that you see behind the Abomination Pass spot I'm finishing up now, and I like it better than the full sky photo backdrop.
So that's the plan anyway. I'll have to scratch build the roundhouse and shops. I haven't decided on the turntable yet. I'll scratch the coal shed. I have the water crane kit, and the vehicles and figures will be no later than 1925. I will have the gas pump next to the depot for the rail cars, since I have Dave Hoffman's Railbus #3 kit and the Sango Railbus #4 kit on the shelf.
Below is the future home of the Phillips module. After the shelving is ripped out, the track will be extended from the Reeds Station module (covered in protective plastic in the left of the left photo) along the wall to the right. Phillips will include most of everything in the above diagram and take up most of the wall.
|
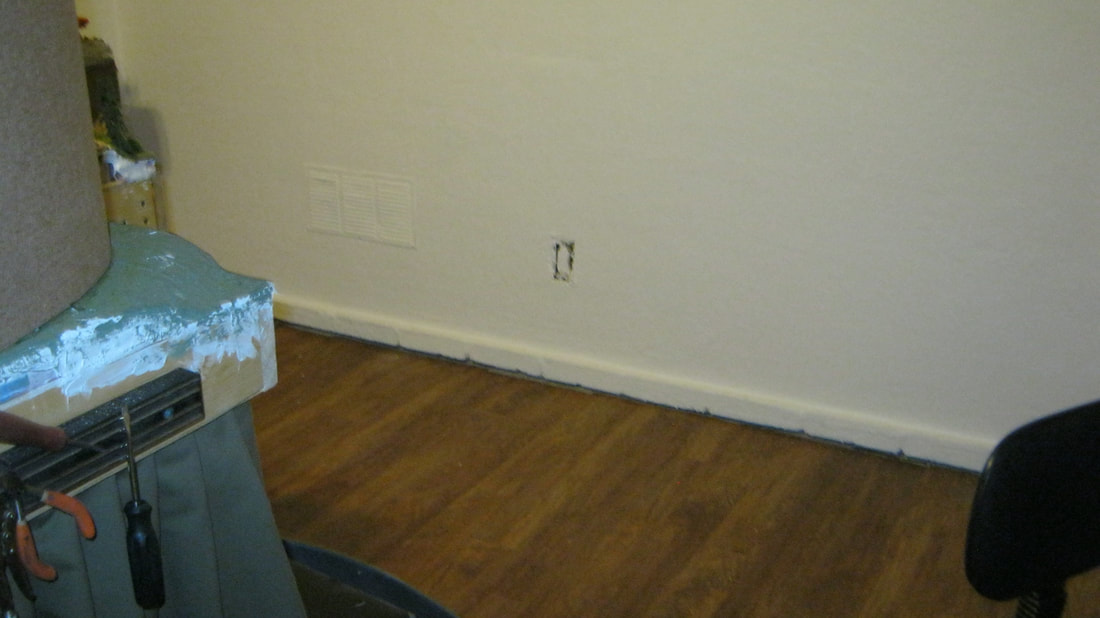
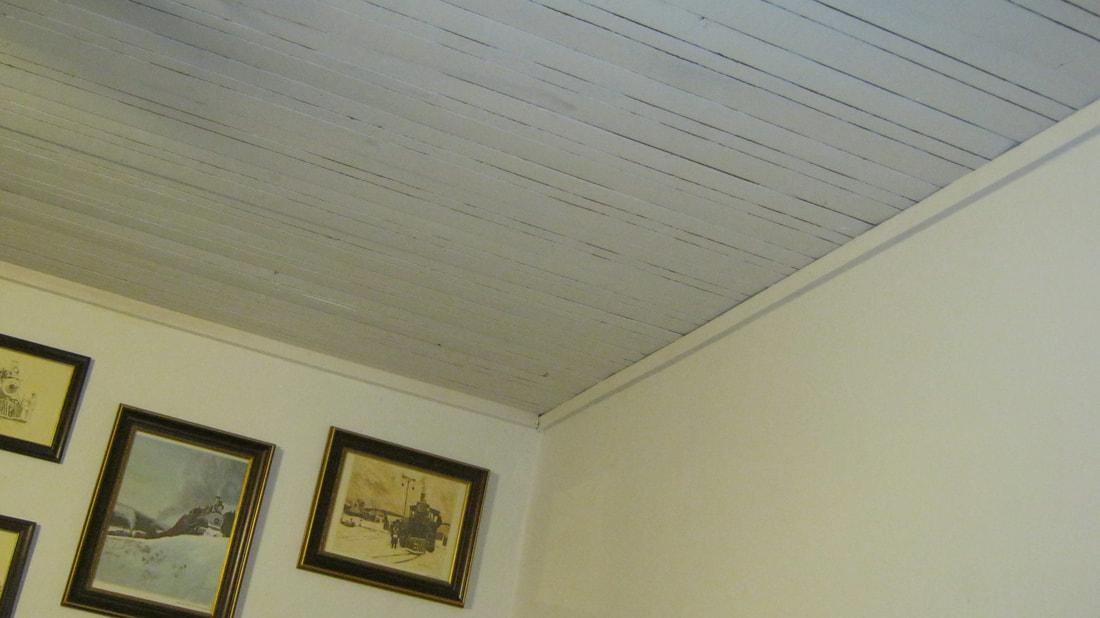
Below left, the shelving now removed from the wall, and the wall painted white. Below center, the plank natural wood ceiling painted white to help reflect light onto the layout. You can see the difference it makes in the photo below right. It's like doubling the amount of lighting in the room.
|
|
|
|
|
|
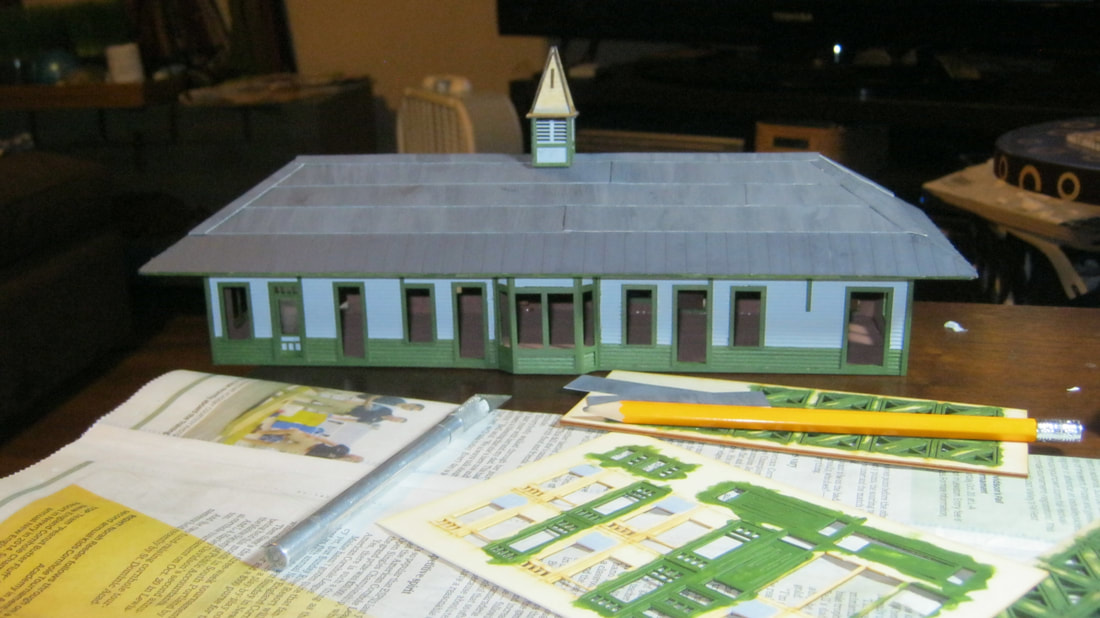
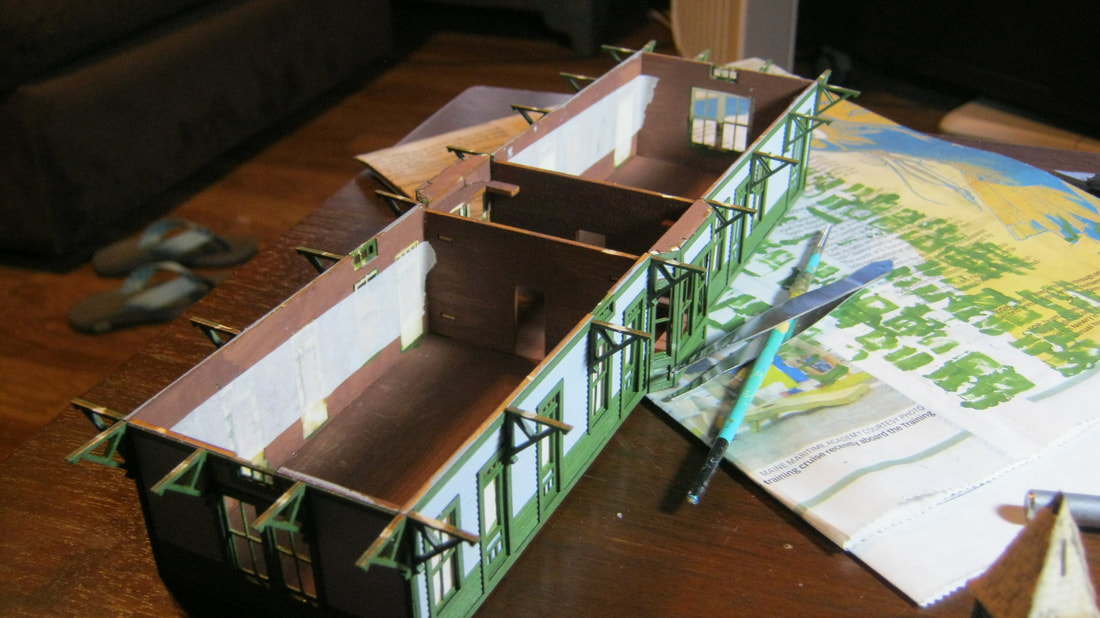
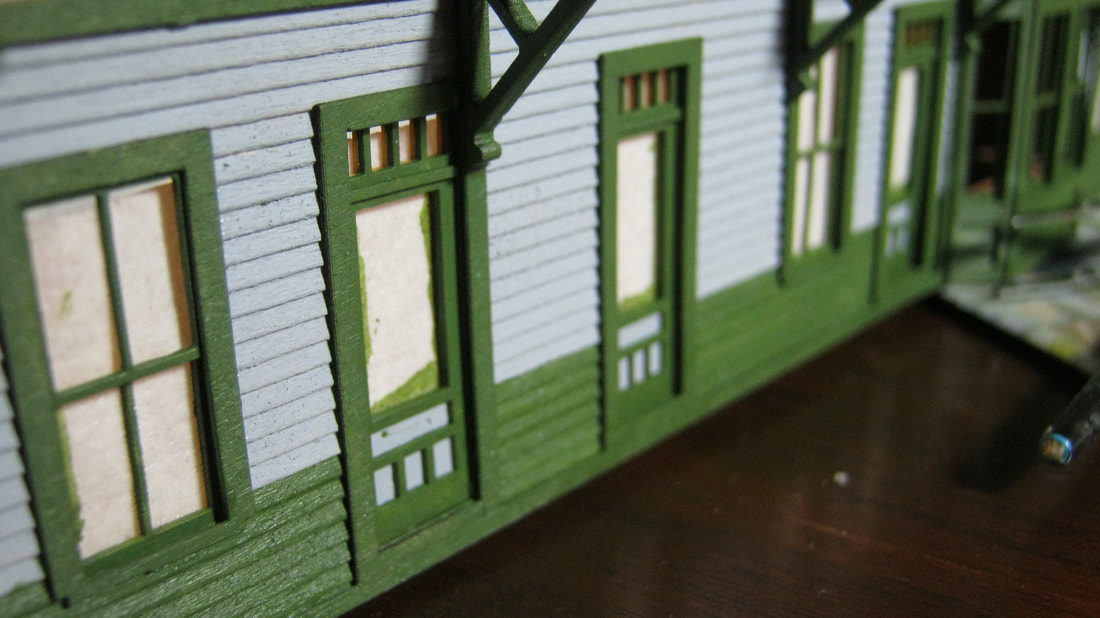
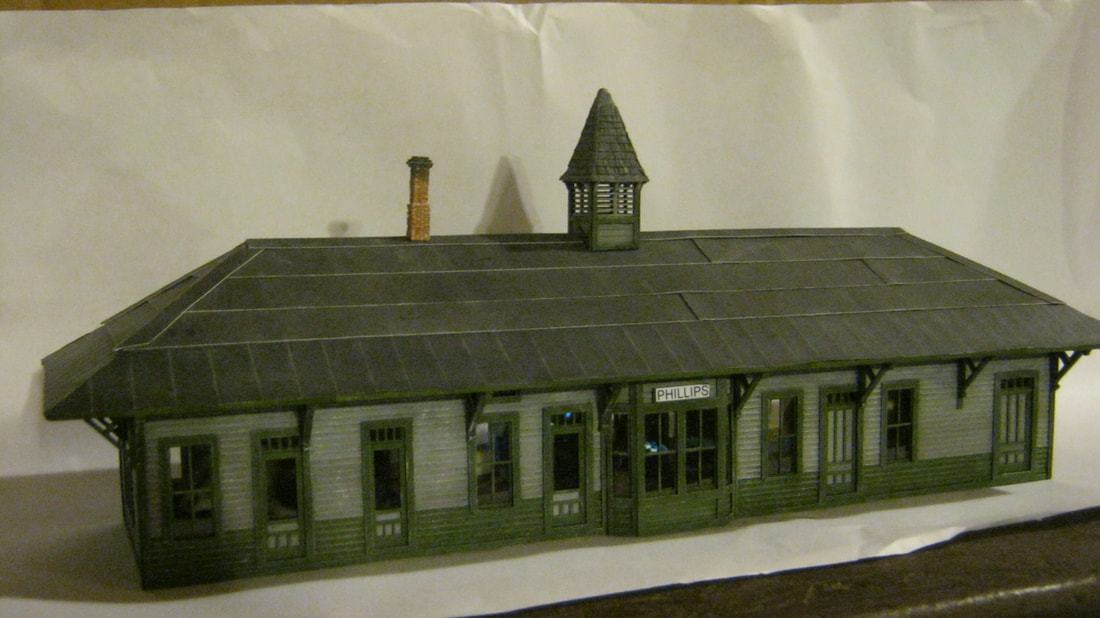
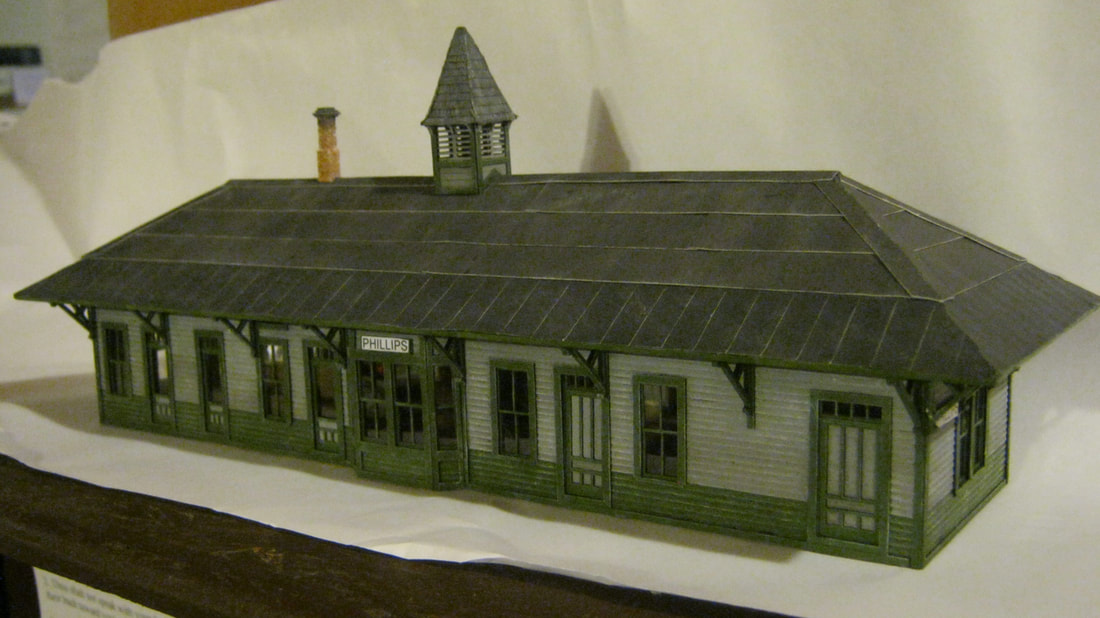
Constructing the Banta Model Works Phillips Depot. The Depot and railroad's facilities at Phillips will be the focal point of the whole Phillips module. This is a wood and card stock kit. I almost had a heart attack when I put the gray wash on it to weather it, and the walls started curling. Luckily, when it dried, they straightened back up.
|
|
|
|
|
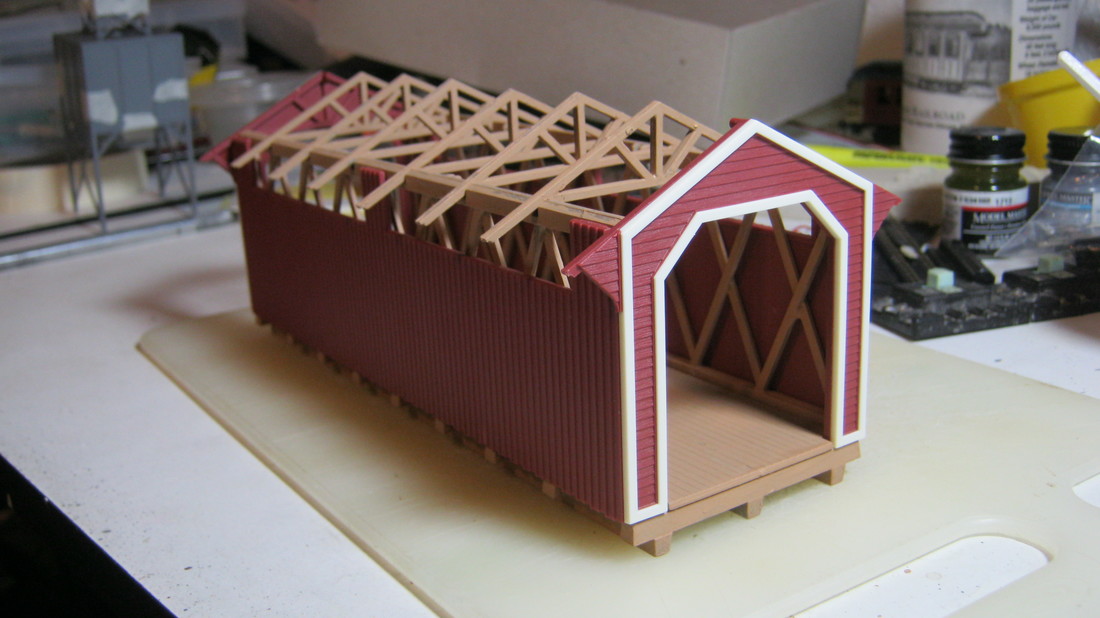
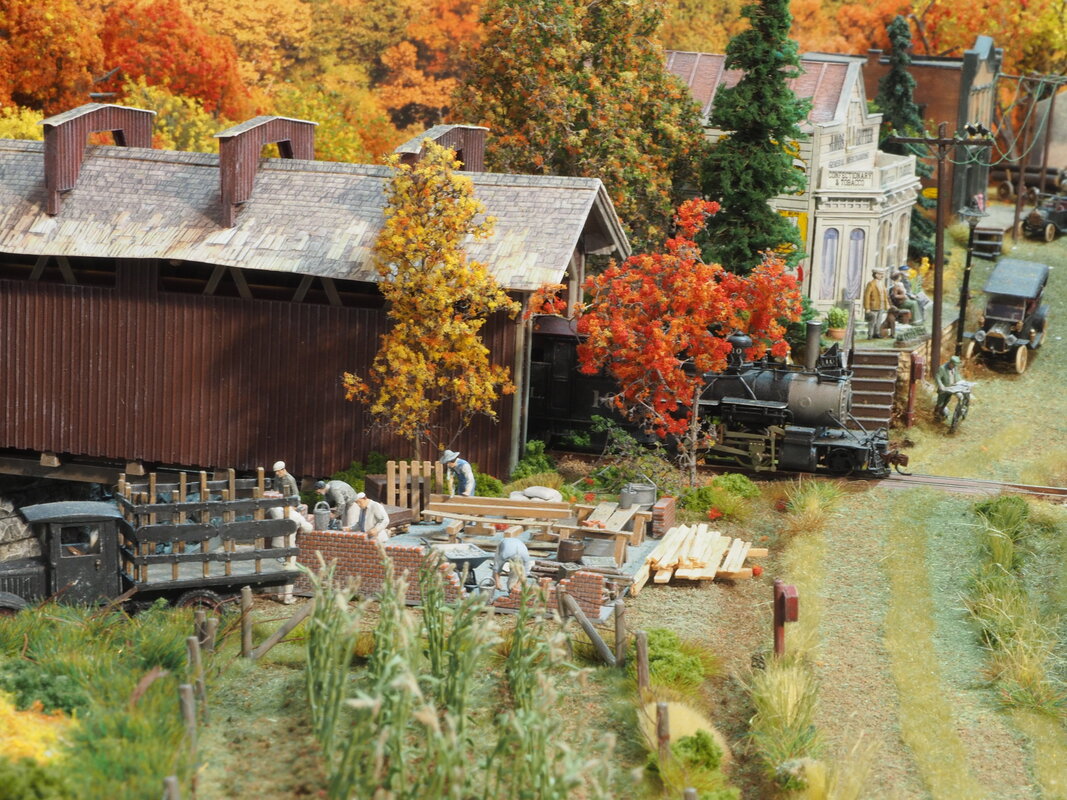
To the left is the progress of the kit-bash for the covered rail bridge that crosses the Sandy River above the Phillips yard - in progress.
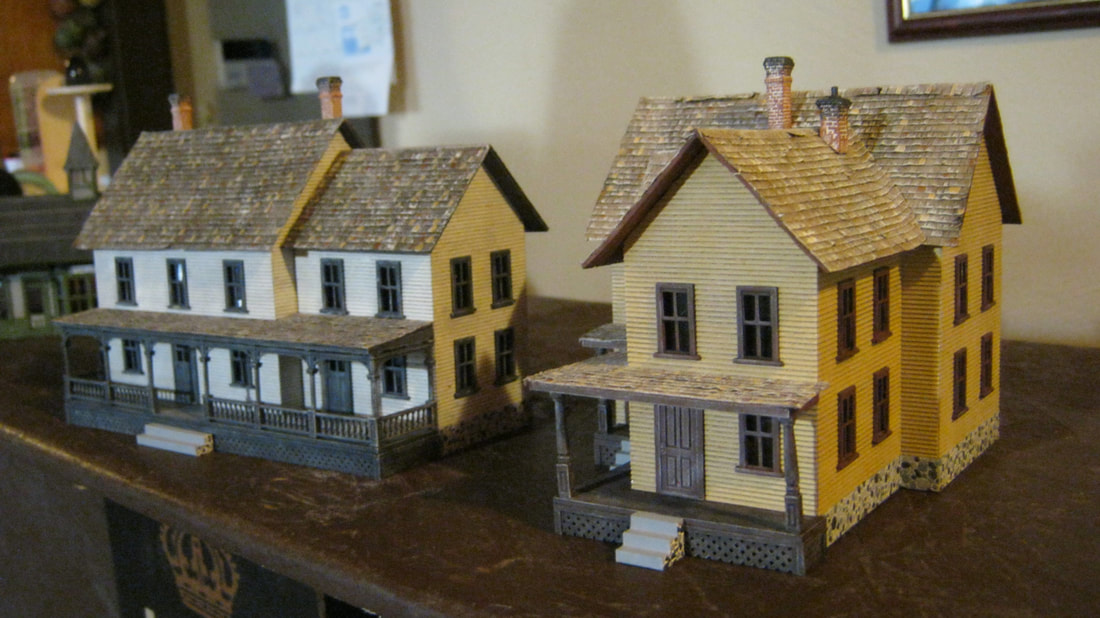
Right: Starting up the construction of houses to populate the town. |
|
|
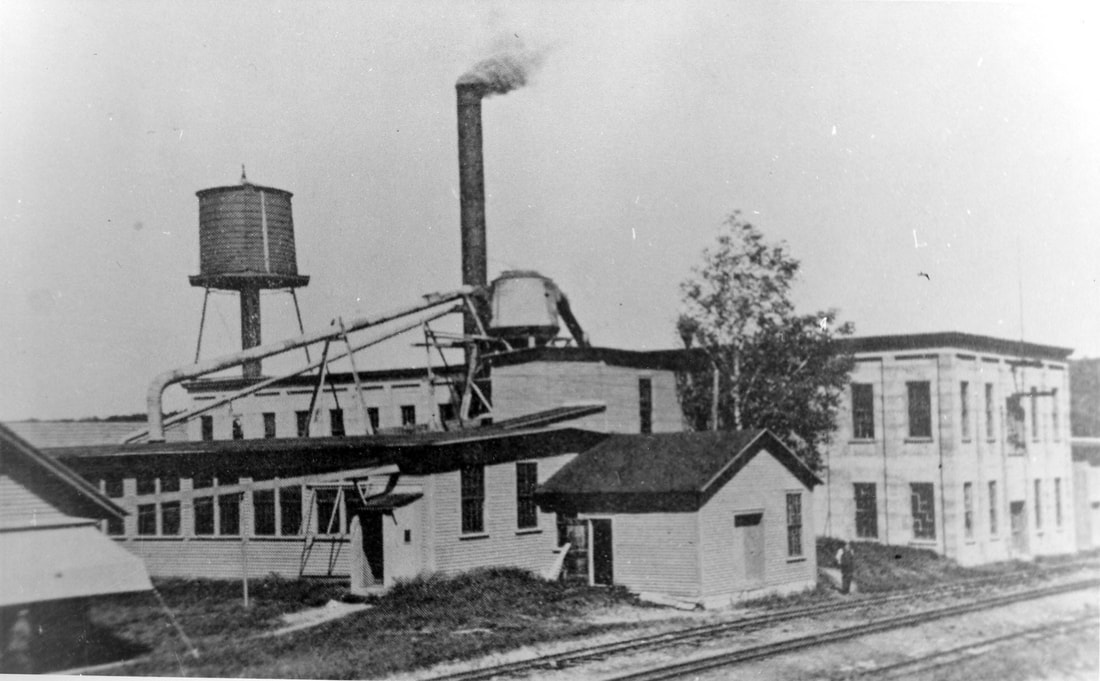
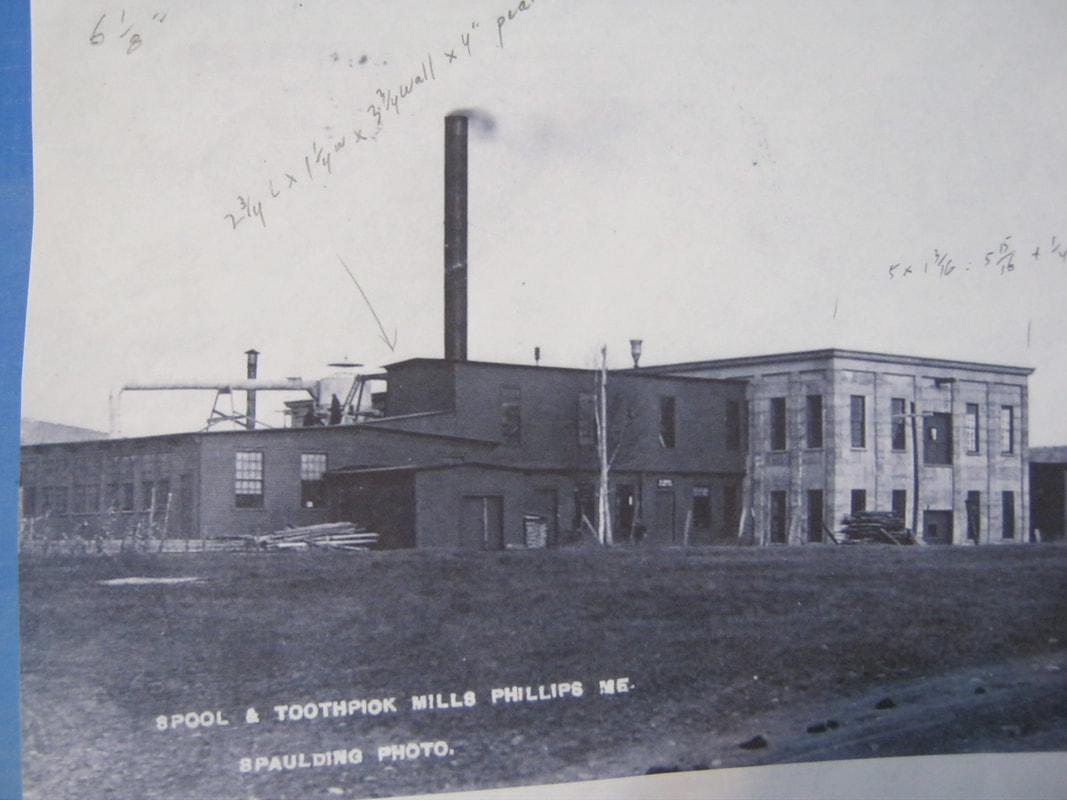
Left: A period photo of the International Mill on the east side of town. Over time, the mill was expanded, owned by different owners, and produced various products from clothespins to spools to toothpicks to matches, etc.
|
|
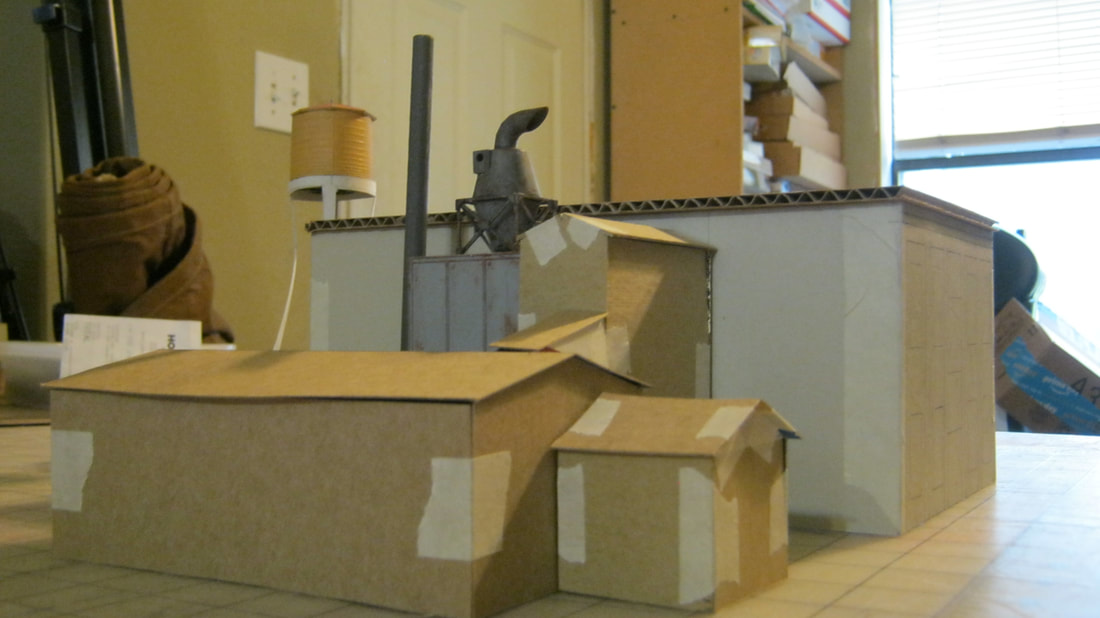
Left: Starting the cardboard mock-up that will also serve as templates for making the International Mill which was serviced by the railroad. To the right is the completed mock-up of the mill, selectively compressed to fit the available space on the layout. |
|
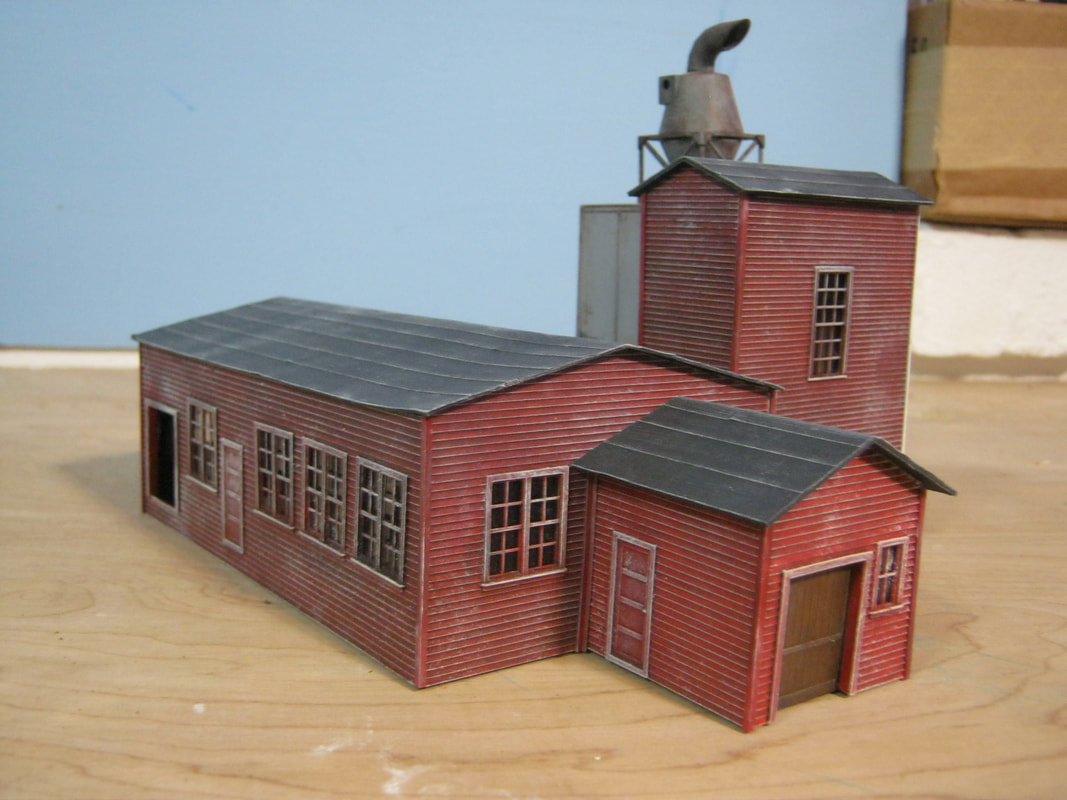
Progress on the International Mill. Below left is the "rough draft" of the west wing of the mill. Scratch built with Evergreen plastic, Grandt Line windows and doors, and with a dust cyclone taken from a Walthers Cornerstone kit. Below center is the water tank for the roof of the east wing. You can see the tank itself the way I found it, above right, after digging through a junk box at a local hobby shop and paying a buck for it. It's actually an N scale water tank from rail yard. I turned it into something useful for my mill. Below right is the "rough draft" of the east wing of the mill. The front and left walls were built up from sheets and strips of Evergreen plastic, with Grandt Line windows and doors added. The rear wall is just a sheet of plastic painted gray, as it won't be seen. The right wall, that you see in the photo, is a color photo-copy of the left wall, laminated onto a sheet of plastic. This wall will be angled away from the operators, and can only be seen if you intentionally lean over to the right to look around the corner of the building. It doesn't look too bad, and saved a ton of time and some materials.
|

|
|
|
|
|
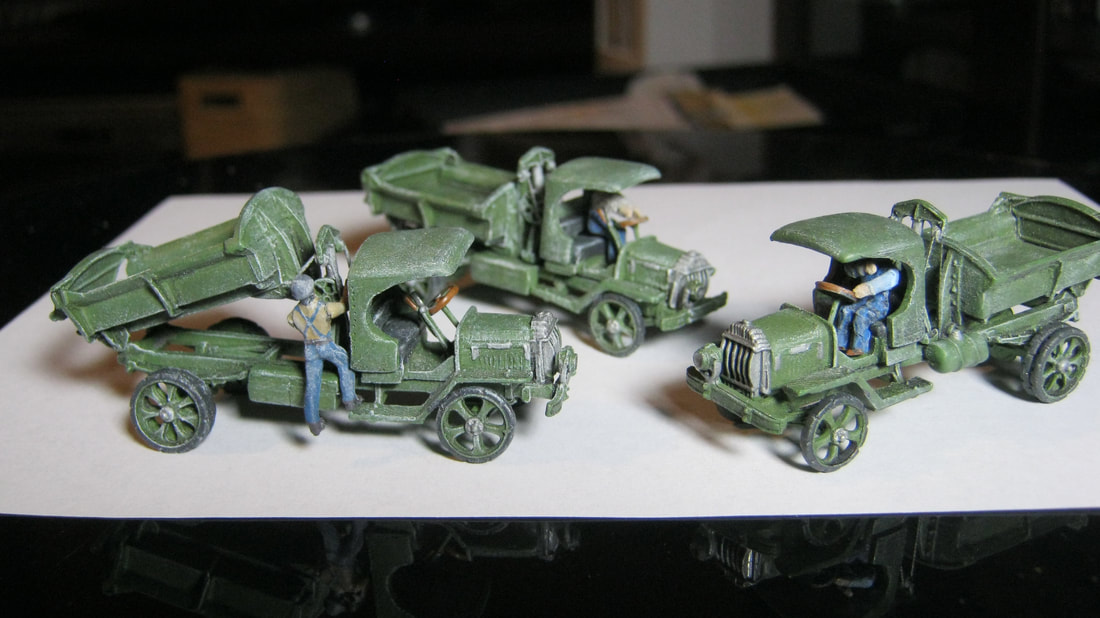
The International Mill on the layout will be undergoing construction of the added-on warehouse, just barely visible on the extreme right of the upper left-hand photo. Some of the construction equipment on the layout will be the steam powered cement mixer and dump trucks seen to the left and right.
|
|
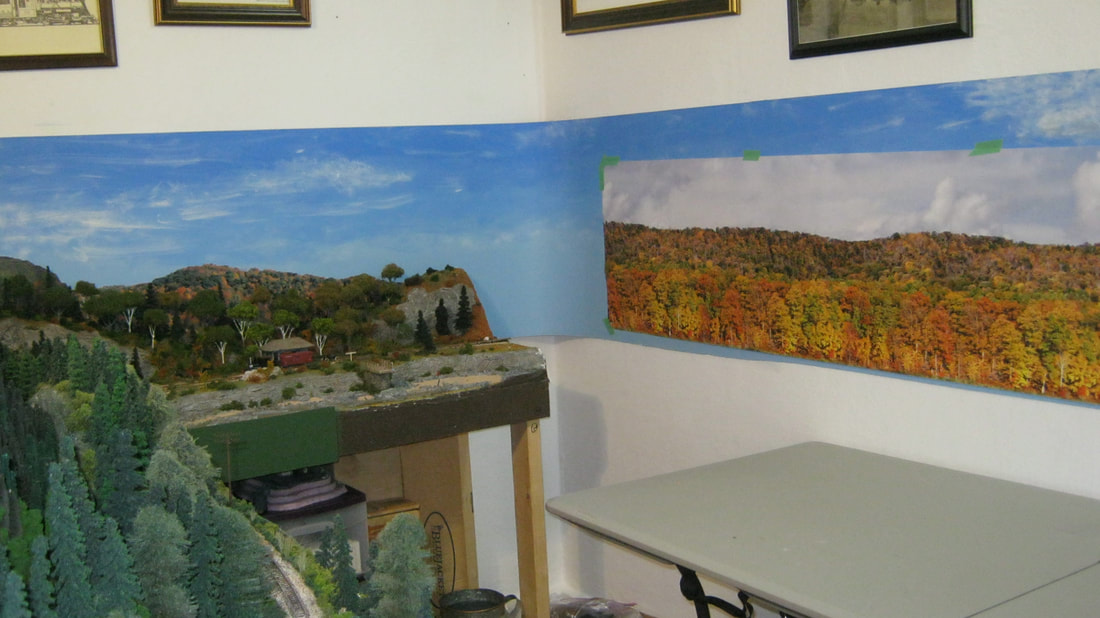
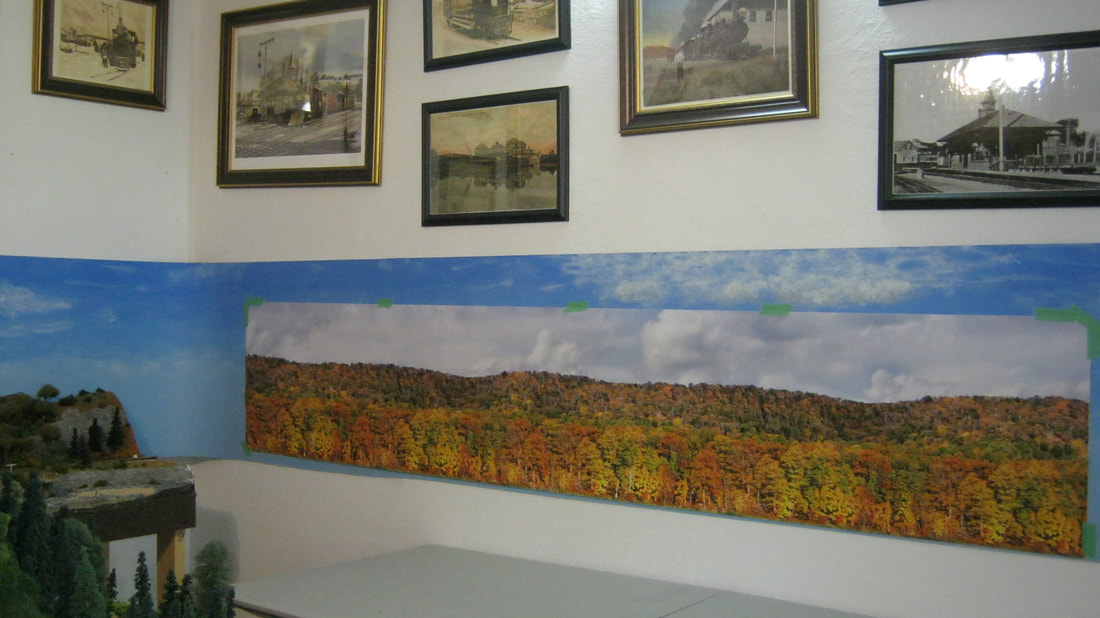
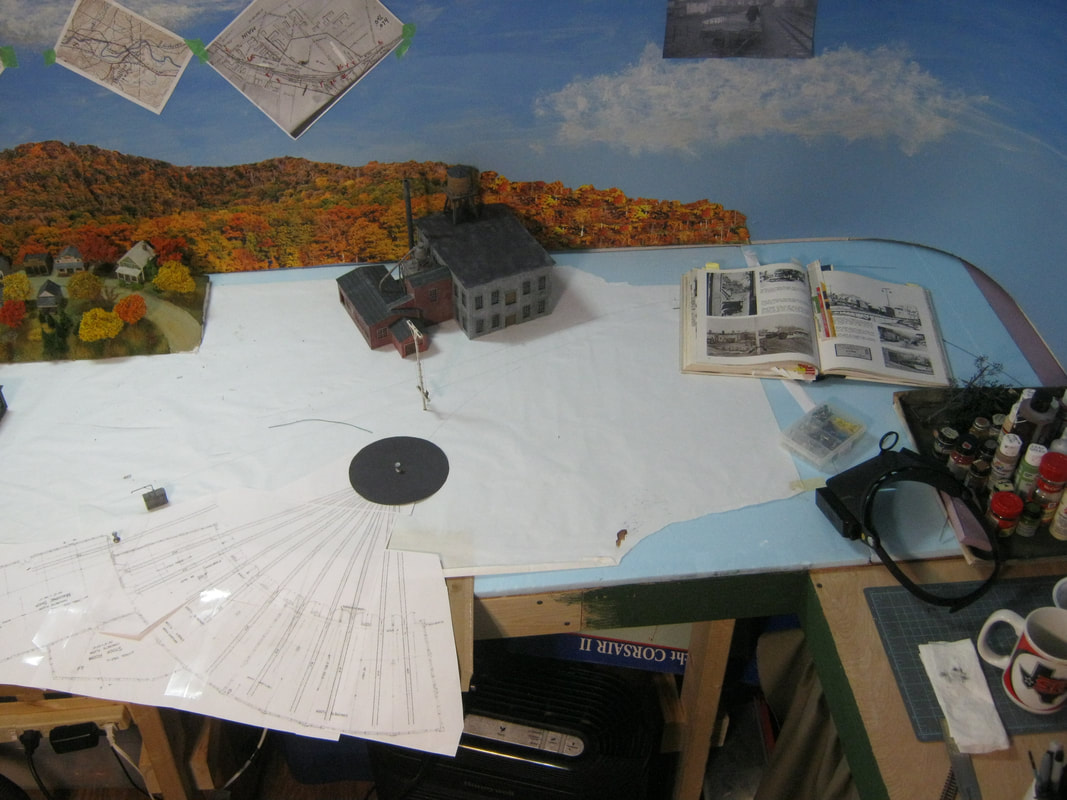
With the Reeds module in place, the masonite backdrop with the sky painted on it in place, and the photo backdrop on hand, construction on the Phillips module can now begin. The three masonite panels that bring the sky from behind Reeds, across the back of Phillips, and then around the next corner of the room toward Avon, are each 2' tall by 8' long. They are butted end to end and screwed straight into the wall, with the masonite curving around the corners of the room. The ends have a bit of glue to hold them flush to each other, then sanded and painted to blend them. The screws are painted into the sky with enough paint to blend them so they become nearly invisible.
The sky is done with a base coat of light blue, then starting at the top and working my way to the bottom, darker shades of blue fading to light are blended onto the base coat with a sea sponge. After the blue has dried, clouds are applied with a sea sponge as well, with the undersides of the clouds getting a very light blending of light gray.
The photo backdrop will have the sky cut off of it, and it will then be glued into place when I determine where it needs to be positioned on the sky-painted masonite.
|
|
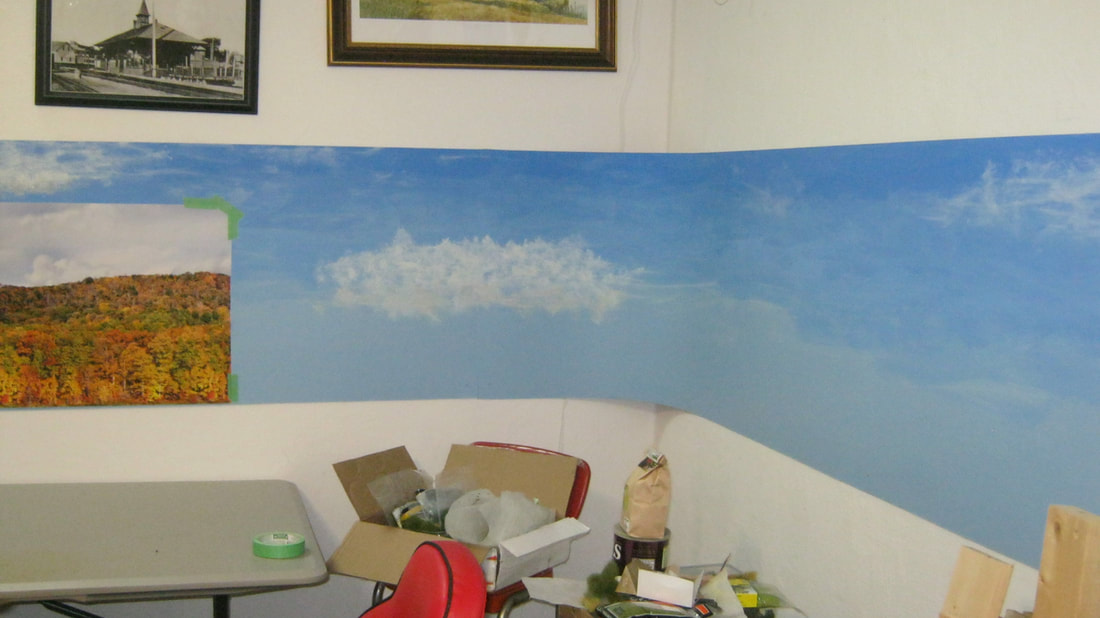
Below left and right, the bench work has been installed, the gray sky has been trimmed off the photo backdrop, and it has been permanently been attached to the masonite sky. This photo backdrop has a self-adhesive glue back, and is much better to work with (to me anyway) than those that aren't self-adhesive. If you notice the left top corners of the horizon in the above and below left photos, the corner of the backdrop has been trimmed to give it a downward sloping taper. The top right corner got the same treatment. This will help blend it with the 3D scenery, and the trimmed off material won't go to waste.
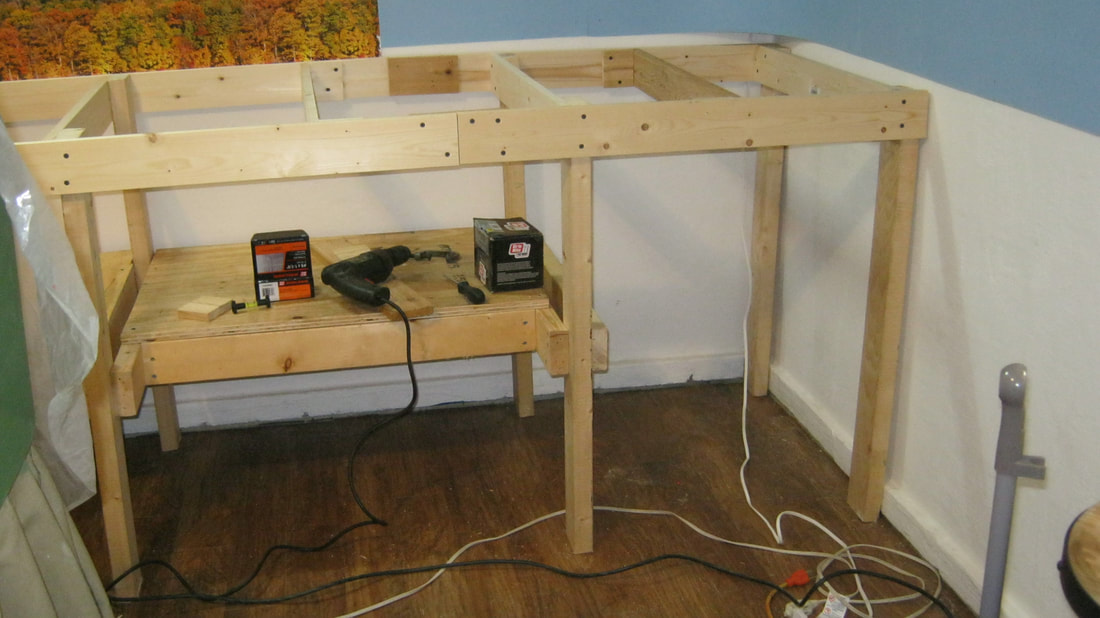
The bench work lower shelving is framed with 2x4's for sturdiness, and the shelves made with 5/8" plywood, to suppor my weight while working on the underside of the layout, and so heavy items can be stored there later. I left an open space under the right side so that I can store the shop vac, short broom with tall dustpan, etc. under there when not in use.
The bench work lower shelving is framed with 2x4's for sturdiness, and the shelves made with 5/8" plywood, to suppor my weight while working on the underside of the layout, and so heavy items can be stored there later. I left an open space under the right side so that I can store the shop vac, short broom with tall dustpan, etc. under there when not in use.

|
|
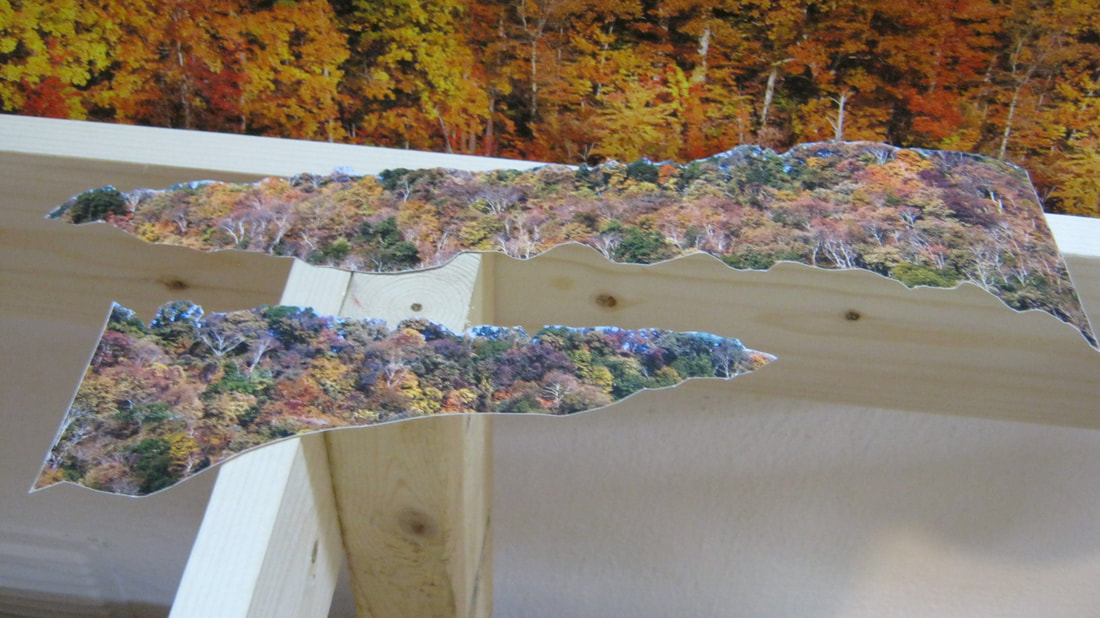
Below left are the corners that were trimmed off of the photo backdrop. I used them to 'build' a hilltop rising above the original flat-ish horizon of the photo backdrop, as you can see in the lower right photo. Even with close inspection, the overlap of the photos isn't easy to spot.
|
|
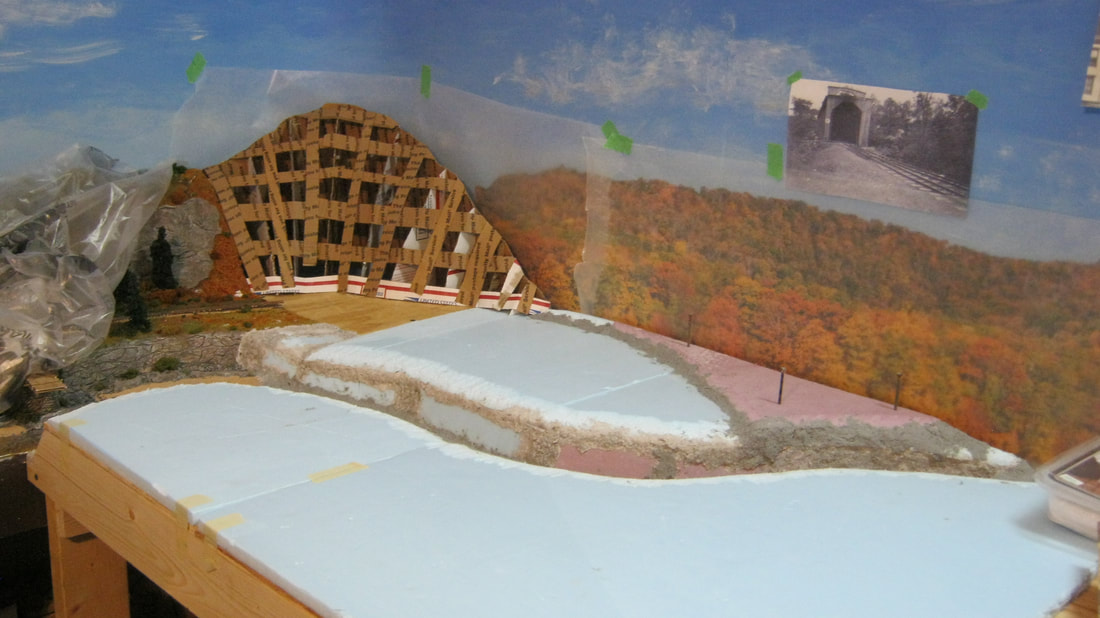
With the backdrop now done, and 1/4" plywood and 1/2" foam board in place, the railroad and 3D scenery can be plotted out to begin construction of the module itself.

|
|
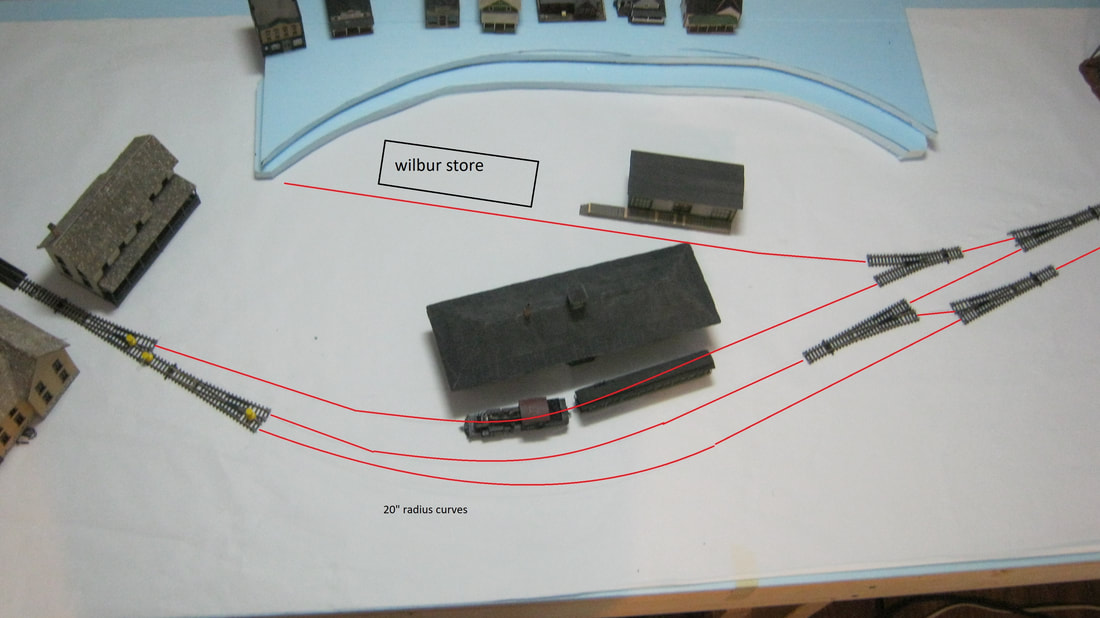
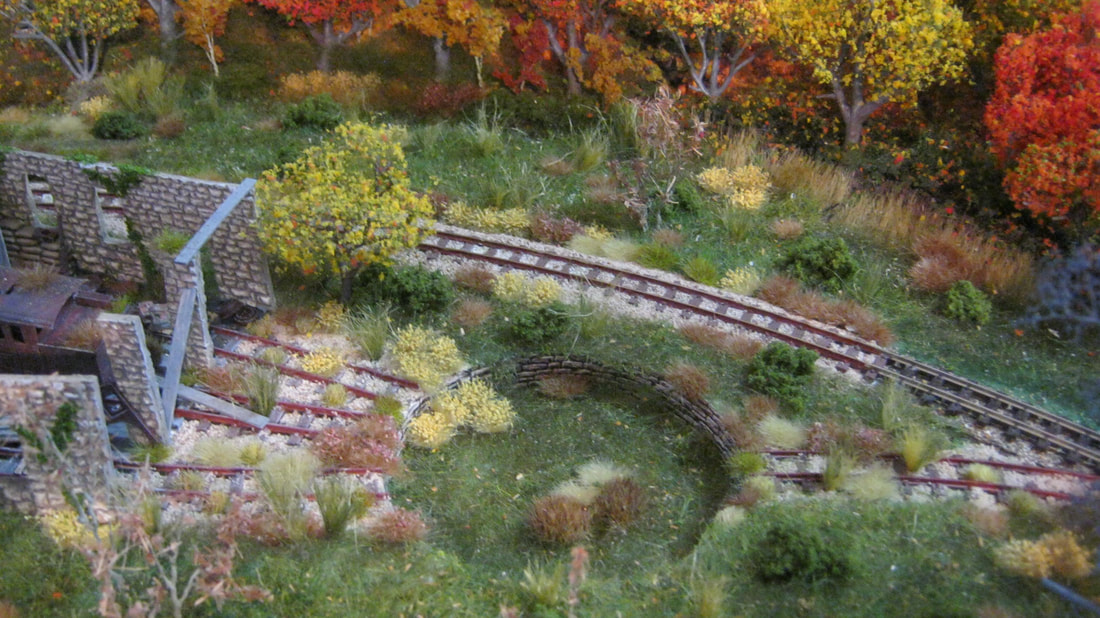
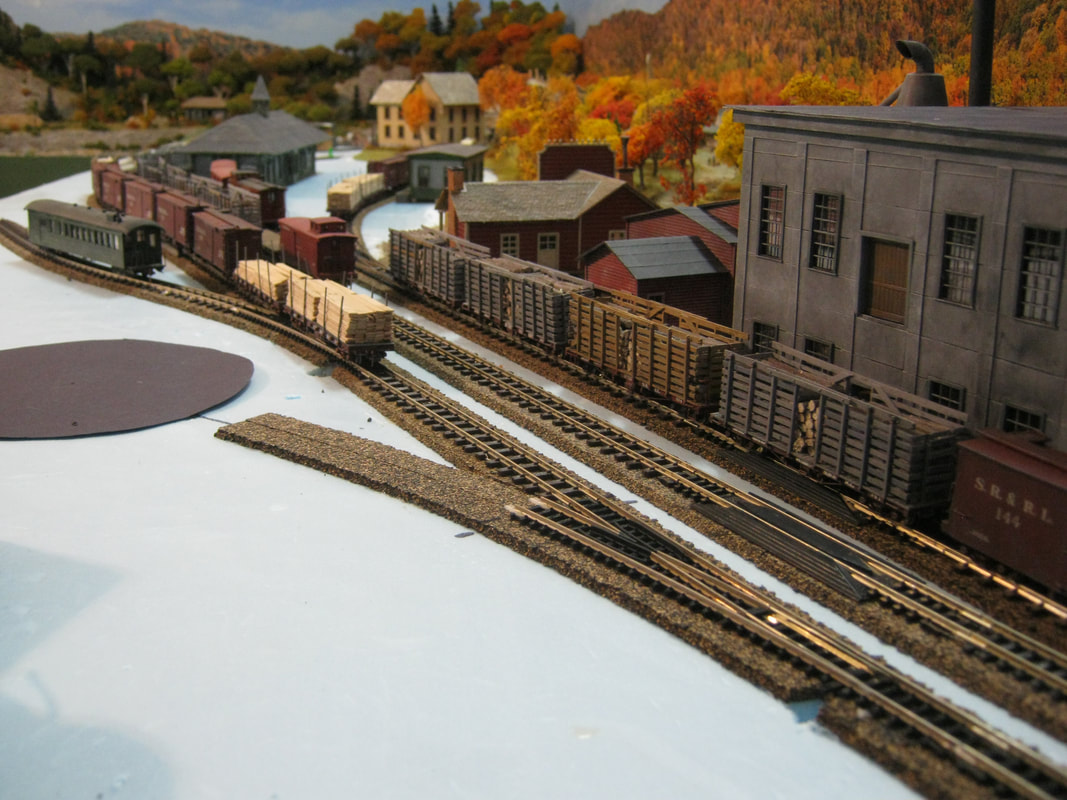
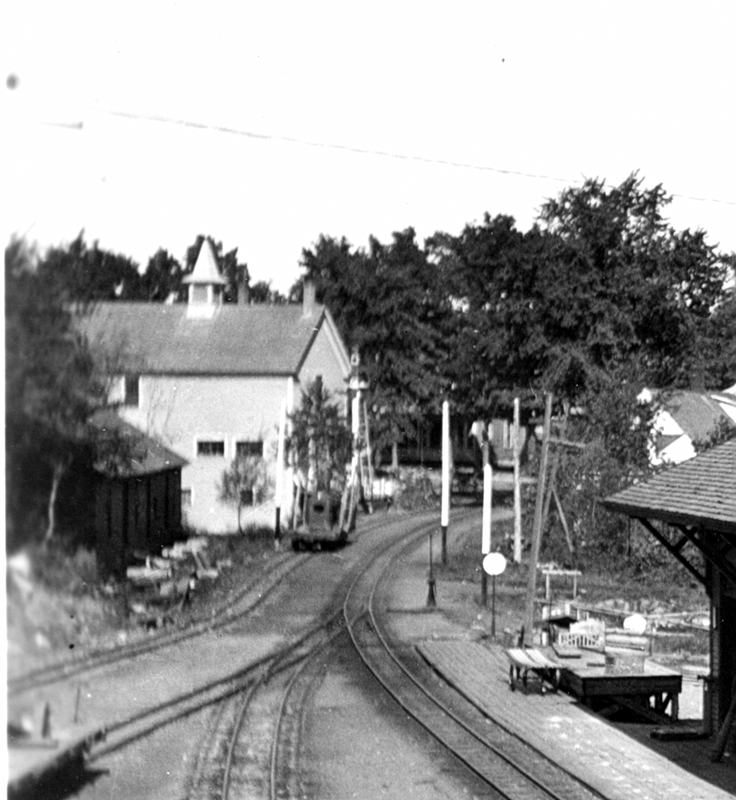
Above left, the curve coming out of Reeds will go into a tangent passing through the covered bridge over the Sandy River, and enter Phillips, crossing Main Street where you see the re-railer track. If you know the railroad well, you'll recall that the track runs along Orbeton Stream at Reeds, so here, magically, Orbeton Stream becomes the Sandy River. It just kind of worked out that way here! Upper right, after crossing Main Street, you enter Phillips main yard, which will include the depot, freight shed, roundhouse and shops, and the Wilbur spur.
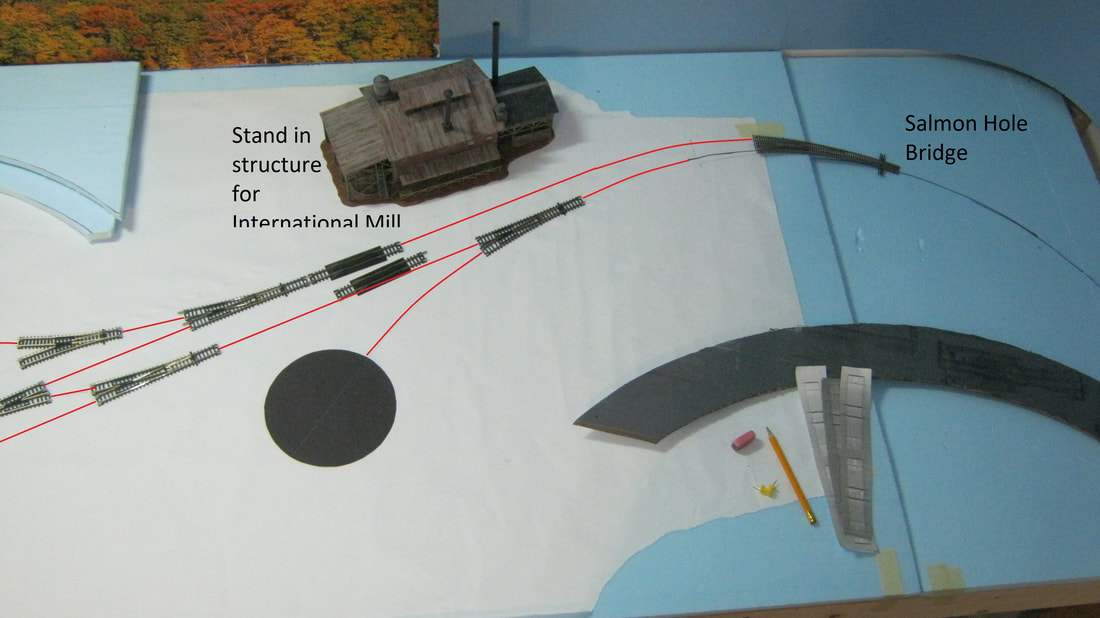
Below left is a possible track plan, to replicate as closely as possible the actual yard at Phillips. An extension will be built out from the current bench work for the roundhouse to be included. Likely, I'll eliminate the portion of the shops that has the through-track, and that track will be used as a passing track or sorting track. Below right is the south end of the yard, with the spur leading to the turntable and roundhouse, and the International Mill. There will be a spur added for the International Mill, and the Salmon Hole bridge crossing the Sandy River will be moved further away from the mill so that it can be on a tangent instead of a curve. I thought about just including the near-end of the bridge, with trees hiding the 'rest of the bridge', but I'd rather have the whole bridge and river crossing, so it's moving south.
Below left is a possible track plan, to replicate as closely as possible the actual yard at Phillips. An extension will be built out from the current bench work for the roundhouse to be included. Likely, I'll eliminate the portion of the shops that has the through-track, and that track will be used as a passing track or sorting track. Below right is the south end of the yard, with the spur leading to the turntable and roundhouse, and the International Mill. There will be a spur added for the International Mill, and the Salmon Hole bridge crossing the Sandy River will be moved further away from the mill so that it can be on a tangent instead of a curve. I thought about just including the near-end of the bridge, with trees hiding the 'rest of the bridge', but I'd rather have the whole bridge and river crossing, so it's moving south.

|
|
|
|
Above left is the bench work for Phillips, now permanently attached to the Reeds module, and the bed of the river cut out from the upper plywood and lowered to the level of the existing bed at Reeds. Upper right is how that looks from above.
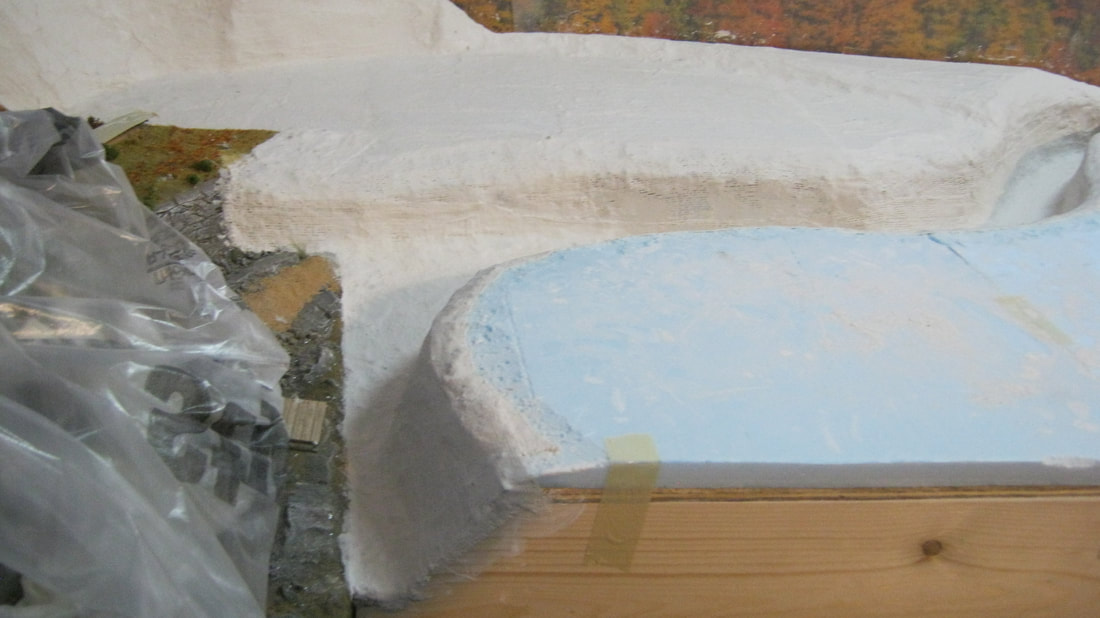
Below left, the hill from Reeds is extended around the curve onto Phillips, with the cardboard frame completed, and the foam panel base for the scenery glued down for the northern end of Phillips. Scrap foam has been hot-glued in between the upper scenery base and the river bed, shaved into rough shape, and then the contours and gaps filled with Celluclay and further shaped.
Below right, the plaster cloth has been applied to the hill and scenery through the entire river bed. This portion of the scenery will be roughly 90% complete before the roadbed and track is laid, so that the track won't be damaged trying to do scenery behind it after it's laid.
|
|
|
|
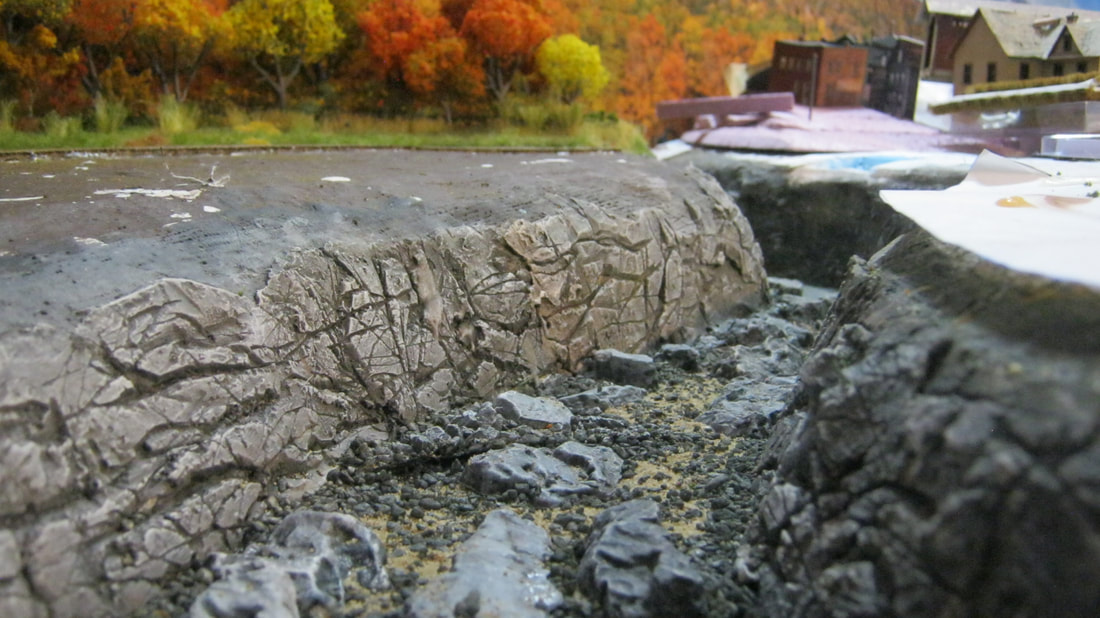
PhoAbove left is a close up of the joint between Reeds on the left, and Phillips on the right. Part of the scenery on the right side of the Reeds module has been cut away, so that the railroad bed can continue on in the required 22" radius around the curve, and so that the river can be changed into a tighter curve to flow under the covered railroad bridge in Phillips.
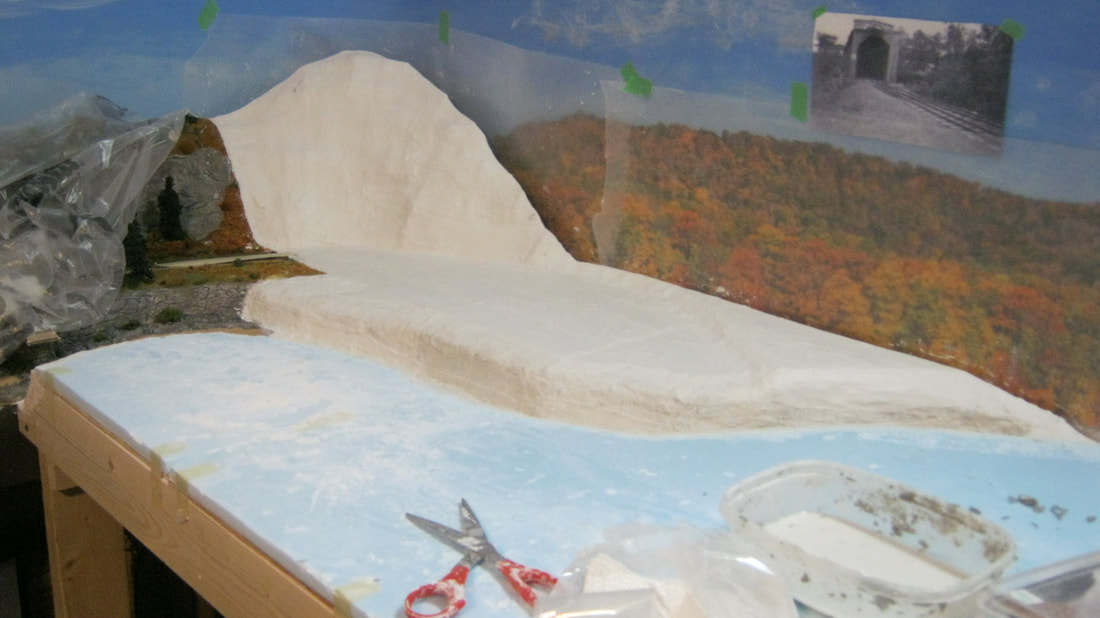
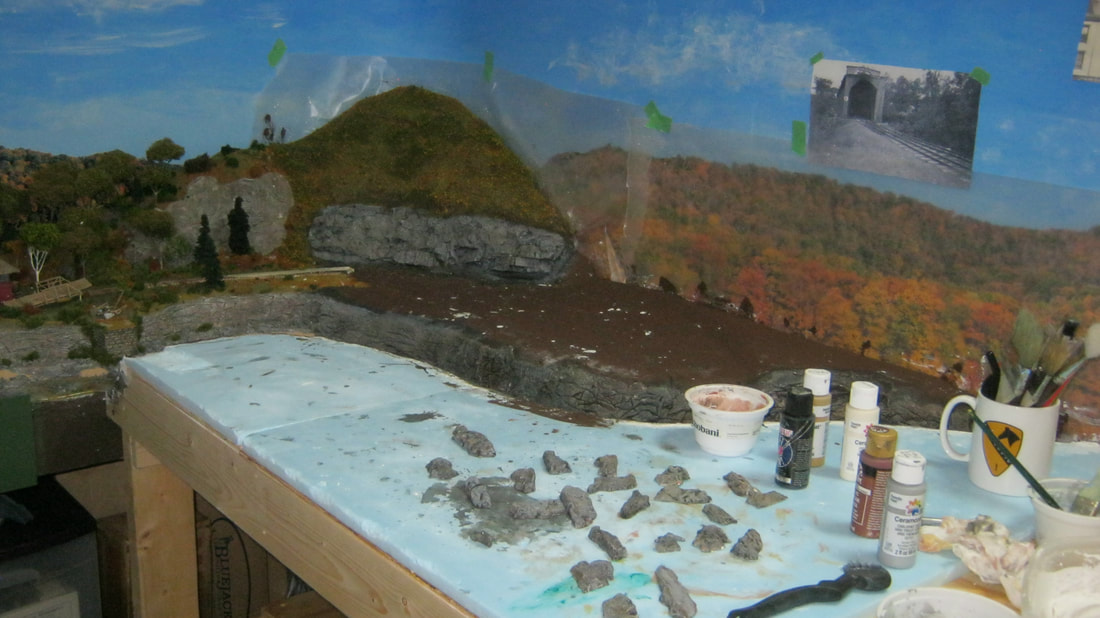
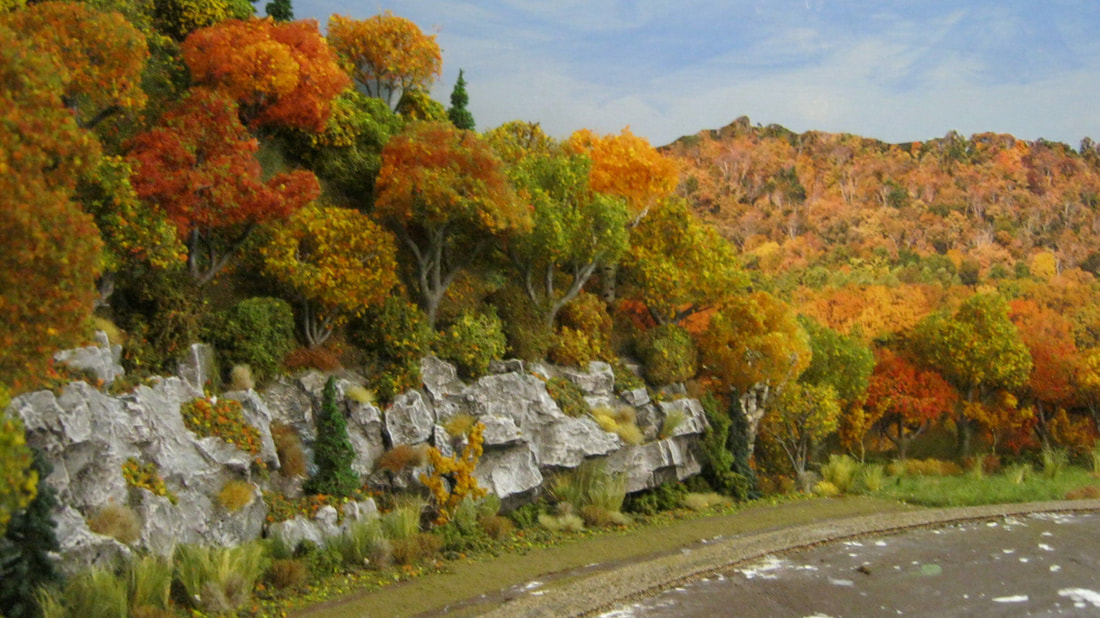
Above right, rock castings have been applied to the base of the hill by pushing the plaster filled latex molds against the plaster cloth and holding them there until the plaster has hardened enough to remove the rubber molds, which only takes a few minutes. Wet plaster has been applied to the sides of the river bed with a putty knife, and then carved into 'rock' with an X-acto with #11 blade. The rock on the hill and in the river has been stained with black, raw umber, khaki and gray, then dry-brushed with white. On the bare foam base in the foreground are several smaller rock castings with the same coloring as the other rock, that will be glued into the river bed. A base coat of brown latex paint has been applied over the rest of plaster cloth, and the initial ground cover has been applied to the hill with green ground foam and a light mixing with the green of yellow, orange and brown for the transition from summer to fall.
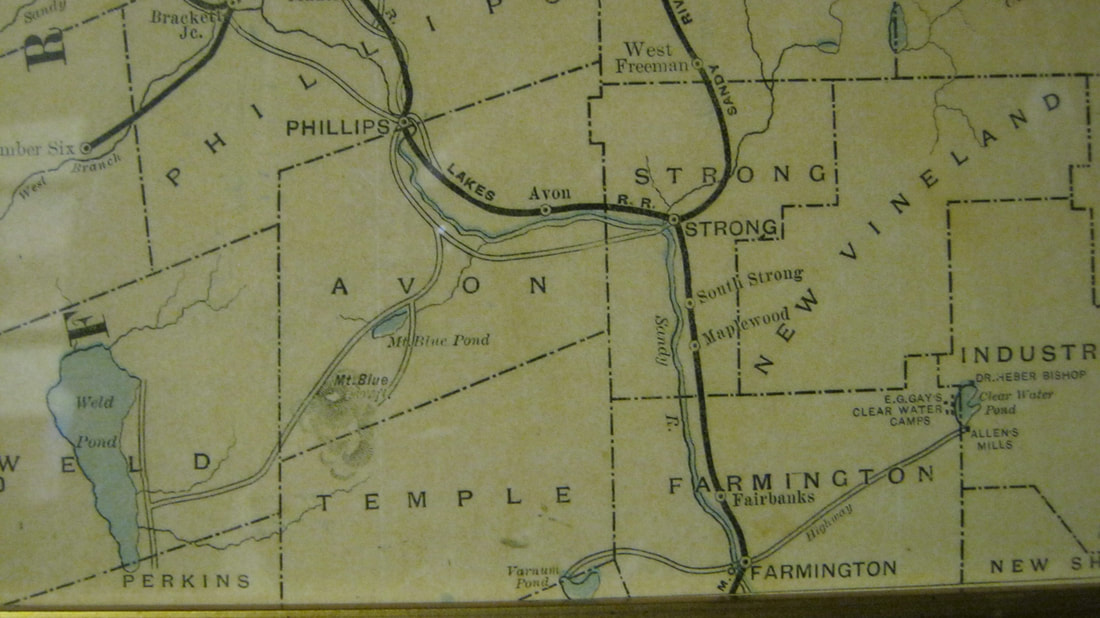
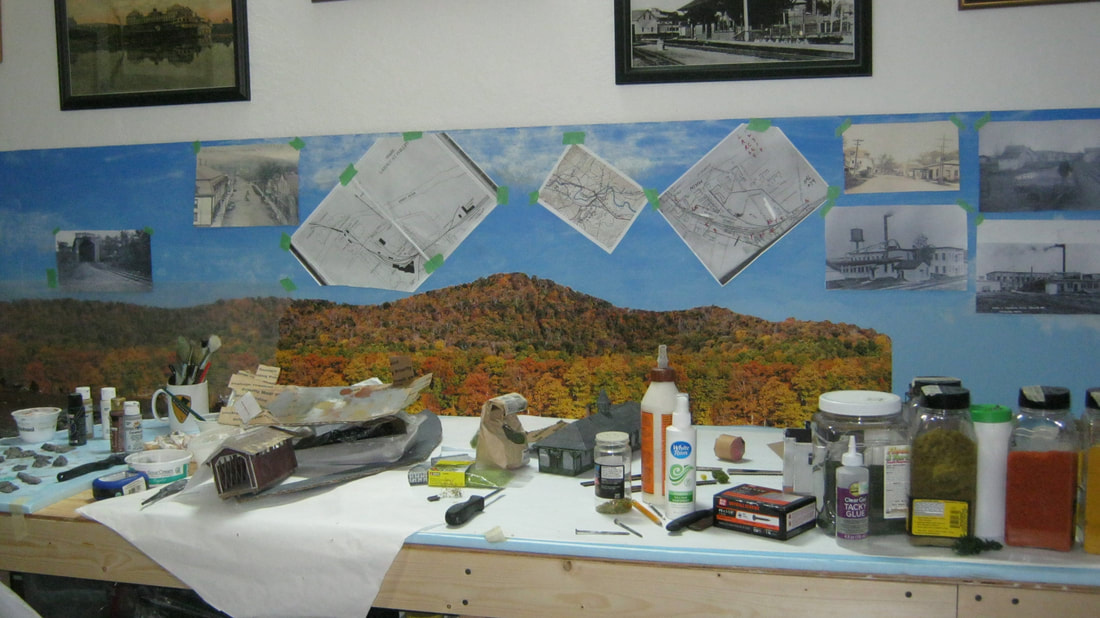
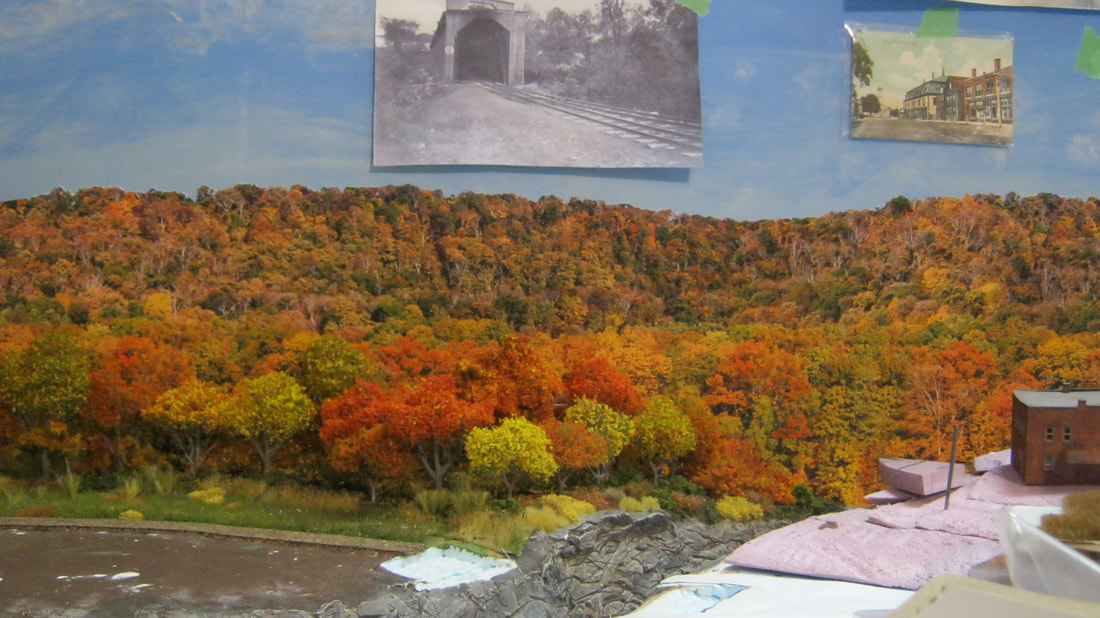
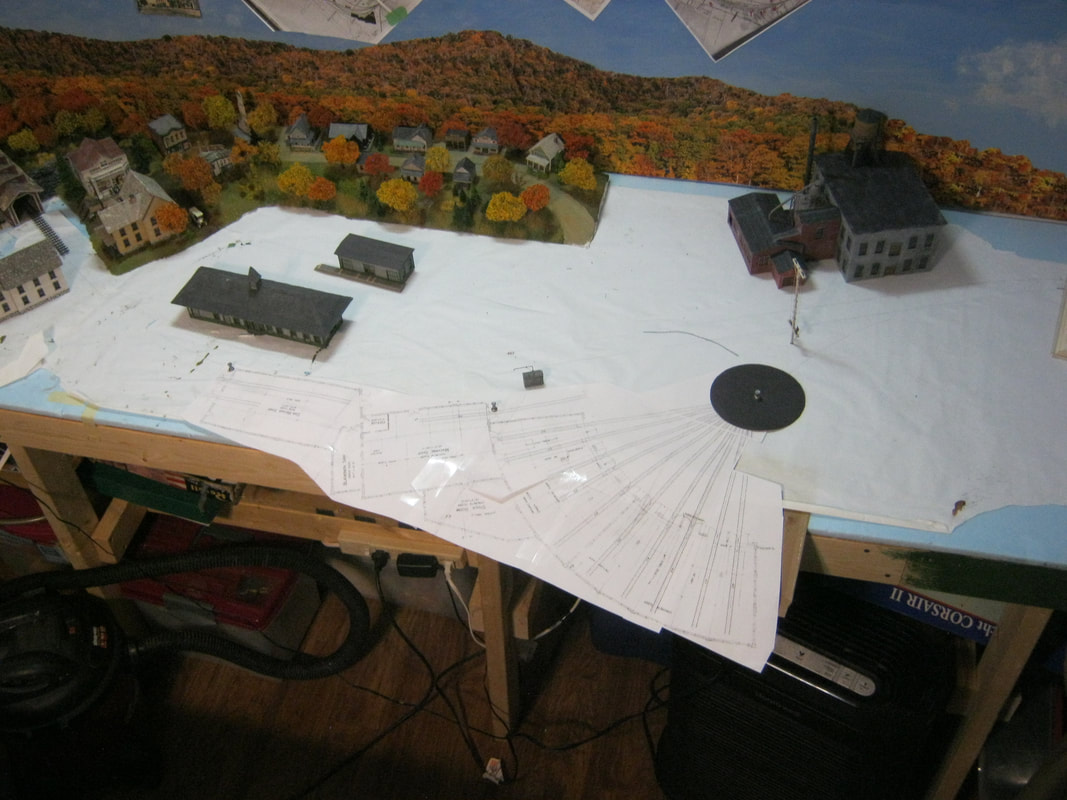
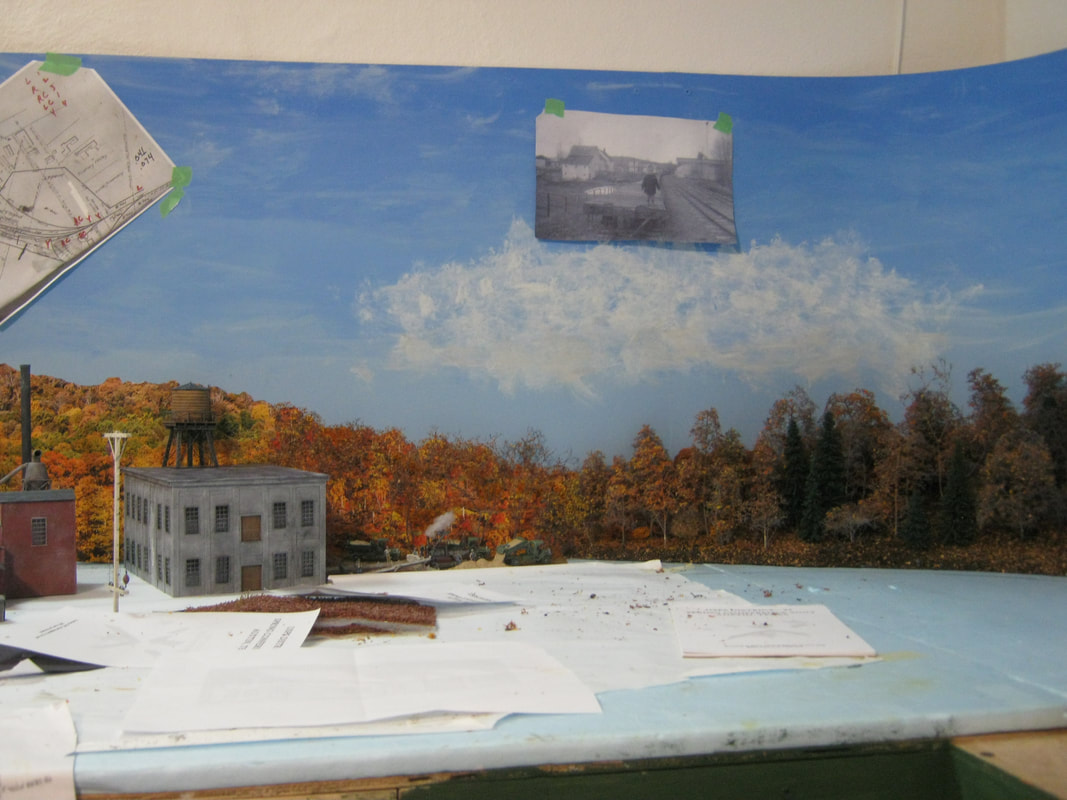
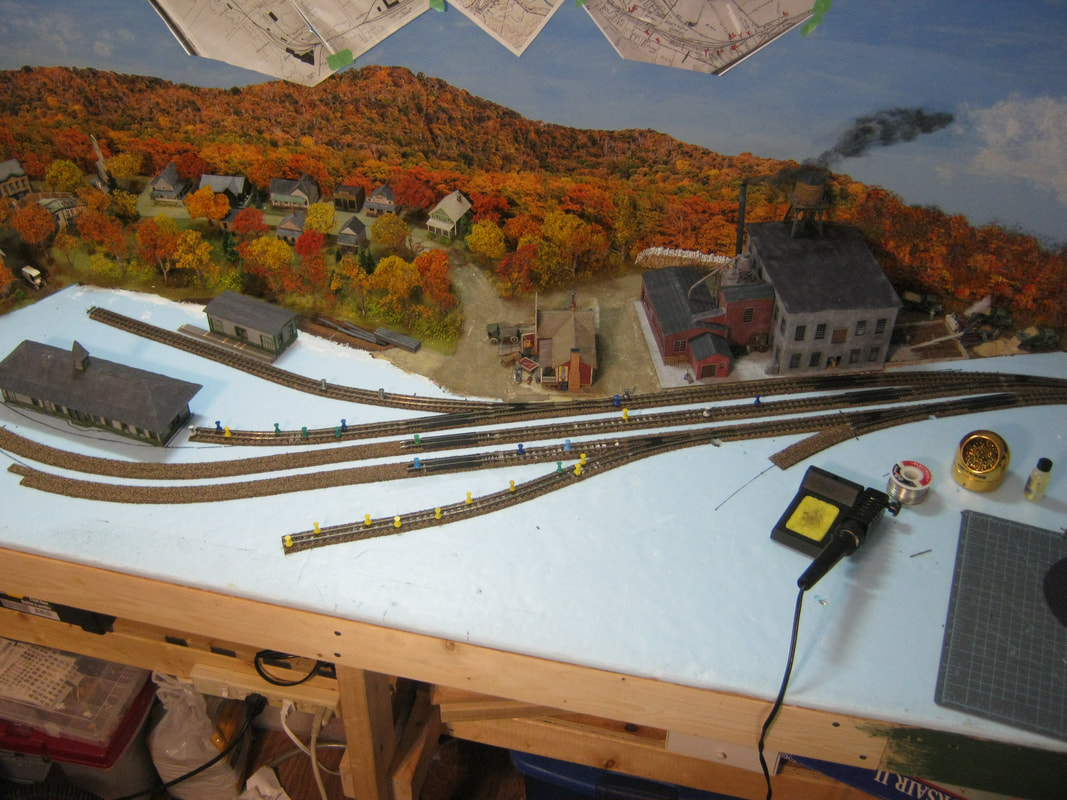
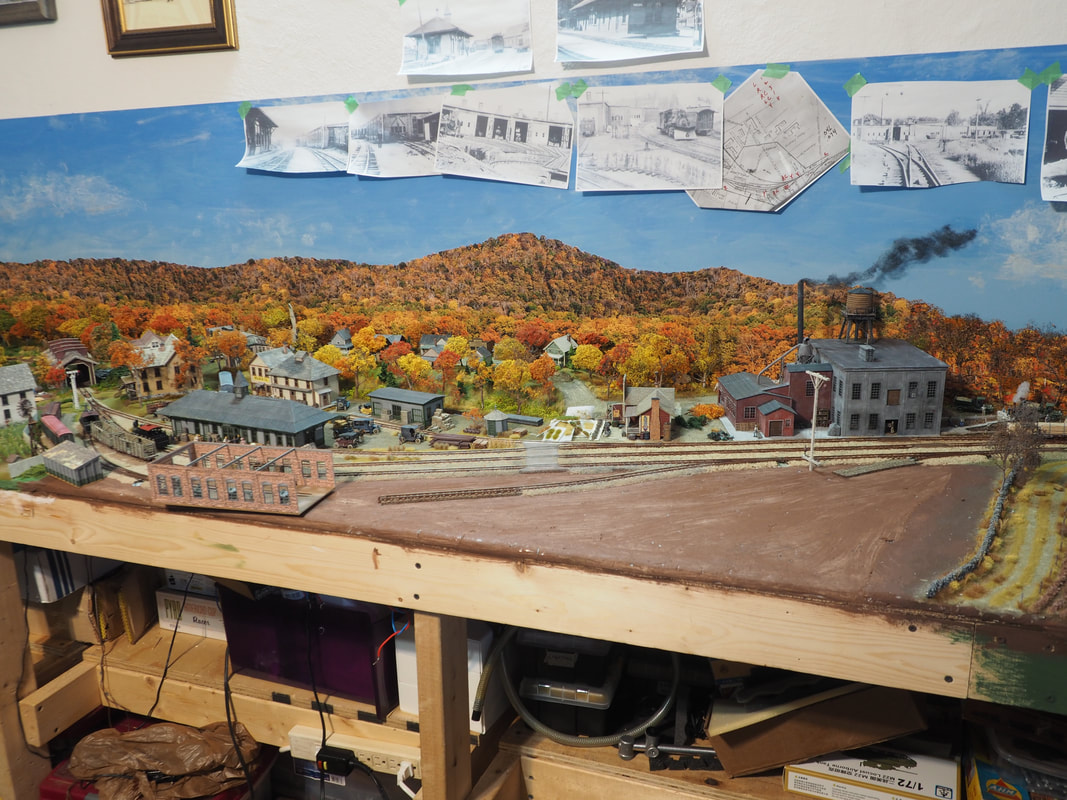
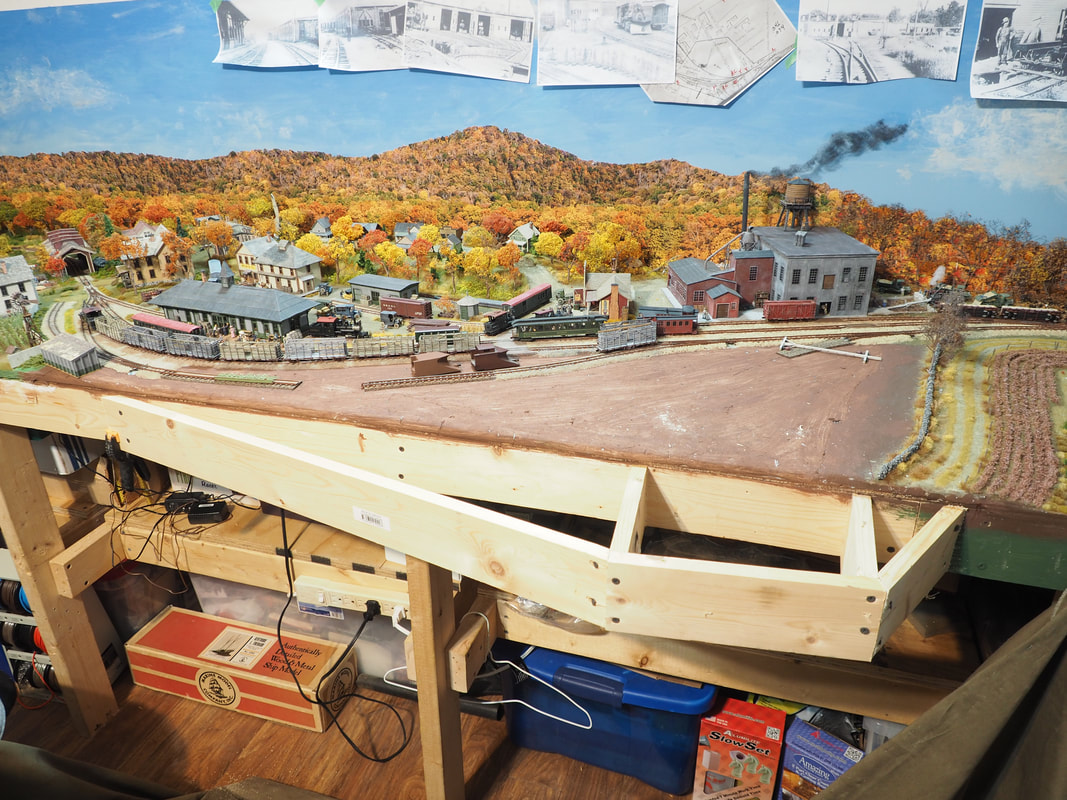
Below, the rest of the module becomes the work bench as I work my way 'south' along the layout. Photos from the prototype railroad, a diagram of the prototype from the book "Ride the Sandy River", a section from an early 20th Century topographical map of Phillips, and a photocopy from an original copy of the 1908 Maine Central Railroad survey of the SR&RL railroad are taped up on the backdrop as guides while doing the final planning and construction for the module.
Above right, rock castings have been applied to the base of the hill by pushing the plaster filled latex molds against the plaster cloth and holding them there until the plaster has hardened enough to remove the rubber molds, which only takes a few minutes. Wet plaster has been applied to the sides of the river bed with a putty knife, and then carved into 'rock' with an X-acto with #11 blade. The rock on the hill and in the river has been stained with black, raw umber, khaki and gray, then dry-brushed with white. On the bare foam base in the foreground are several smaller rock castings with the same coloring as the other rock, that will be glued into the river bed. A base coat of brown latex paint has been applied over the rest of plaster cloth, and the initial ground cover has been applied to the hill with green ground foam and a light mixing with the green of yellow, orange and brown for the transition from summer to fall.
Below, the rest of the module becomes the work bench as I work my way 'south' along the layout. Photos from the prototype railroad, a diagram of the prototype from the book "Ride the Sandy River", a section from an early 20th Century topographical map of Phillips, and a photocopy from an original copy of the 1908 Maine Central Railroad survey of the SR&RL railroad are taped up on the backdrop as guides while doing the final planning and construction for the module.
|
|
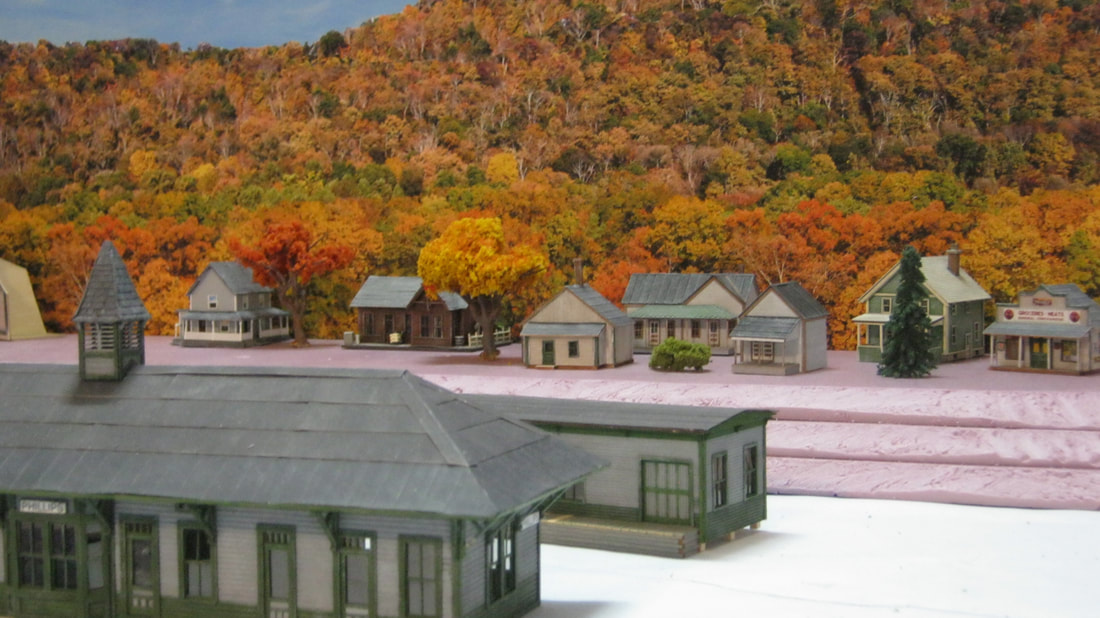
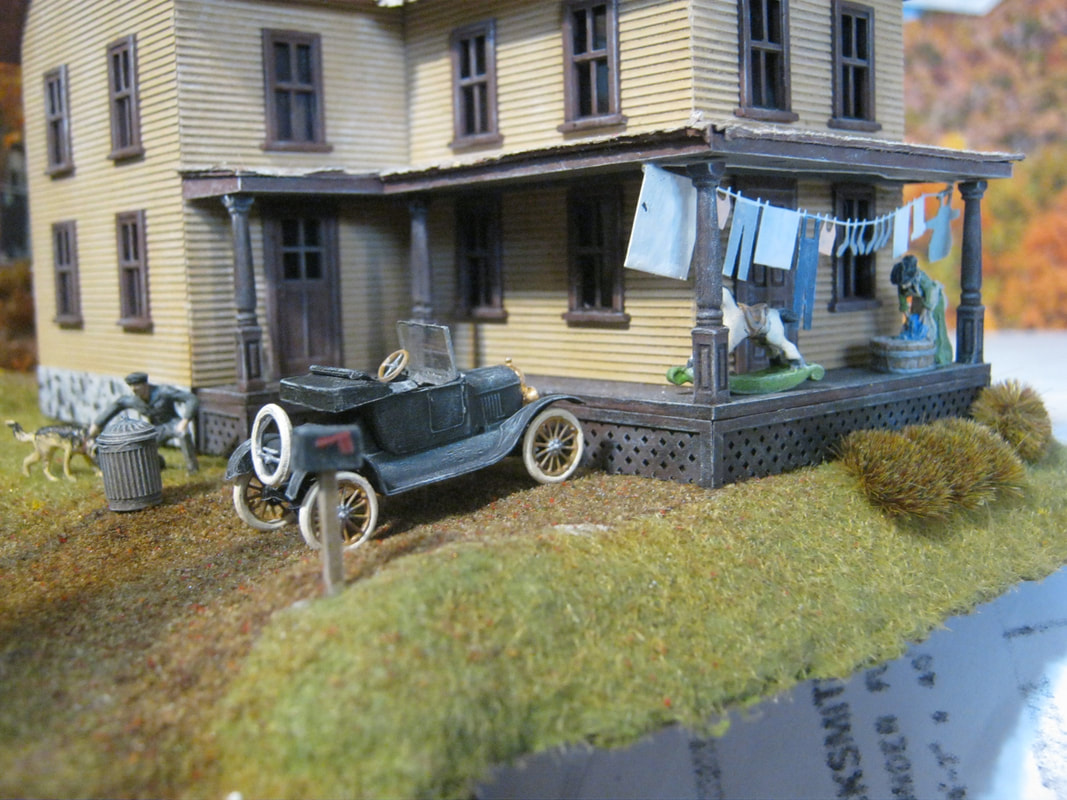
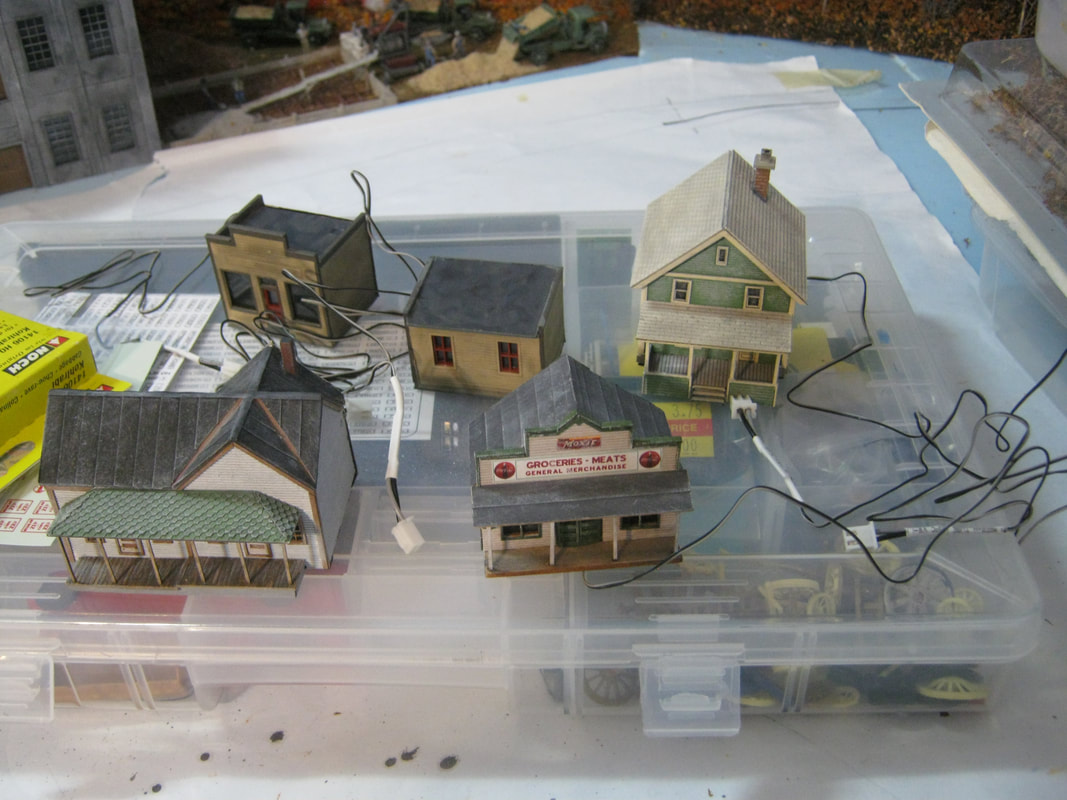
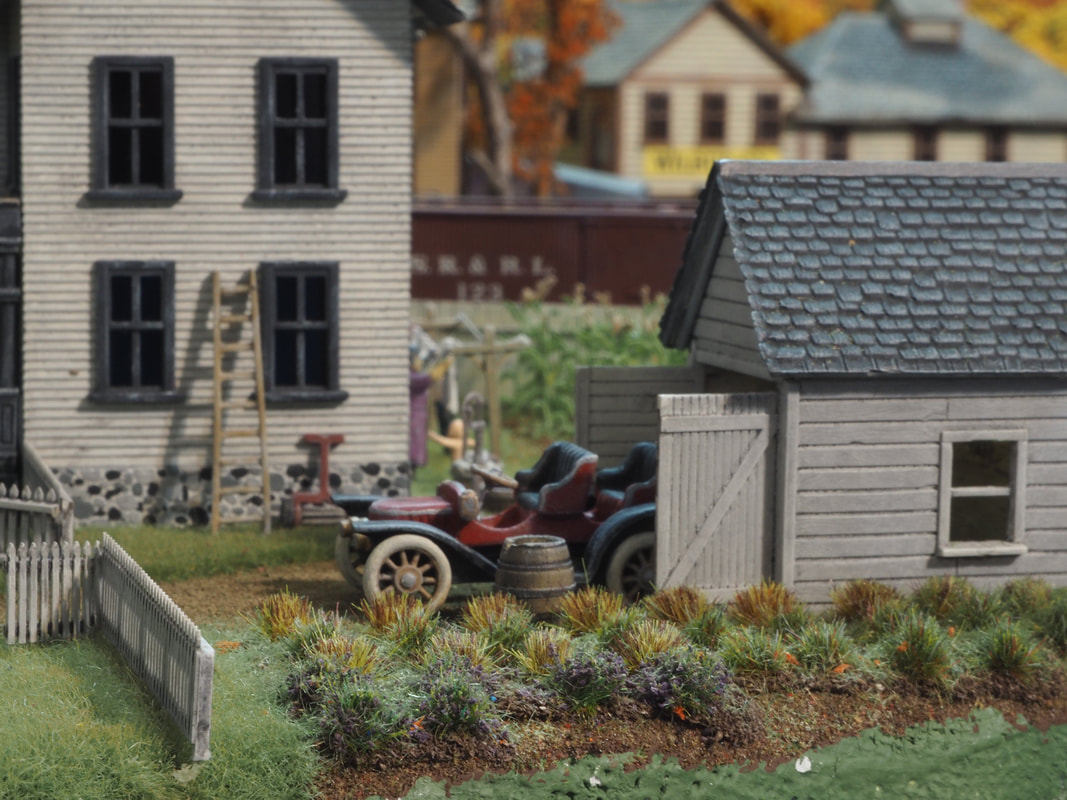
Above left and right, the initial placement of N scale structures for Pleasant Street, that will run along the back side of the module, is figured out, as well as the height of the foam base to give the best illusion of distance behind the full sized HO scale structures and scenery at the front of the module. Two of the buildings have been cut in half, with the back sides of those buildings now facing the front of the layout, to look like buildings on 'this side' of the street. The steep 'hillside' between the rail yard and Pleasant Street will be covered with trees and other foliage to help the illusion of distance. Looking at the above left photo, note that there is the back side of a building between the evergreen tree on its right and a small green bush to its left. Behind the depot is the SRRL freight shed. The distance from the back of the freight shed to that building between the tree and the bush is only 6". If you look to the dark brown house to the left, if you haven't already noticed, there are 3D trees to the left and right of it. Careful blending of the colors of the foliage with the backdrop will make it hard for a viewer to figure out where the photo backdrop ends and the 3D scenery begins. All of this is part of the testing stage before anything permanent goes on the layout.
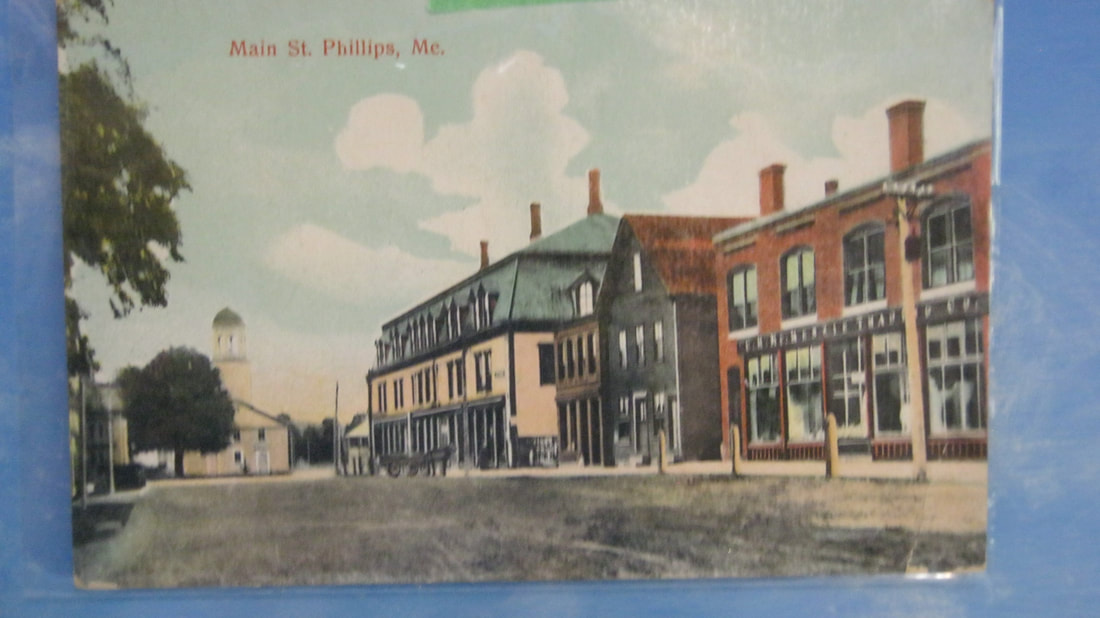
Below left is a color tinted post card of Main Street in Phillips from 1908. Below right, a condensed version (selective compression) of buildings for Main Street on the layout. The large tan building with the Mansard roof in the post card is the Beal Block, said to be the largest wooden building in Maine for several years after it was built. The church at the end of the street is the Union Church. On the layout, below right, these two buildings have been represented by photo-copying the Beal Block by 200% and the Union Church by 400%, then gluing them to strathmore board and cutting them out with a freshg #11 blade. Both buildings will only be visible from this angle, and look good enough to use 'permanantly' - for the time being.
Below left is a color tinted post card of Main Street in Phillips from 1908. Below right, a condensed version (selective compression) of buildings for Main Street on the layout. The large tan building with the Mansard roof in the post card is the Beal Block, said to be the largest wooden building in Maine for several years after it was built. The church at the end of the street is the Union Church. On the layout, below right, these two buildings have been represented by photo-copying the Beal Block by 200% and the Union Church by 400%, then gluing them to strathmore board and cutting them out with a freshg #11 blade. Both buildings will only be visible from this angle, and look good enough to use 'permanantly' - for the time being.
|
|
Below is an enlargement of the above right photo. Once the contouring of the foam base, shaping of terrain with celluclay, finished street and other structures and scenery are added, the illusion of depth and 'flavor' of Main Street in Phillips should be convincing. If you haven't already noticed it, the two houses to the front right are HO scale, and the business building to the left is N scale. The total distance from the near edge of the partially visible near house on the right to the photo backdrop is 25".
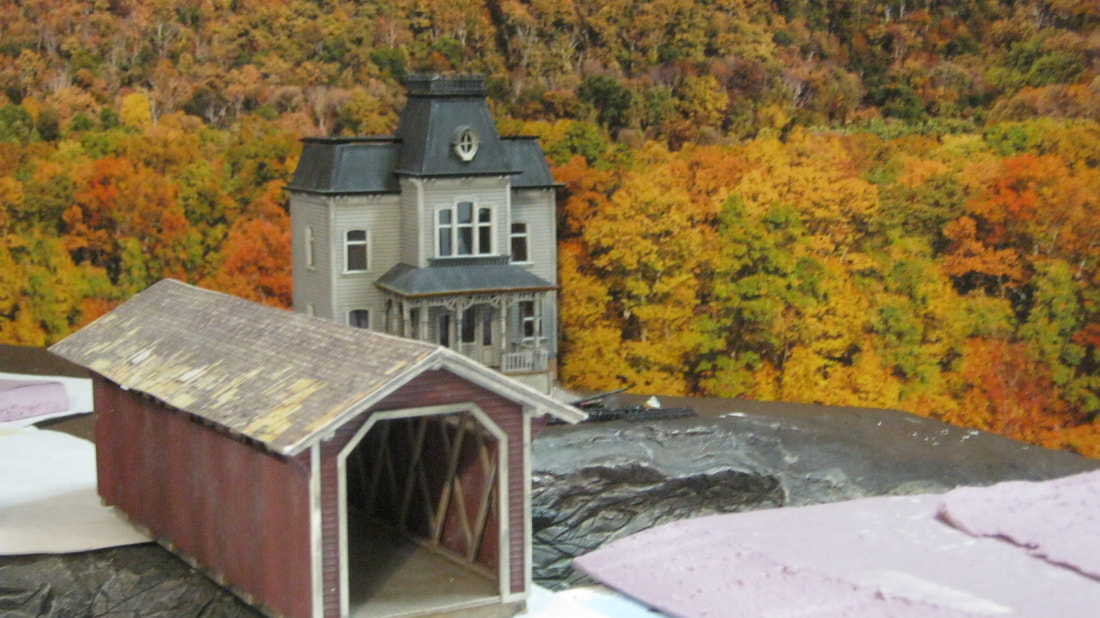
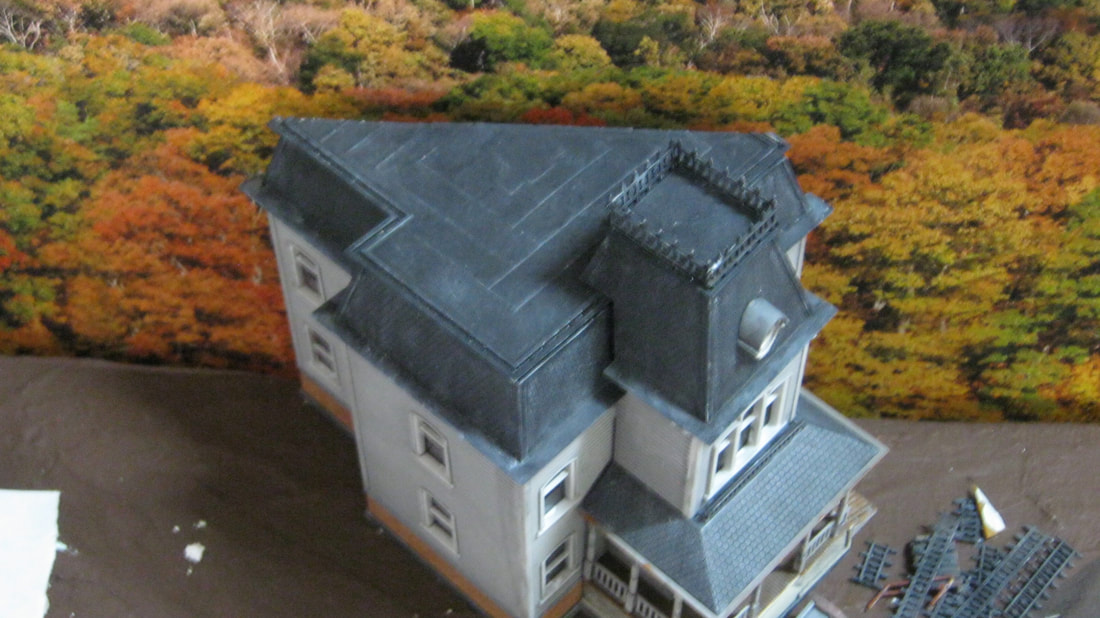
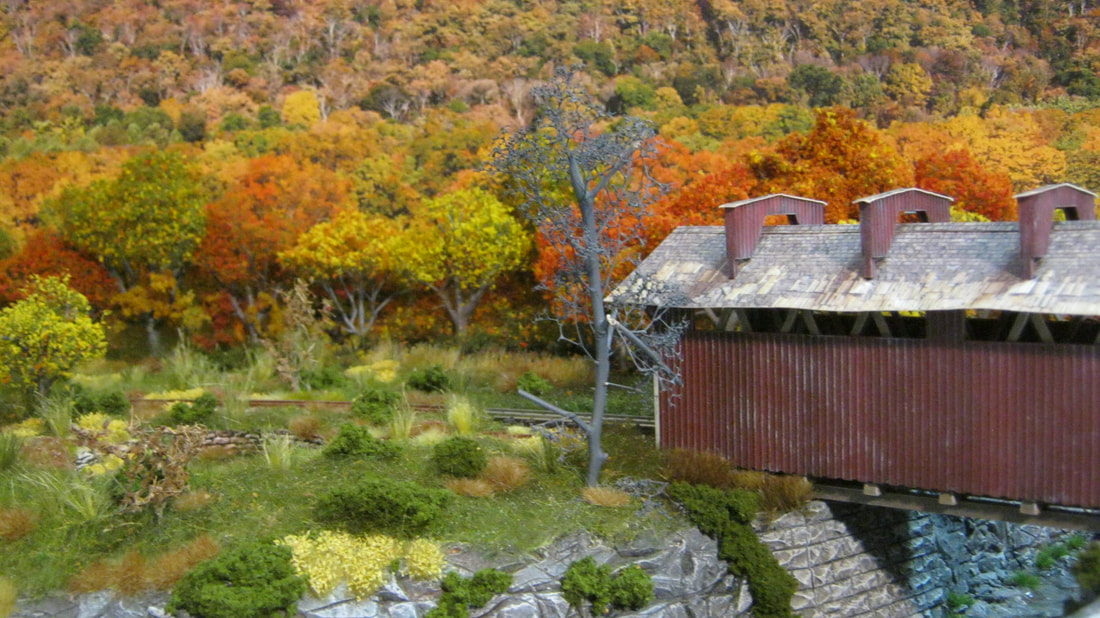
Below left and right are the railroad covered bridge and a stand in house for the Ambleside mansion. The bridge still needs to have the overhead structural trusses that were protruded above the roof of the prototype bridge added. Norman Bates' house from the movie "Psycho" is the stand-in structure for Ambleside until a model of the prototype gets scratch-built or kit-bashed.
|
|
After having it there, and looking ahead to finishing the covered bridge, I decided to leave it out put in forest instead to look more like the prototype at the bridge itself, as you'll see further below.
|
|
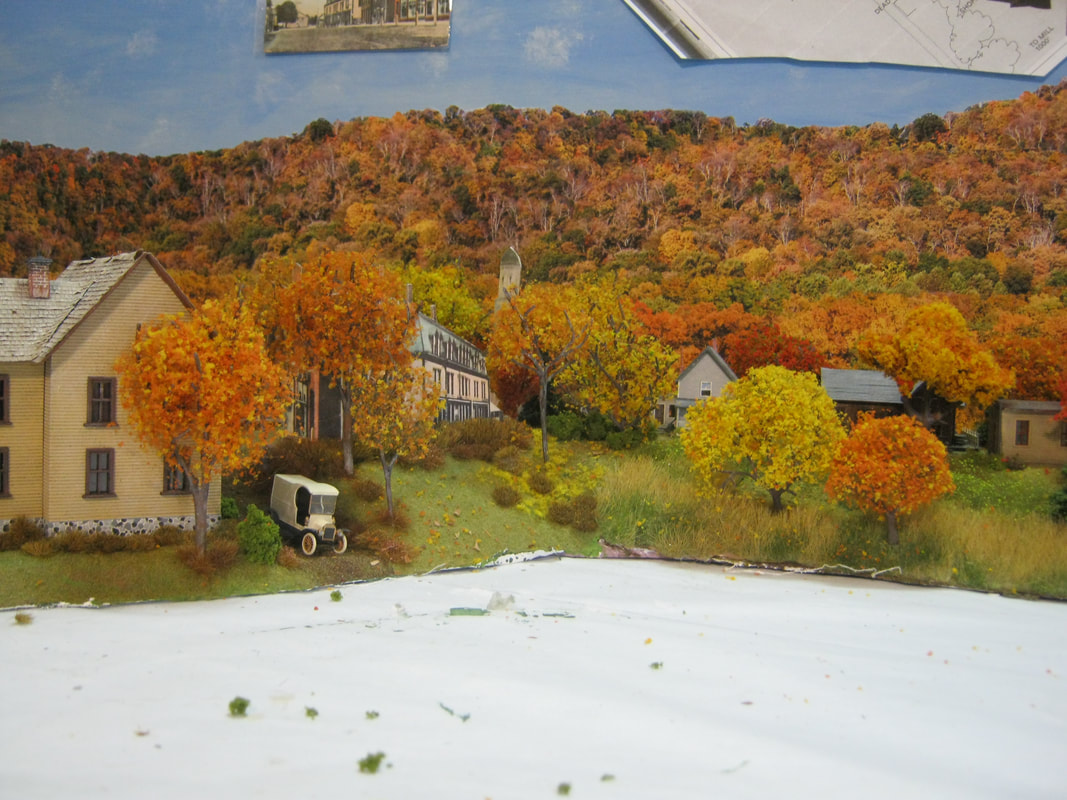
Above and below, the woods have been added in to the hill in the corner and to the right of it all the way to the river. Note the transition of the colors from solid green to the left of the station at Reeds above left, to nearly full blown fall colors to the river at the far right in the photo below left.
|
|
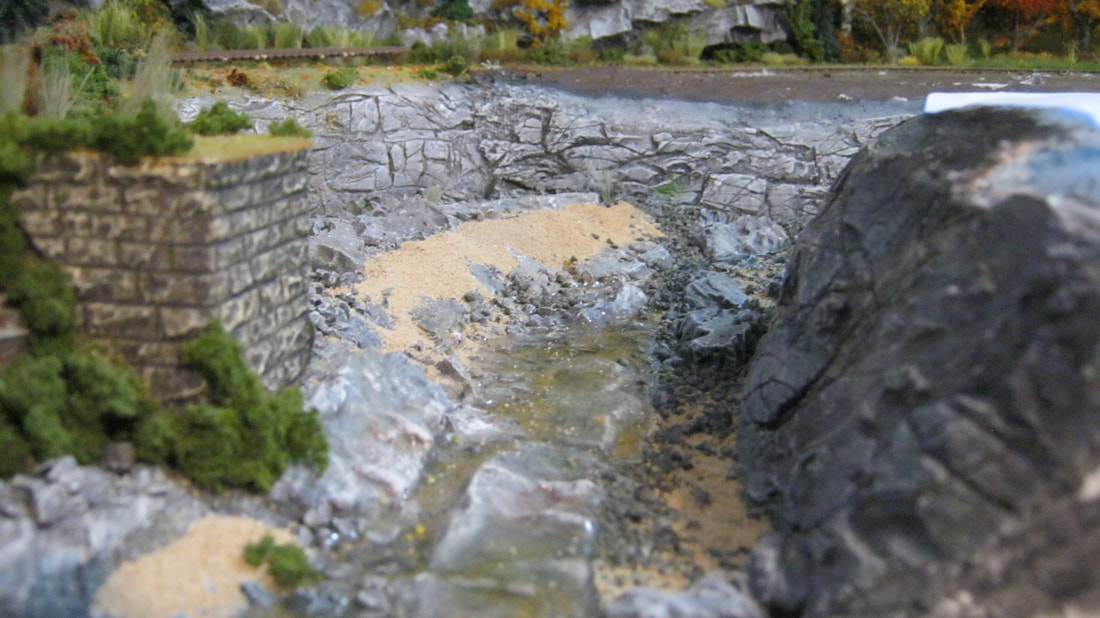
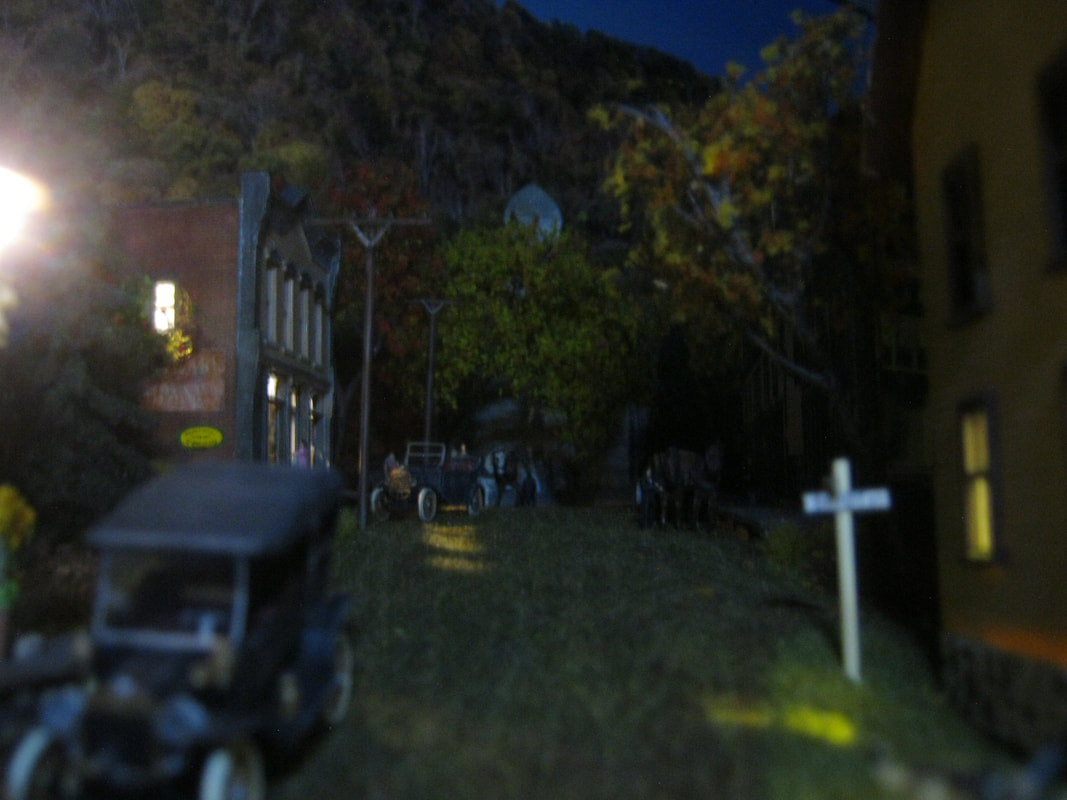
Below left, when you look in the river bottom, notice the left half of the river has water in it, and the right half is dry. This is the joint between the Reeds module and the Phillips module. The Reeds module was built about two-and-a-half years before Phillips, so
|
|
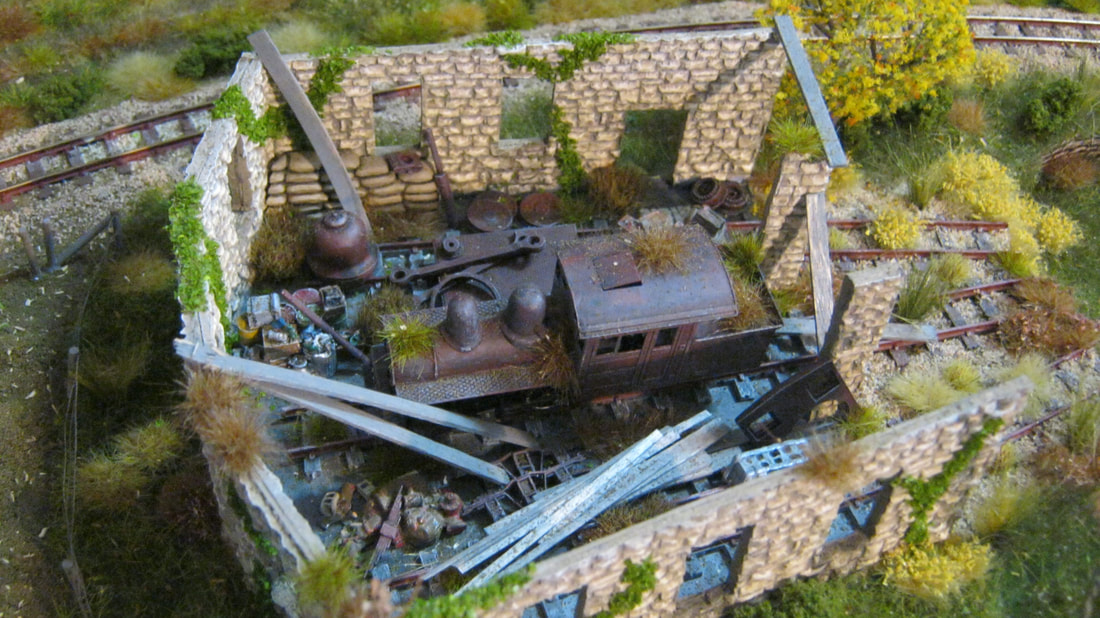
After deciding to leave Ambleside out, I put a mock up of the "Old Stone Fort" north of the bridge, and referred the idea to friends whether they thought it was a good idea or not, and after the 'yeas' came in, I went forward with it. The Old Stone Fort was a roundhouse facility built for the Phillips & Rangeley RR, but it was decided it was unnecessary, so it was never finished. Over the years, it was used to dump worn-out locomotives and other materials. Above is the old stone fort.
|
|
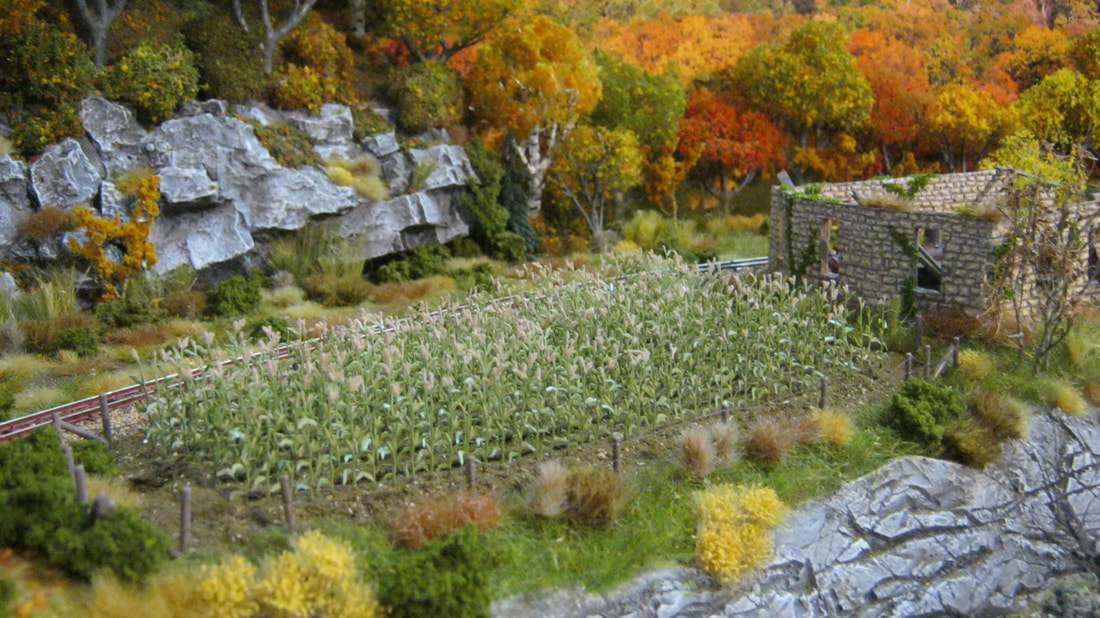
For something that was an after-thought, I'm very happy with the results. Above and below are the details of the scene, with overgrown tracks and turntable pit, rusted components, and an out-of-service forney in the roundhouse. Originally I had planned to use this whole space for a large corn field. I still managed to get the corn field in, and maintain enough space, even with the Old Stone Fort there, between Phillips and Reeds Station to keep the feeling of them being two separate destinations.
|
|
Below left and right, with the riverbed structure of rock and sand completed and saturated with diluted matte medium and dry, then the water is poured in. Alumilite clear gloss casting resin is poured in two layers, one on top of the other, and after it has cured, ripples on the surface of the water as it flows around and over rocks in the river bed are added by brusing on two layers of ripples with Woodland Scenics "Ripples".
After the water is done, more vegetation is added to complete the river. In the lower left photo, that unfinished river bank on the right side of the photo, will be finished with vegetation when the apple orchard is put in place on that side of the river.
After the water is done, more vegetation is added to complete the river. In the lower left photo, that unfinished river bank on the right side of the photo, will be finished with vegetation when the apple orchard is put in place on that side of the river.
|
|
Below left, before the water was poured, the bridge abutments for the railroad covered bridge where added. The structural truss rods protruding from the roof of the bridge have been scratch built and added to the covered bridge kit.
|
|
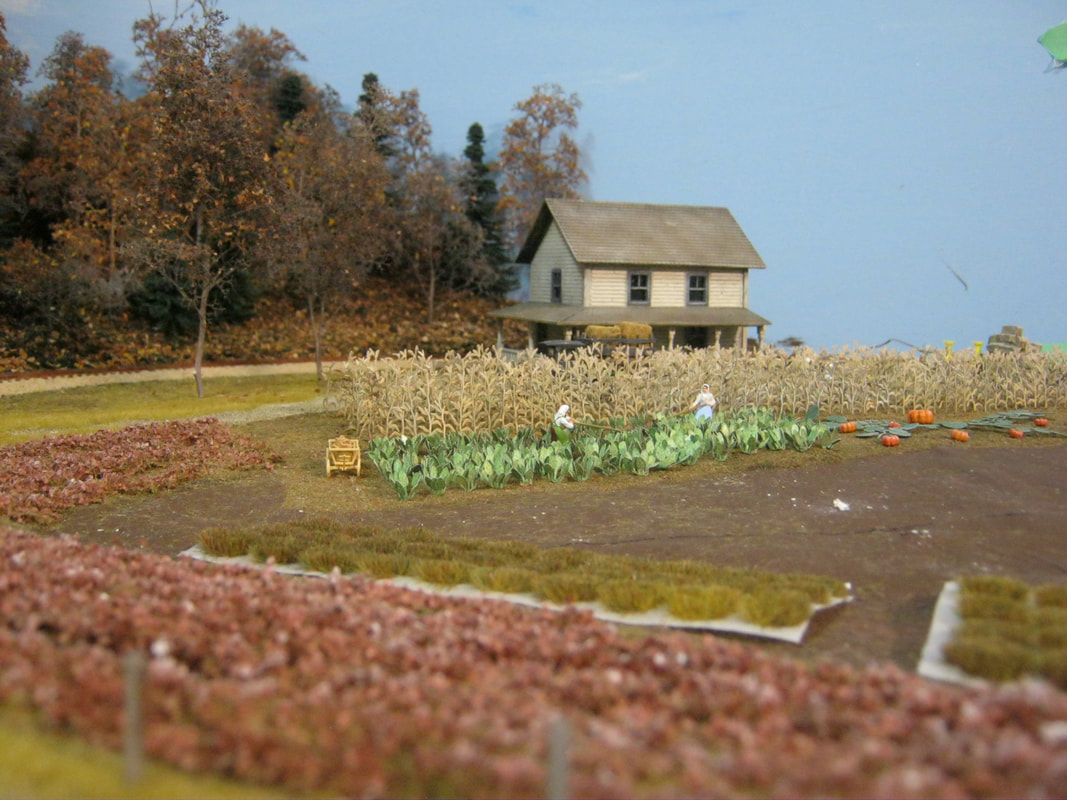
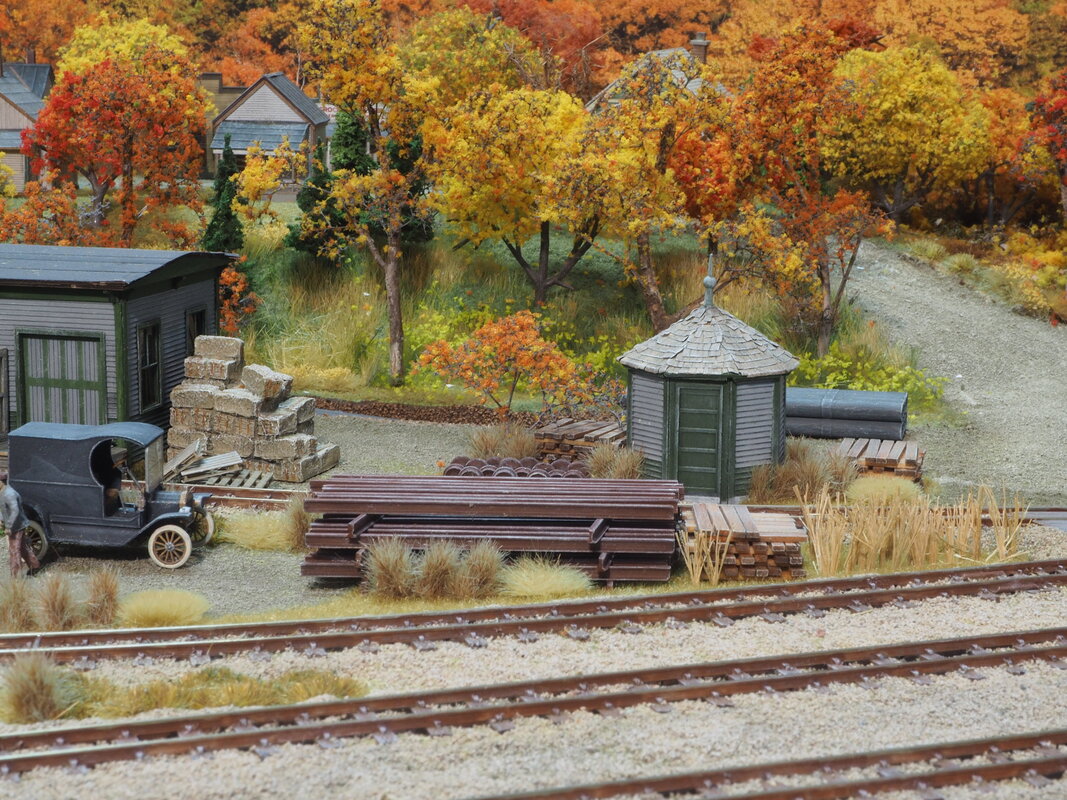
Above right and below left and right are the completed apple orchard on the western side if Phillips. The apple orchard will provide apples for the canning plant in Strong that produced "Pierpole" brand apples. The corn on the other side of the river will proved corn for the other canning plant in Strong. In Maine parlance of the time, these were called 'corn houses', not plants or factories, in the same way that the hotels in Rangeley were called 'houses', not hotels. For instance, The Rangeley Lake House.
The apple orchard is on a hillside that slopes down to the river, helping create the feeling that Phillips is built in a river valley, which of course it is. The hillside was built up with 1/2" thick foam board, shaved down on the river-side with a steak knife, then the contour smoothed out with a thin layer of celluclay where needed. The hill was then covered with a single layer of plaster gauze, and painted a base coat of green. After that dried, another thin coat of green was applied, and then a thin shaking of a mix of Woodland Scenics green and brown turf was applied, followed immediately with a mix of summer green and harvest gold grass flock while the paint was wet. This was followed by a spray of hair spray, and another application of green and gold flock, varying the colors across the base of the orchard.
Following that, tufts of grass, weeds and bushes were applied with WWS, Serious Play, Scenic Express, and other products. The trees are Woodland Scenics armatures, sprayed flat brown, then a light spray of gray auto primer, then given a darker gray wash, then dry brushed with Ceramcoat Oyster. Woodland Scenics poly fiber was then stretched extremely thin and puffy, and wraped around the tops of the tree branches and thinly around the side branches. Hair spray was applied, then sprinkled with fine medium green foam, sprayed again, sprinkled with Noch medium/light green leaves, sprayed again, and sprinkled with Woodland Scenics red fruit (apples). One last spray of the trees with flat clear enamel paint keeps everything in place.
The fence is Woodland Scenics 'barbed wire fence'. The fence is kept taught the whole time I work with it, because if it isn't, the wire will easily bend into irregular shapes that are almost impossible to get out once they're there. The wire was painted with Model Masters 'rust', and the posts given a light dry-brushing of oyster, and then the fence is put in place by poking holes through the shell with a pin, dipping the pins on the post bottoms into super glue gel, and planting them in the holes. When the first post is solidly in place, keep tension on the fence as you go, and then poke the hole for the next post and glue it, doing it one post at a time, to keep the wire from bending. I learned the hard way from the cornfield fence that you have to paint the wire or it isn't visible, and if you don't keep the wire taught the whole time you're working with it, it gets kinks all the way along it.
Just as a final note, looking at the below left photo, measuring from that corner post of the fence to the mountain backdrop all the way to the back, is exactly 29".
|
|
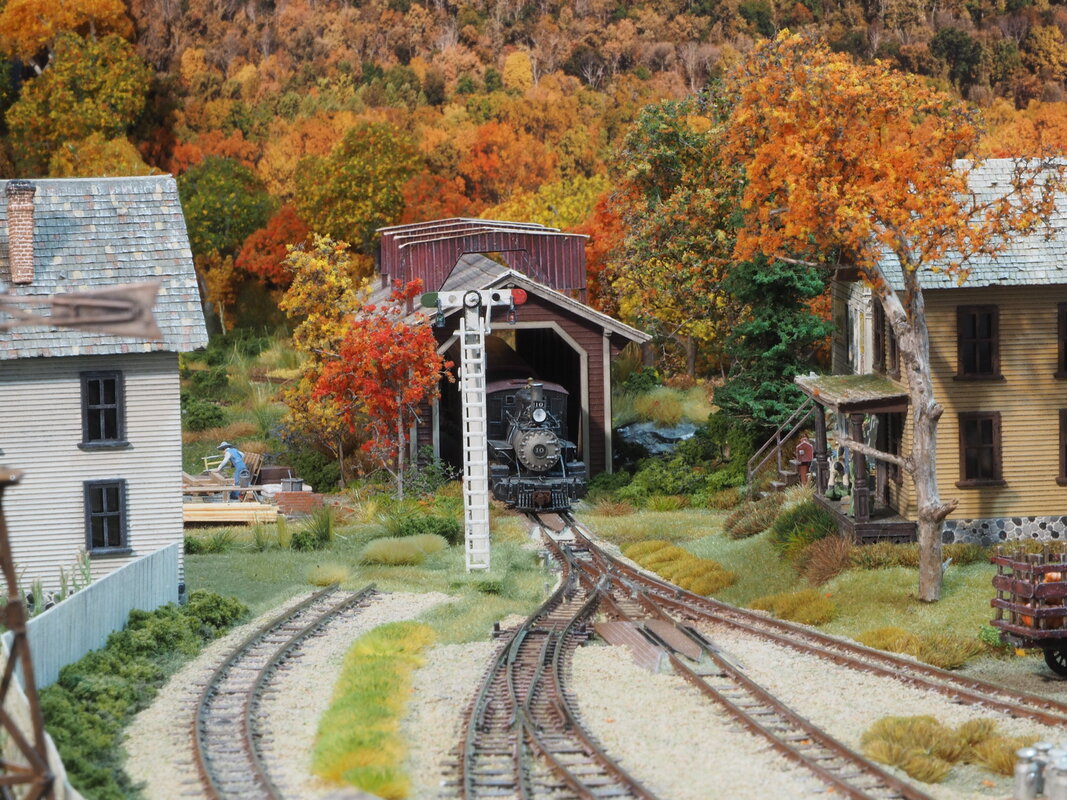
Below is the 'completed' curve from the Reeds module into the Phillips module, with happy little #10 pulling a small consist of pulp racks back up to Langtown for another load of pulp wood.
|
|
Above and below are views of Pleasant Street, that will be part of the background scenery behind the Phillips yard. It is built in N scale, to give a forced perspective of depth to the town of Phillips.

|
|
As seen below, Pleasant Street and the upper portion of Main Street are built as a separate piece, so that I can work on them up close without leaning over the front half of the layout. Once they are done, then they will be pushed back to 1" in front of the photo backdrop and glued in place.
To build up the contour for Main Street, I built up the shape of the terrain with scraps of foam board to fit the base of each structure, then finished it with celluclay. Using scraps allows me to use up unused foam board from larger cuts, custom cutting them to fit small spaces, and saves on the amount of celluclay needed to finish up the contour. This speeds up the drying time as well, since thin layers of celluclay take much less time to dry than thick layers, which can take days.
The structures at the near end will be HO, and the structures at the far end that meets up with Pleasant Street will be N scale. The scenery around them will be tapered in size to help the illusion of distance by forced perspective.
After the celluclay is dry, then a single layer of plaster cloth is applied and the dried plaster cloth sealed with a coat or two of latex paint.
|
|
After all the plaster dries, then the road is added. This was something I tried with a new brand of turf that I'm not thrilled with, but once all the other detail is added it will help draw attention away from the road surface. Foundations for the buildings are made, board sidewalks added, and bushes, grass and trees and whatnot.
Below left, to give the illusion to a deeper scene with a longer street, the near buildings are HO scale, the second building on the left is N scale, and the second building on the right is a flat. It and the church at the far end are actually color photo copies of antique post cards from Phillips, that are glued onto cardboard and cut out. You can see a full view of the post card and full description further up the page.
The sidewalks are made from V-groove plastic and taper from the front toward the back to help with the illusion of distance. The trees are also larger at the front and shorter at the back.
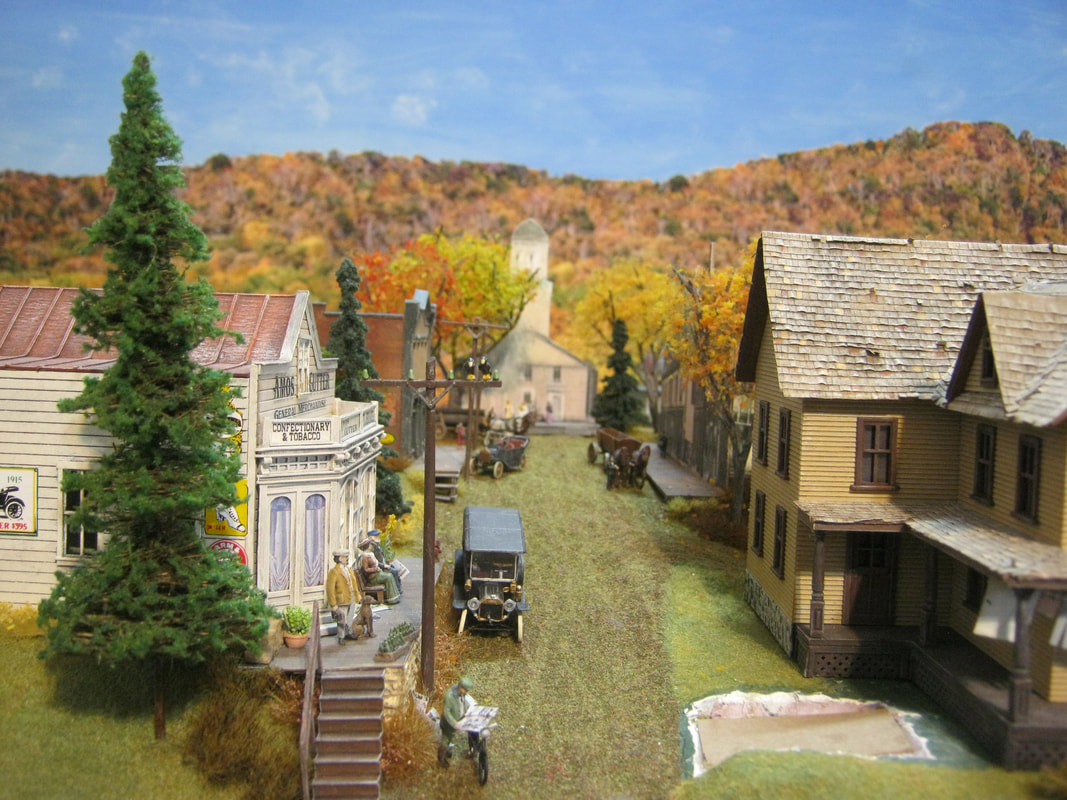
Below right is the view of the back side of Main Street and the junction with Pleasant Street. You can see the back side of the Beal Block, which is the cardboard flat, and the steeple of the Union Church. All the buildings on Pleasant Street are N scale. The trees taper from taller at the front to shorter toward the back. The Model T delivery truck is driving down what will become Depot Street.
Below left, to give the illusion to a deeper scene with a longer street, the near buildings are HO scale, the second building on the left is N scale, and the second building on the right is a flat. It and the church at the far end are actually color photo copies of antique post cards from Phillips, that are glued onto cardboard and cut out. You can see a full view of the post card and full description further up the page.
The sidewalks are made from V-groove plastic and taper from the front toward the back to help with the illusion of distance. The trees are also larger at the front and shorter at the back.
Below right is the view of the back side of Main Street and the junction with Pleasant Street. You can see the back side of the Beal Block, which is the cardboard flat, and the steeple of the Union Church. All the buildings on Pleasant Street are N scale. The trees taper from taller at the front to shorter toward the back. The Model T delivery truck is driving down what will become Depot Street.
|
|
|
|
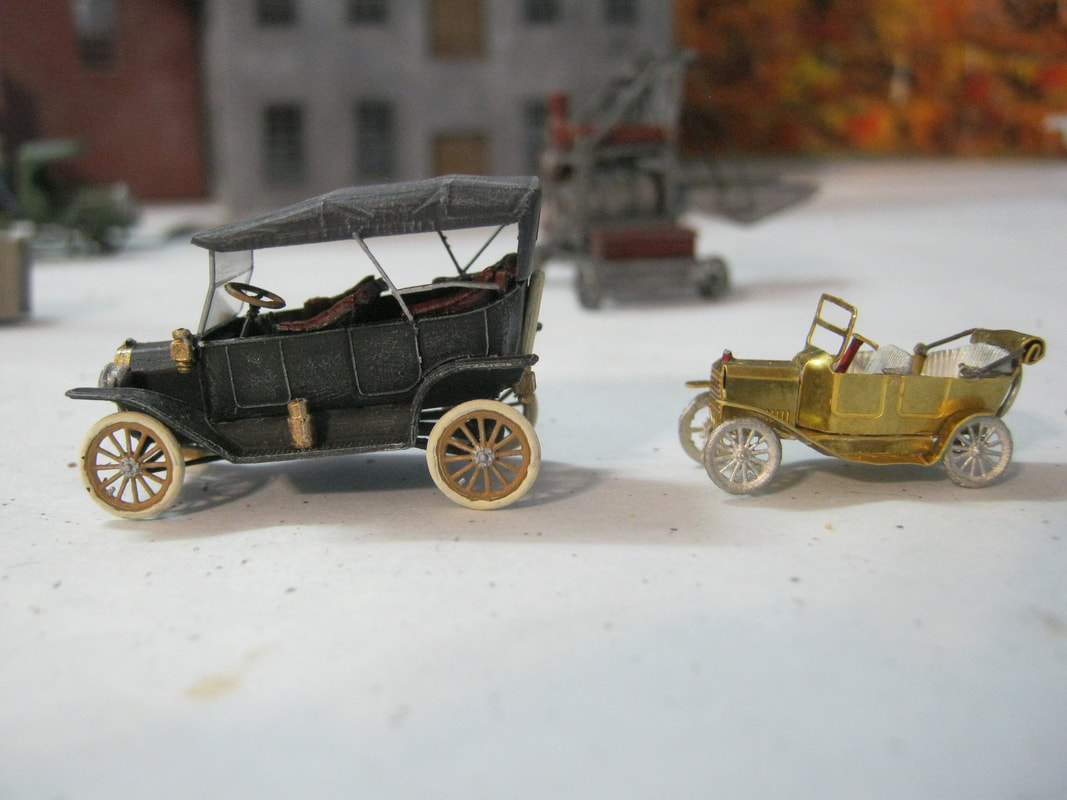
Below left is a comparison of an HO scale Jordan Highway Miniatures Model T kit and an N scale First Editions photo etch and white metal Model T kit. In the lower right photo, the addition of the N scale model T along with N scale horse drawn wagons and people in the background further up Main Street really helps the illusion of a deeper scene, the forced perspective.
|
|
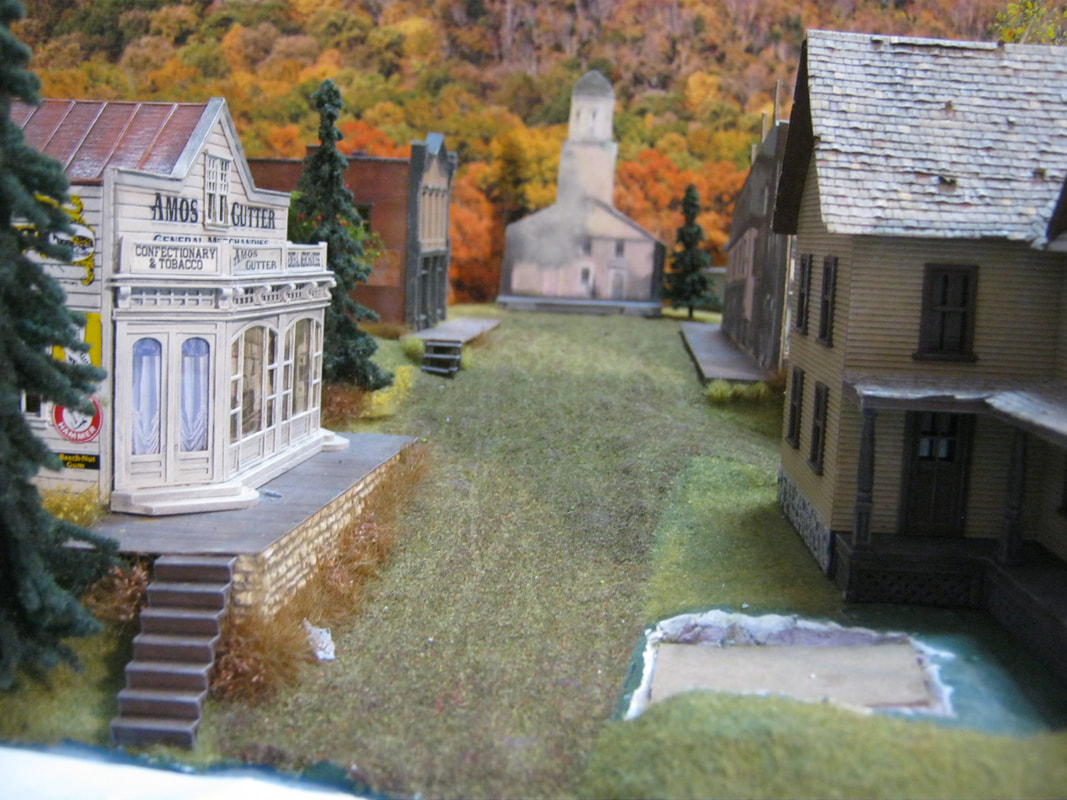
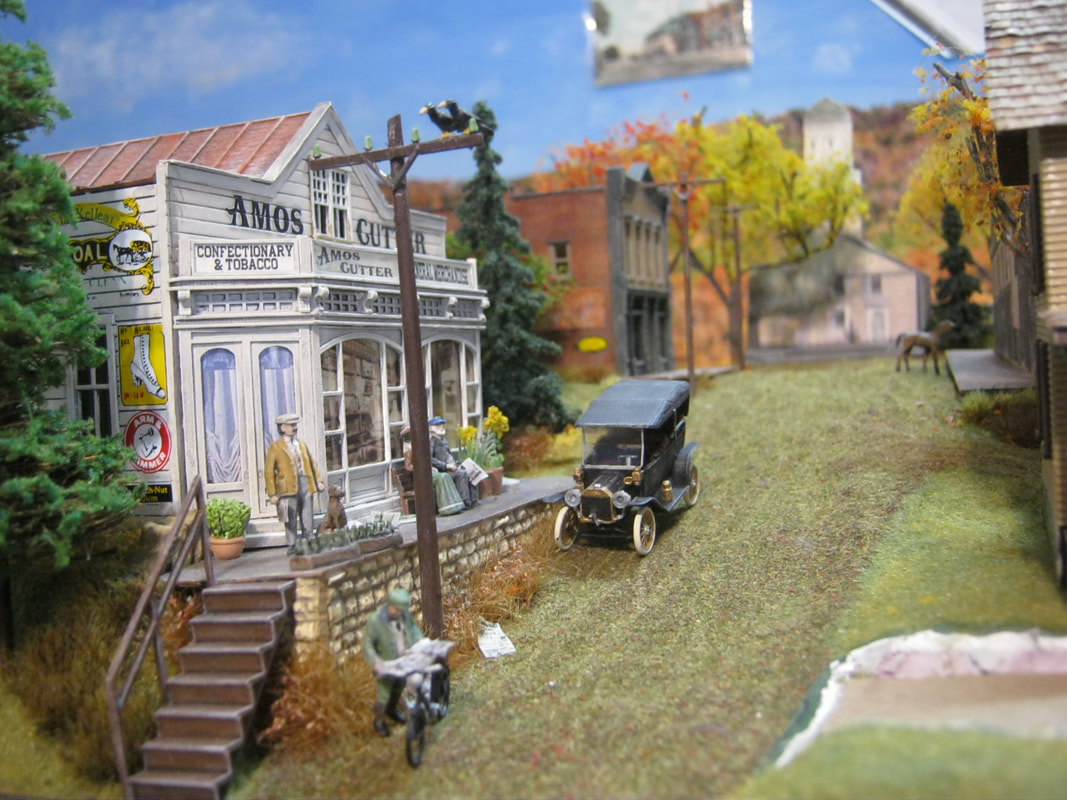
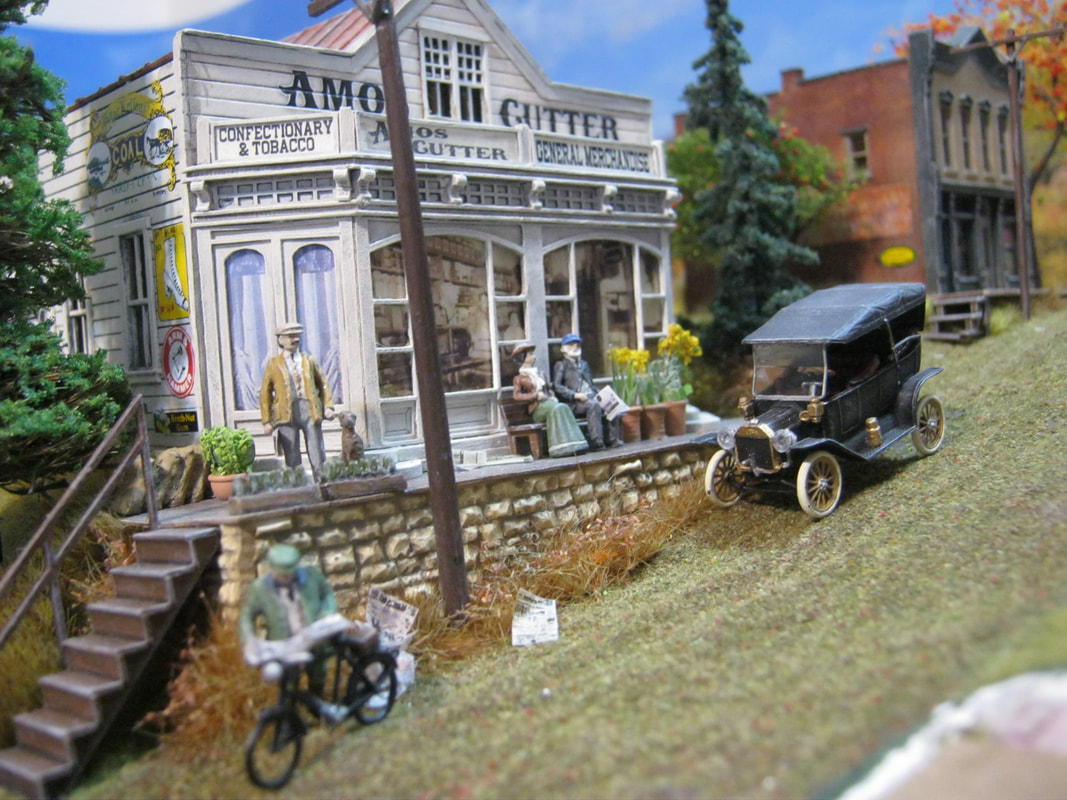
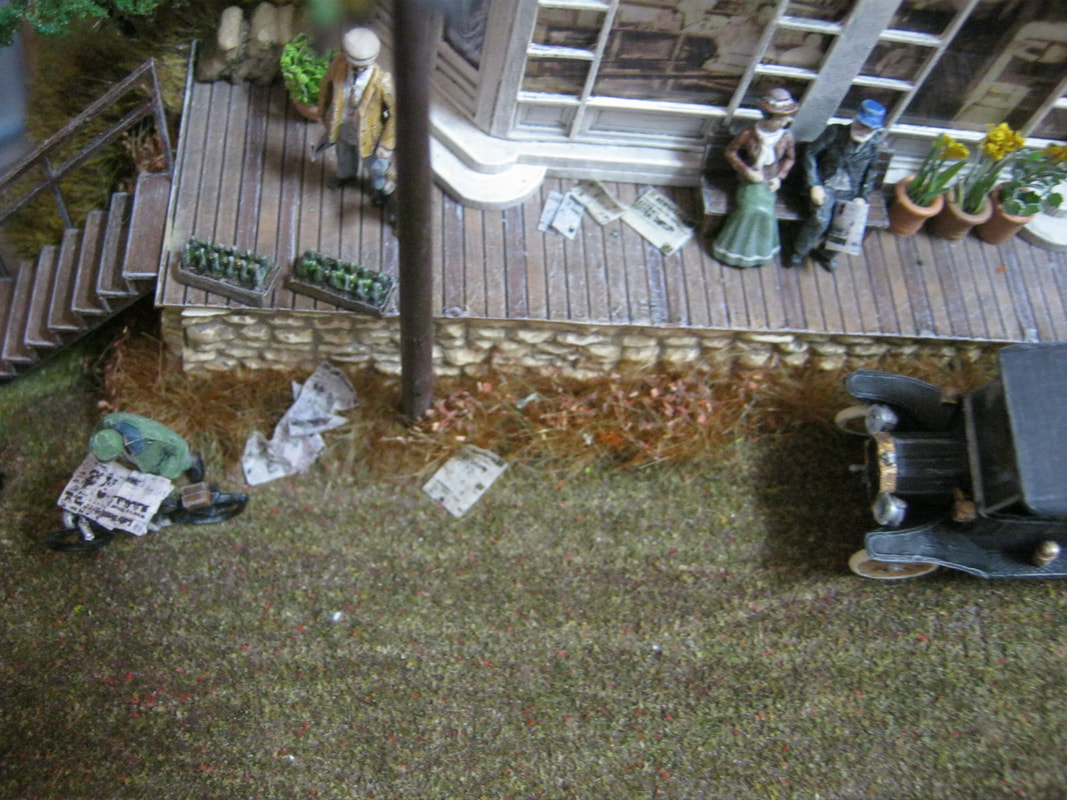
Now detail is being added to Main Street. Everything at the Amos Cutter store is HO scale. All the men are busy with the morning paper, and previous readers have been untidy and left theirs on the sidewalk and have blown into the street. Period dry transfer adds have been added to the side of the store, along with sacks of flour, cases of bottles, potted plants and other details. The two birds on top of the telephone pole are named Heckle and Jeckyl. The telephone poles up the street are scratch built successively smaller to help create the illusion of distance.
|
|
As you can see below, the sooner I get that 3-D model of the Union Church scratch built, the better.
With the background scenery starting to really come together, my next step was to take a scale drawing of the footprint of the Phillips roundhouse and shops, and blow it up on the photocopier in pieces. I then patched the pieces together to make a near-HO scale footprint of the roundhouse and shops, and pin it onto my layout. Luckily, my calculations came out pretty well, and a slightly-compressed model of the roundhouse and shops will work in very well for the layout.
Below left, the mainline will come across Main Street from the north, pass the coal shed on the right, then the depot on the left, and then the car shop, machine shop, roundhouse, turntable, and the ball signal as it heads past the International Mill.
Below right, as the mainline leaves the yard and passes the mill, it will go into a 22" curve past farmland as it heads for the Salmon Hole Bridge and leaves Phillips behind. Note in the photo, I have "Two Feet Between the Rails", volume 2, open to pages with photos of the yard at Phillips. Between maps and photos taped to the backdrop and books for reference, I'm constantly adapting what I'm building on the layout to reflect as closely as I can the original railroad and locations in Franklin County.
|
|
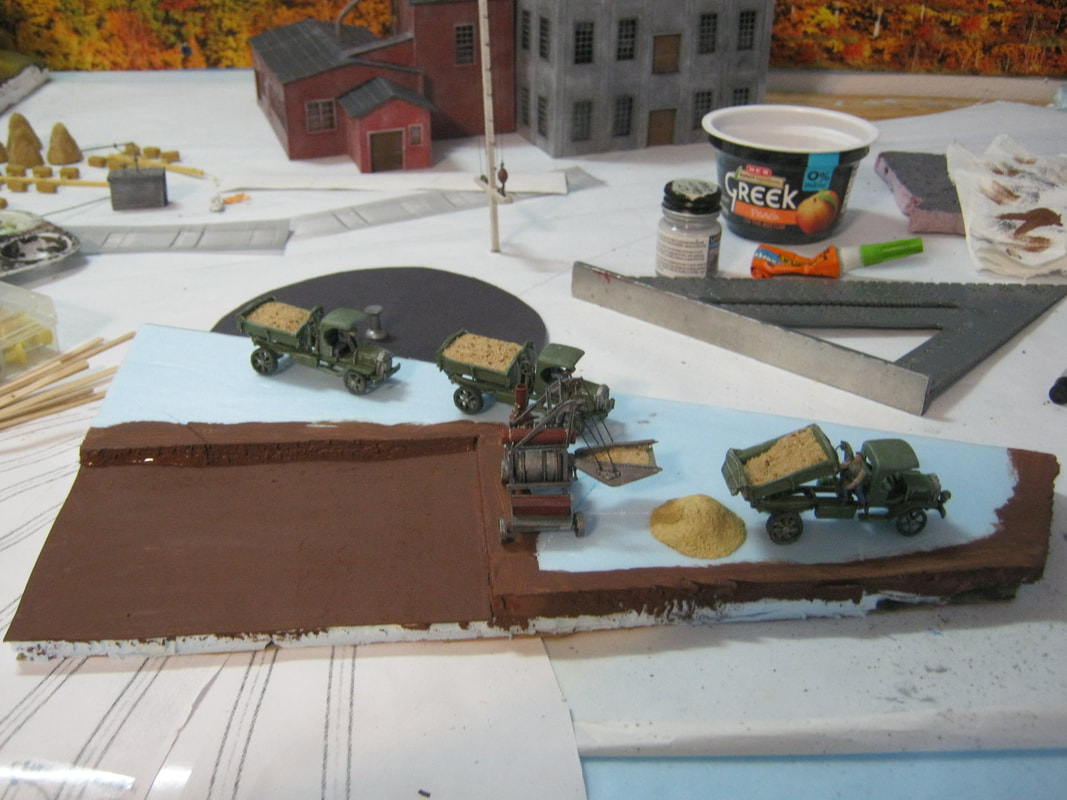
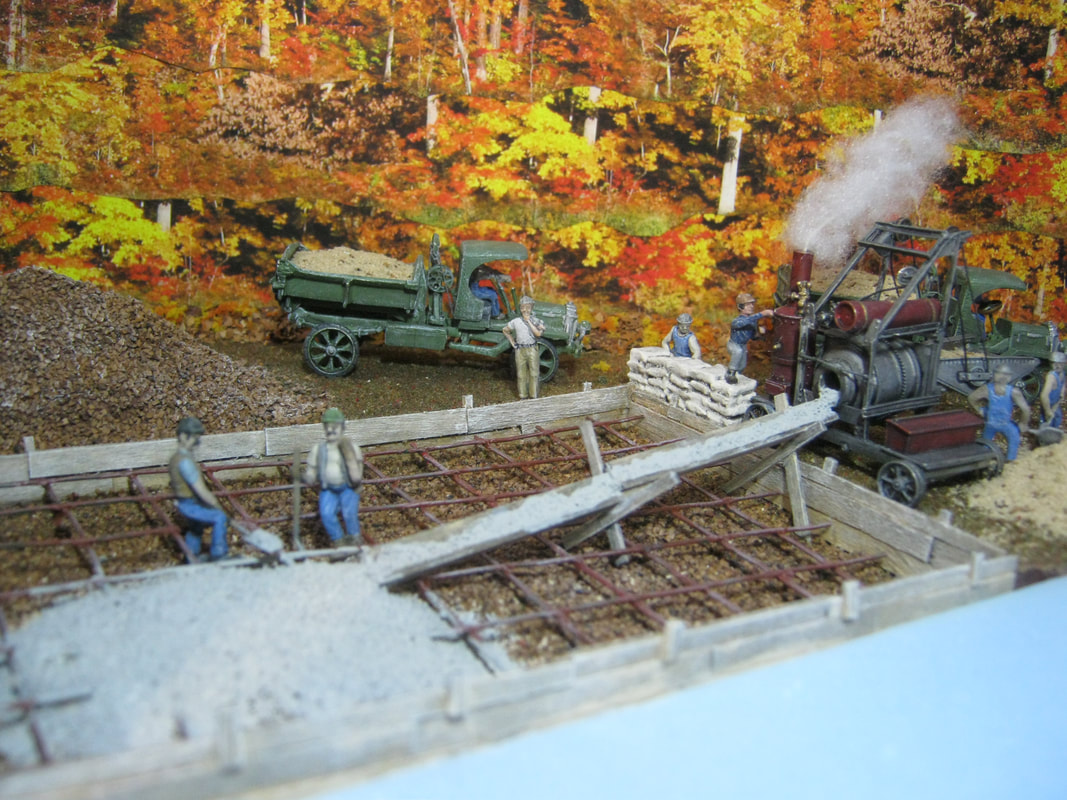
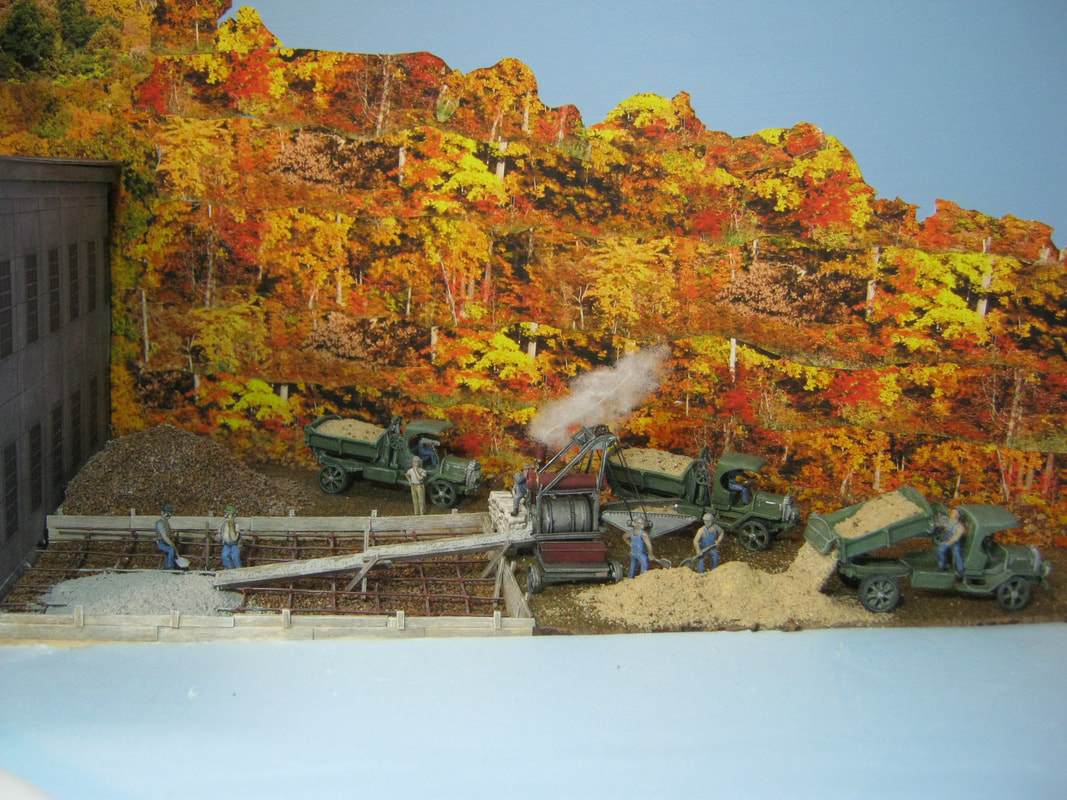
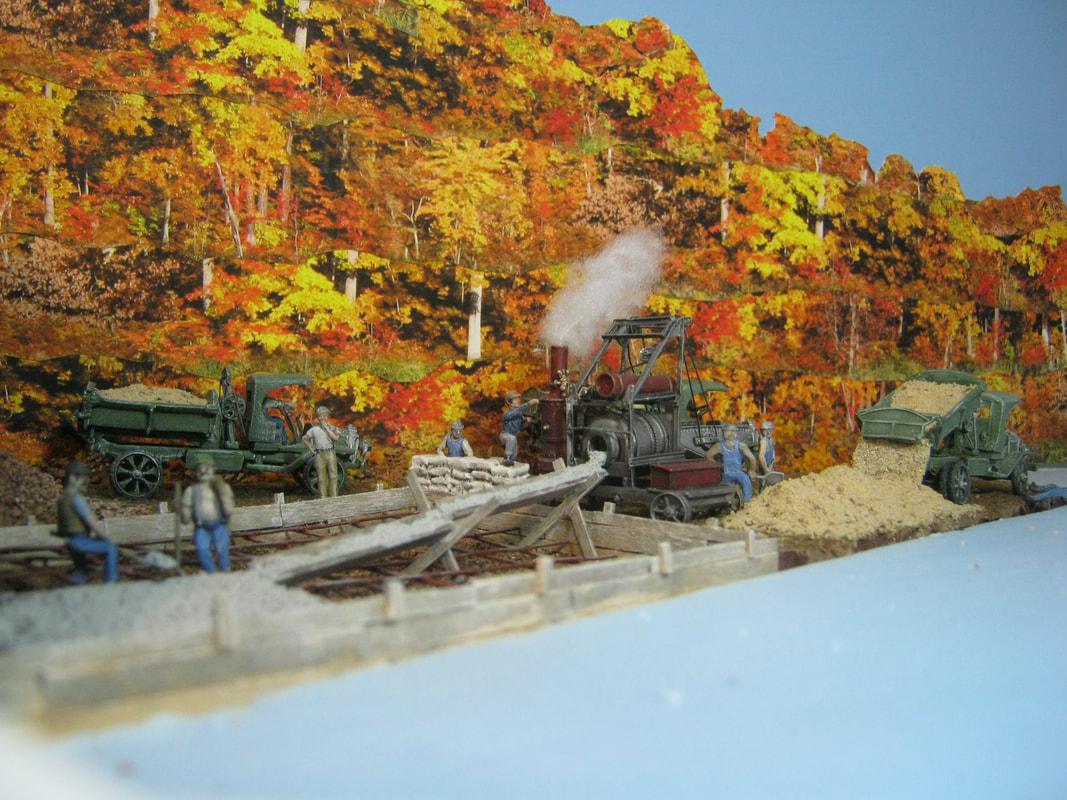
Below left, I have cut out a portion of the foam base where a scene portraying the laying of the concrete foundation for the warehouse extension of the International Mill will be. This way, I can model it easier without having to bend over the layout to do it. Once it's complete, I'll simply glue it back in place, and then lay the roadbed for the track. This way, everything beyond the track will be done, without having to bend over the track to do any of it and possibly damaging the track.
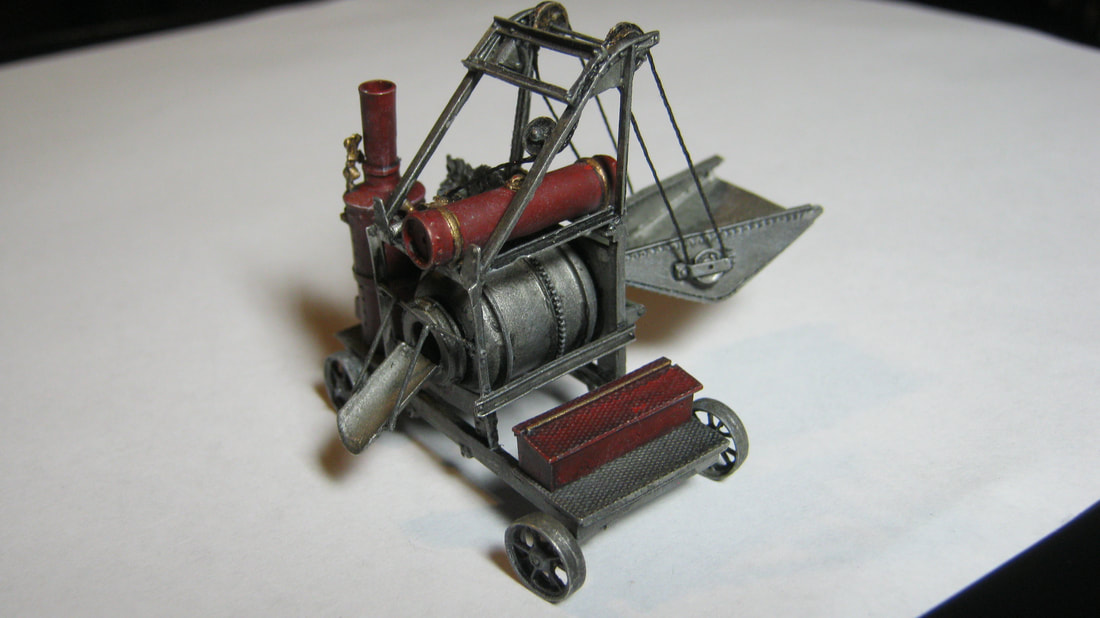
Below right is that chunk of the foam base with the start of the scenery modeling process on it. The scene will have the board formers for the foundation around it, with rebar laced and ready for the concrete pour. Workers will be spreading the concrete which is being mixed in the steam powered cement mixer to the right, and dump trucks are lined up waiting their turn to dump the aggregate in piles, as the lead truck is doing.
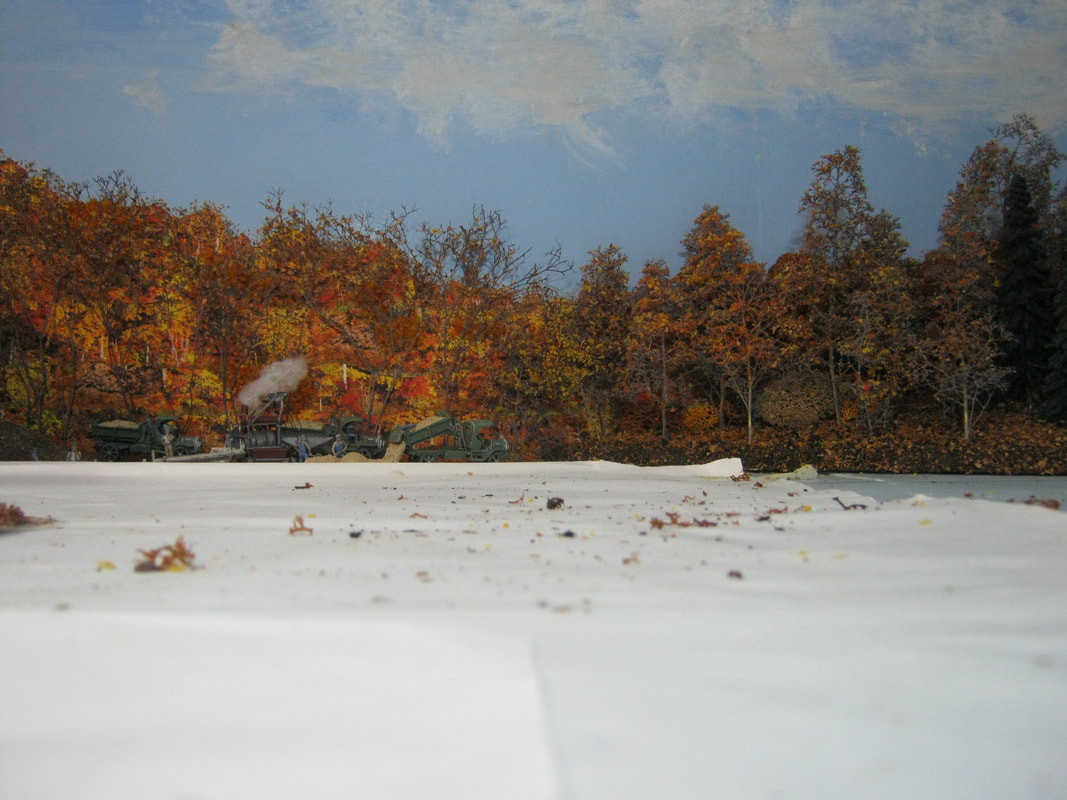
The autumn leaves backdrop was collaged together from the bottom trimmed off the rest of the backdrop to the left. The colors and shadows are too harsh, so I'll brush some matte medium in spots on it and then blow ground foam on to alter the color and texture until I like it. This is a good spot to start transitioning the leaves from the bright colorful scenery to the left of the mill, with the browning and falling leaves transitioning to bare trees to the right of the mill as the scenery goes around the bend in the corner.
Below right is that chunk of the foam base with the start of the scenery modeling process on it. The scene will have the board formers for the foundation around it, with rebar laced and ready for the concrete pour. Workers will be spreading the concrete which is being mixed in the steam powered cement mixer to the right, and dump trucks are lined up waiting their turn to dump the aggregate in piles, as the lead truck is doing.
The autumn leaves backdrop was collaged together from the bottom trimmed off the rest of the backdrop to the left. The colors and shadows are too harsh, so I'll brush some matte medium in spots on it and then blow ground foam on to alter the color and texture until I like it. This is a good spot to start transitioning the leaves from the bright colorful scenery to the left of the mill, with the browning and falling leaves transitioning to bare trees to the right of the mill as the scenery goes around the bend in the corner.
|
|
|
|
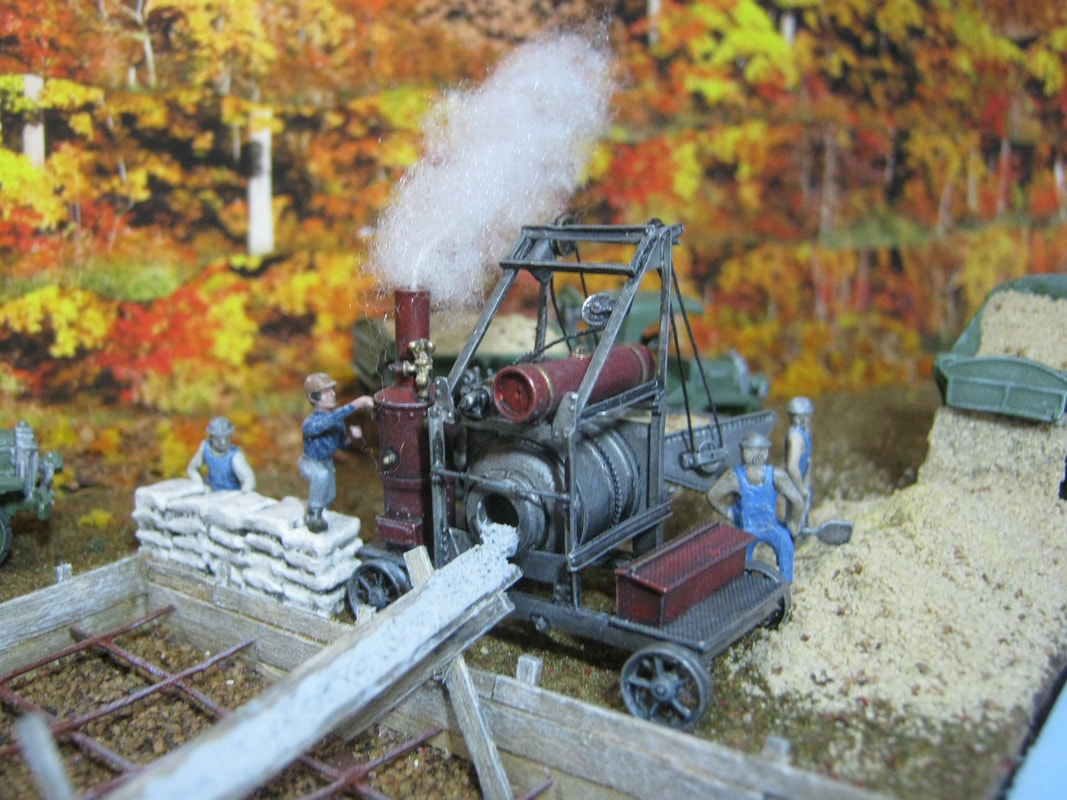
The spoil pile and bottom of the foundation pit are dark course ballast. The aggregate in the dumptrucks and the pile is light fine ballast, and the concrete is light fine ballast painted gray. The formers and chute are made from scale lumber, and the figures are unpainted cheap-o specials from Ebay. The dump trucks are Woodland Scenics kits, and the steam-powered cement mixer is a Wiseman Model Services kit.
|
|
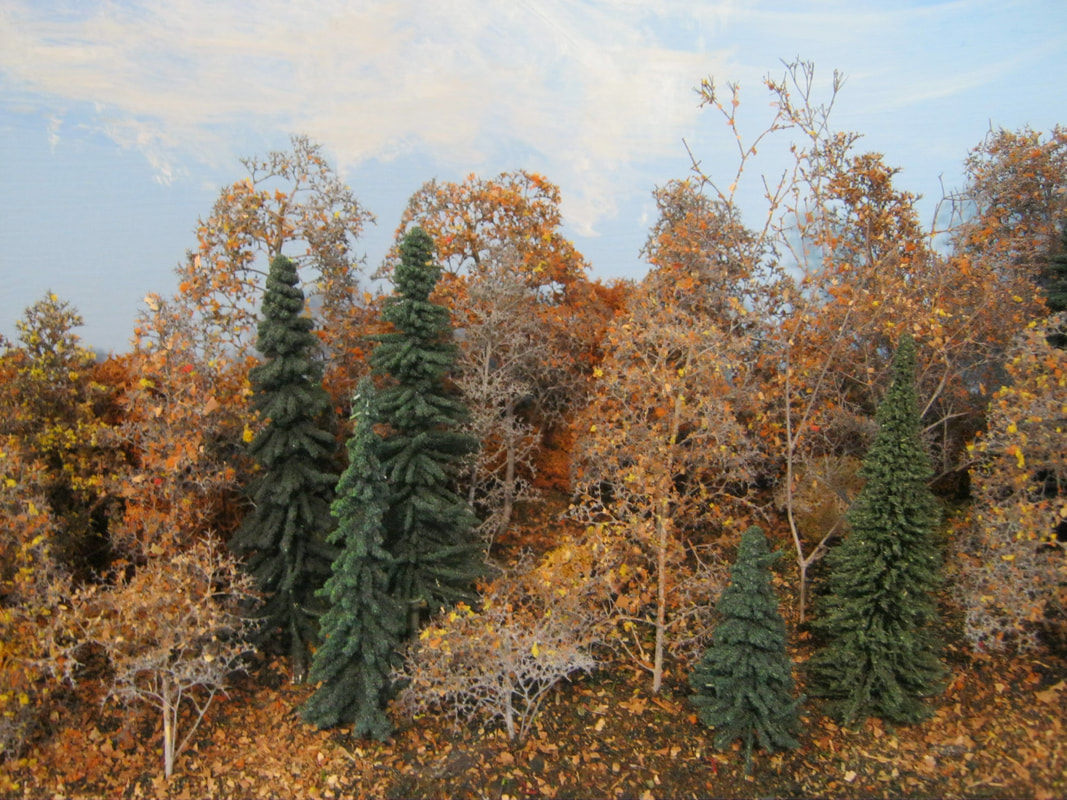
Below left, the colors and shadows of the photo backdrop have been toned down with ground foam and ground up leaves blown onto the matte medium brushed on the backdrop. Some dried and preserved weeds with excellent branch structure have been painted and ground up leaves and ground foam applied to them with spray glue. These are really flat so they fit right up against the photo backdrop, but give a much better 3D effect. The 3D trees to the right of the photo backdrop have been blended with a bit more orange and yellow ground foam to help blend the colors with those to the left.
Below right are the 3D autumn trees made from Super Trees material, sprayed with floral preservative to strengthen them, then sprayed with gray auto primer, then a light spraying of white spray paint from above, and a very light spraying of black spray paint from below, to help 'weather' them and help with sunlight effect above and shadow from below. Then I spray them with hair spray, and sprinkle mixed orange and yellow ground foam, with varied quantities of each from tree to tree. Then I give them another dose of hair spray, and sprinkle them with a dose of ground up leaves. The ground up leaves are literally leaves I collect in the back yard and run them through a blender and then a spice grinder. A final dose of hair spray finishes locking all the foliage in place.
Below right are the 3D autumn trees made from Super Trees material, sprayed with floral preservative to strengthen them, then sprayed with gray auto primer, then a light spraying of white spray paint from above, and a very light spraying of black spray paint from below, to help 'weather' them and help with sunlight effect above and shadow from below. Then I spray them with hair spray, and sprinkle mixed orange and yellow ground foam, with varied quantities of each from tree to tree. Then I give them another dose of hair spray, and sprinkle them with a dose of ground up leaves. The ground up leaves are literally leaves I collect in the back yard and run them through a blender and then a spice grinder. A final dose of hair spray finishes locking all the foliage in place.
|
|
The hill in the corner going around the curve was built up from scraps of foam insulation, contoured with a steak knife, then finished molding into shape with some celluclay. After that, two layers of plaster cloth to give the ground cover something to stick to and it also gives a nice crust to punch through that holds trees in place well.
A heavy coat of brown latex paint, then a heavy covering of Scenic Express 'Dead Fall Forest Debris', which I firmly press down into the paint and let dry for a while. Then I flip it over and dump the excess loose ground cover off for later use. I then sprinkle ground up leaves over it, and give the whole thing a good soaking with a spray bottle of diluted matte medium. After that's dry, then I plant the trees, and glue the completed hill in place. I packed a bunch of brown lychen behind the trees on the hill to preven the blue backdrop from showing through.
Below is the the completed transition from the early-to-late Fall scenery. Not perfect, but not bad, and once the railroad is in place and the foreground scenery added, it will help balance out the whole scene.
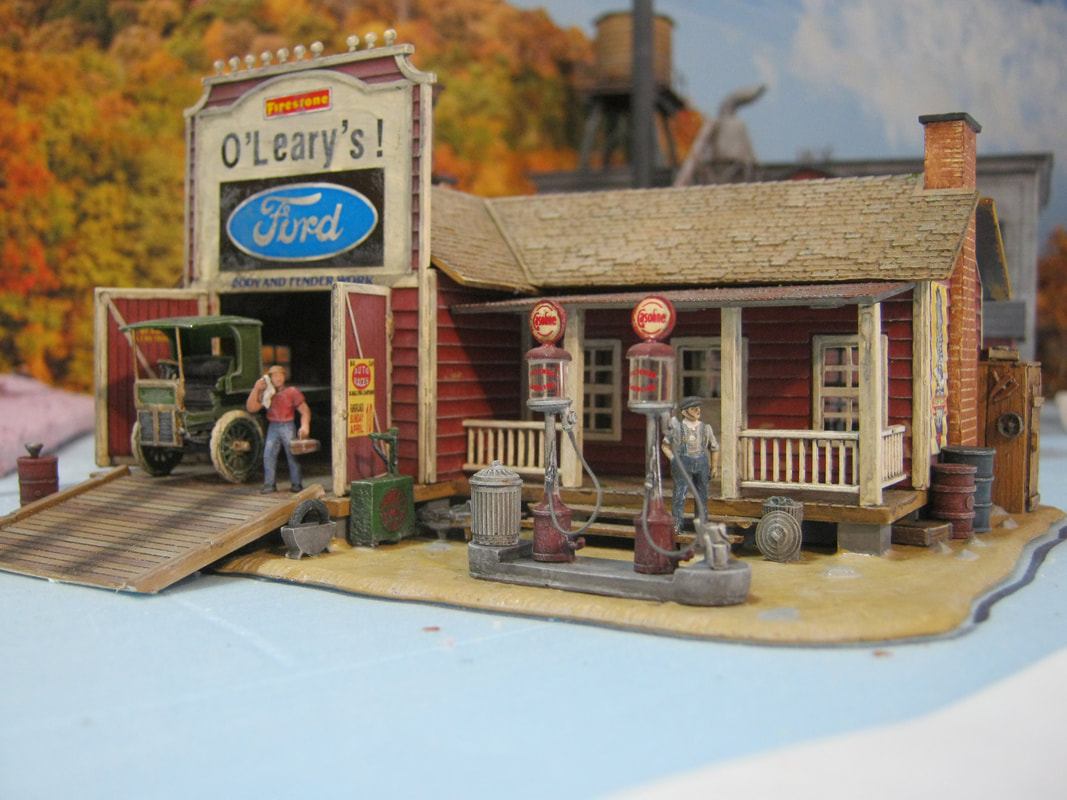
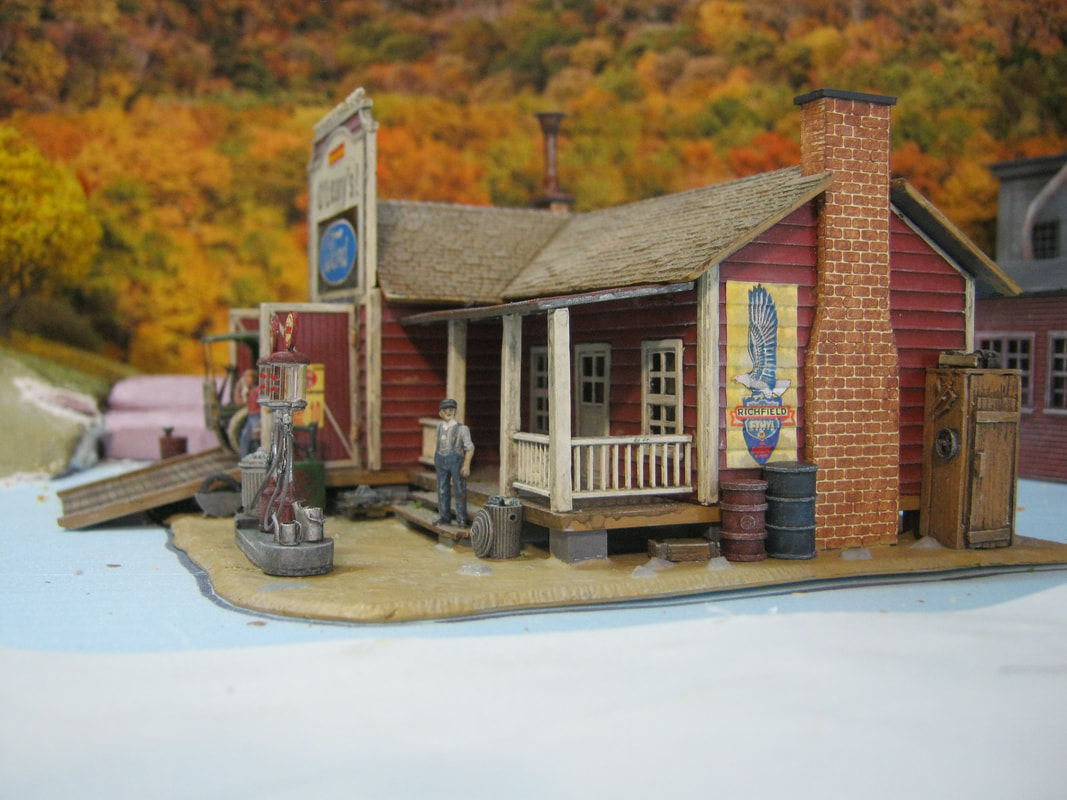
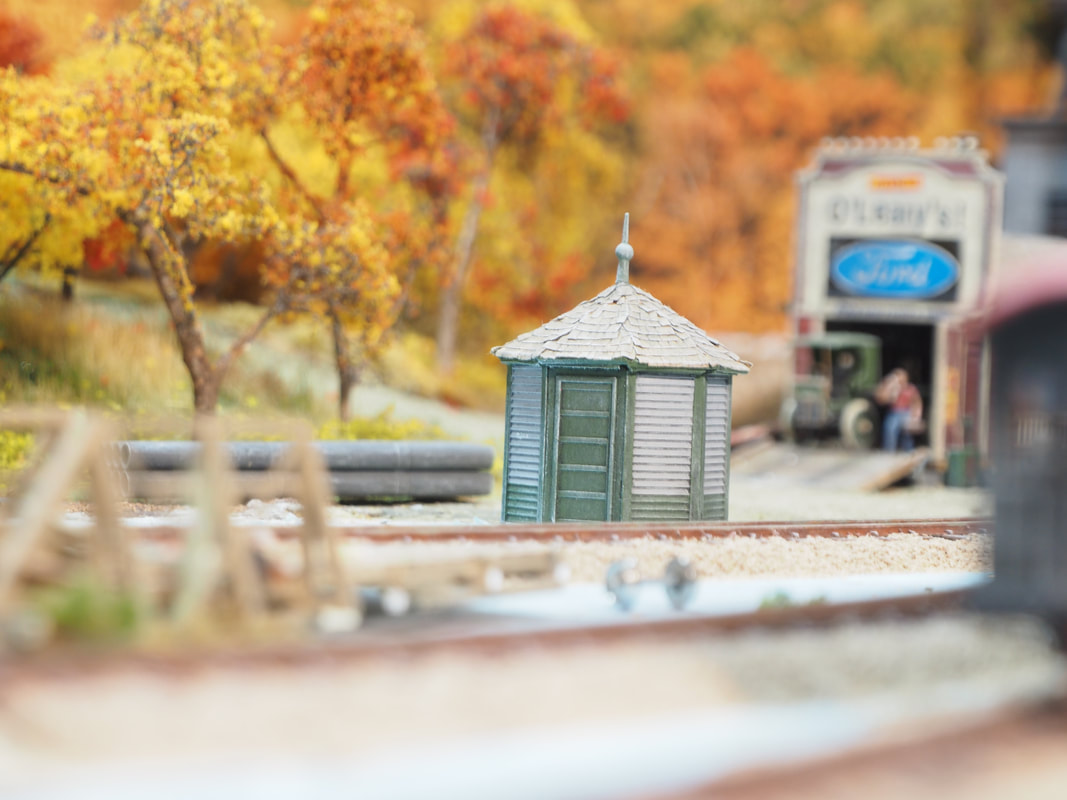
Below is O'Leary's garage and gas station, temporarily positioned where it will be on the layout. If you look closely to the left of the garage in both photos, you can see where the transition of the scenery from Pleasant Street has been started, and to the right is the International Mill. I don't recall the kit this was made from, as I built it a while ago from a kit I bought on Ebay. The gas pumps and other details are from the Master Creations 'Gas Station Details' kit.
|
|
|
|
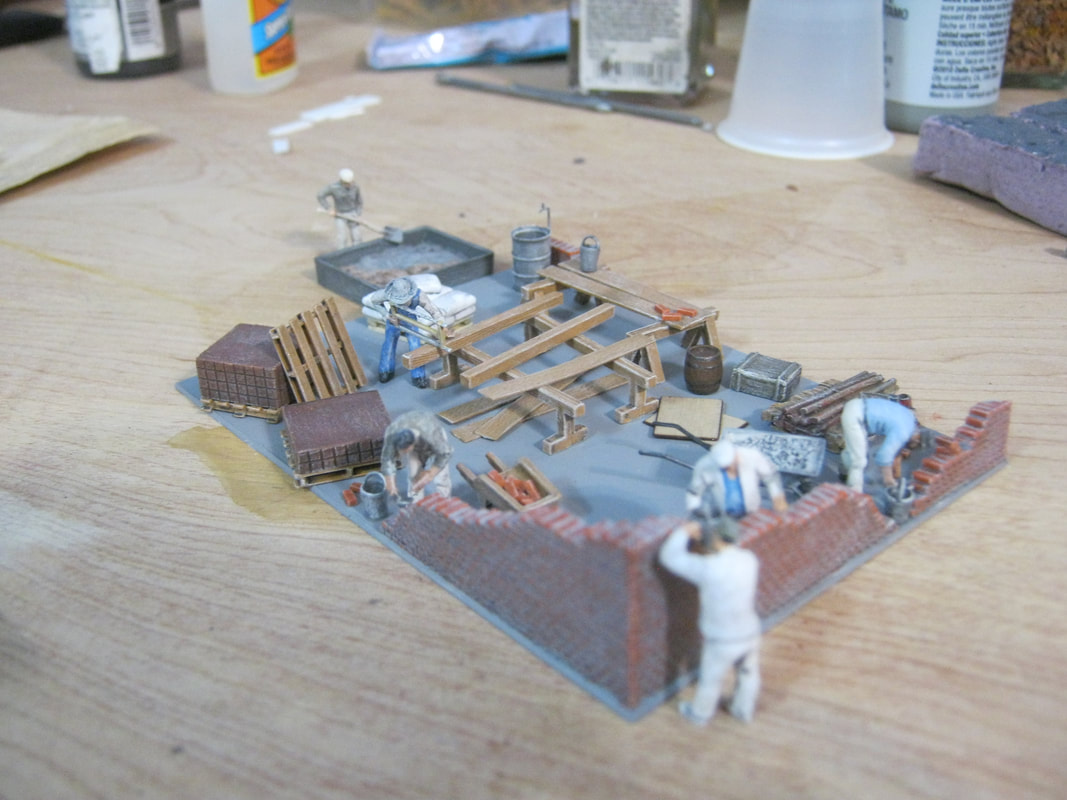
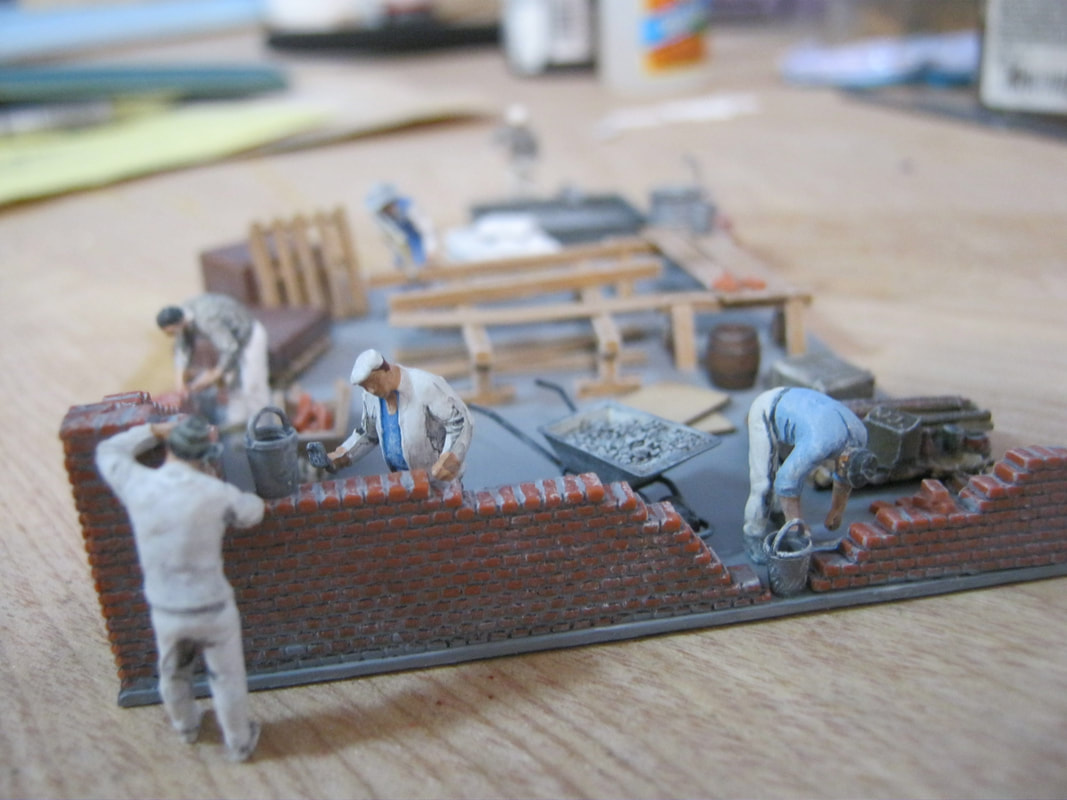
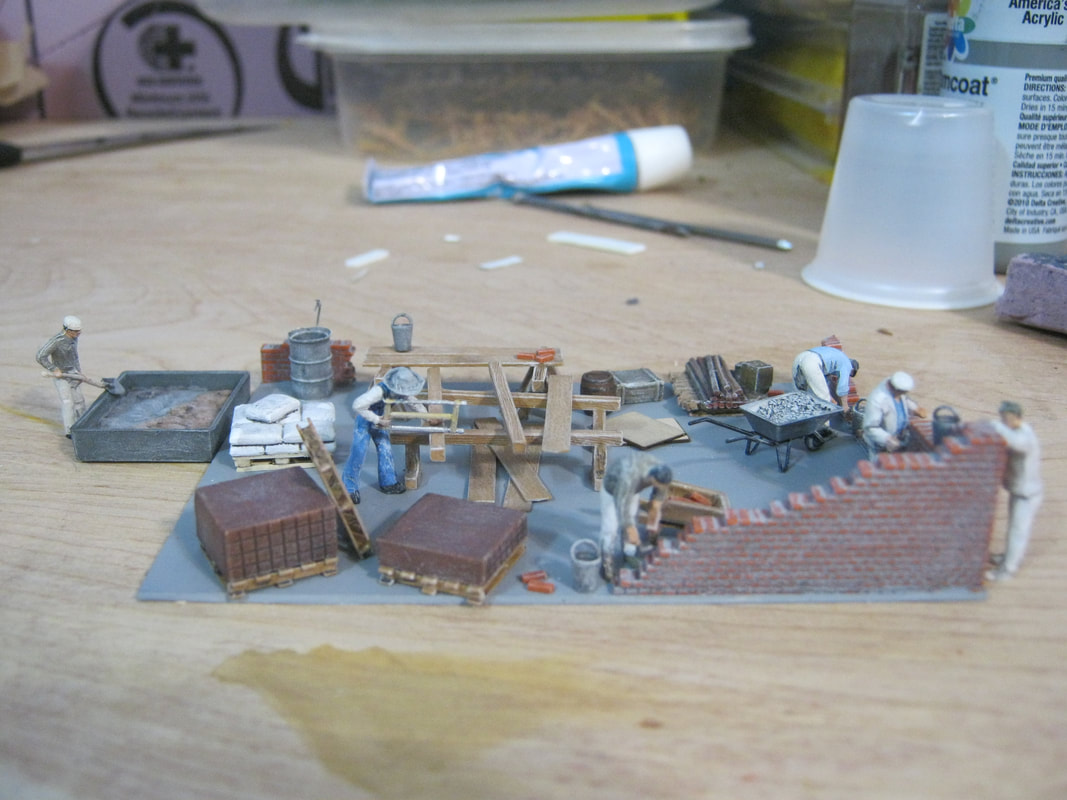
Above left and right, and below left is a building under construction that will be placed on lower Main Street. I had the brick layers and the carpenter, and just had to work them into the layout. I put the scene together on the workbench so I can move it around and work on it up close, and then it will be permanently glued down on the spot where it will go later on.
Below right is the final work on houses and businesses that will go on Pleasant street. The inside walls, floors and ceilings have been painted black, and black craft paper glued inside over joints to prevent light from going through gaps or glowing through the walls. The result is that light will only come through the windows as it should be. Woodland Scenics "Just Plug" self-sticking LED lights are attached up in the ceilings and roofs, and the cords with plugs coming out through small holes in the floors or backs of the buildings. When placed on the layout, the cords will go through holes in the layout to be plugged into the wiring system underneath.
Below right is the final work on houses and businesses that will go on Pleasant street. The inside walls, floors and ceilings have been painted black, and black craft paper glued inside over joints to prevent light from going through gaps or glowing through the walls. The result is that light will only come through the windows as it should be. Woodland Scenics "Just Plug" self-sticking LED lights are attached up in the ceilings and roofs, and the cords with plugs coming out through small holes in the floors or backs of the buildings. When placed on the layout, the cords will go through holes in the layout to be plugged into the wiring system underneath.
|
|
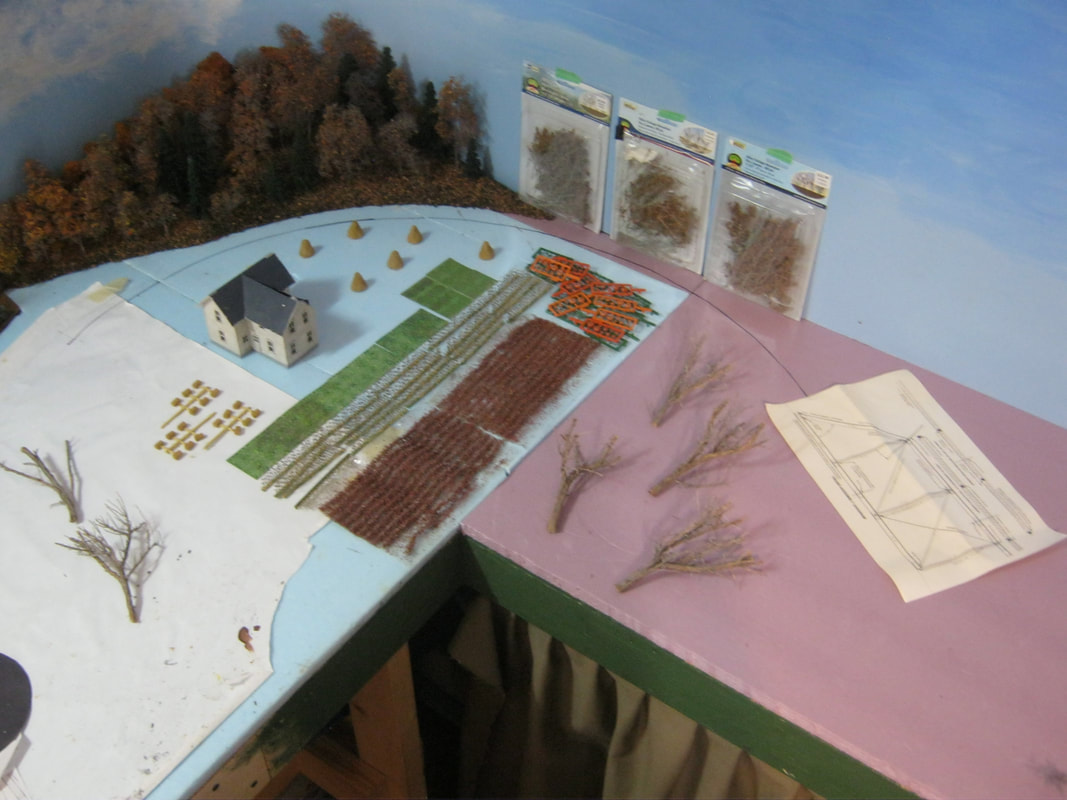
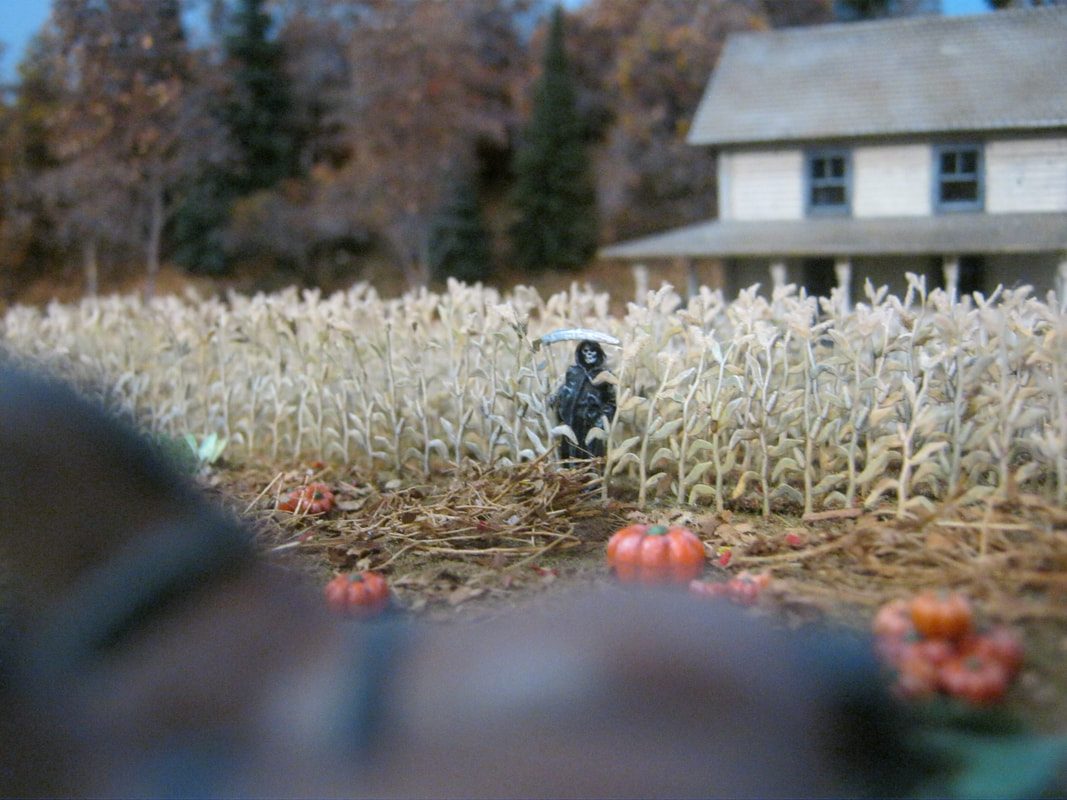
Below left and right, the 22" radius curve for the track has been drawn onto the styrofoam base, so that the track plan can be confirmed before the track is laid. The harvested crops, pumpkins, haystacks, etc., have been laid out just to see how much space they actually take up on the ground. This isn't their permanent arrangement, just for planning how much space is needed for the scenery, and the arrangement of them will be figured out as I go. The girder bridge template for the Salmon Hold bridge over the Sandy River is placed, to help plot out how much space will be needed for the river and bridge, and what angle it will need to be emplaced in as it comes out of the curve.
While visualizing the scene for this section of the layout, I can get a better idea of what the backdrop should look like, and then search on the various websites of the backdrop suppliers for an appropriate one that will work into the scene the best.
While visualizing the scene for this section of the layout, I can get a better idea of what the backdrop should look like, and then search on the various websites of the backdrop suppliers for an appropriate one that will work into the scene the best.
|

|
|
|
Above and below left, the lighting has been added to upper Main Street and Pleasant Street, and that scenery element is now glued down permanently onto the layout.
|
|
Above right, with the background scenery for the most part done, I am now finally laying track in the yard and bend to Salmon hole. Still waiting on a three-way turnout to arrive that I decided was necessary to make the north end of the yard work before laying the rest of the track.
|
|
While waiting for the turnout to show up, I couldn't help putting some rolling stock onto the track to get a good feel for how it will look on the finished yard and pondering switching operations in the future.
Below left, with the road bed and track in place on the south half of Phillips, the backround scenery and track are protected with paper while the foam base is carved into shape, plaster cloth shell is applied, and a base coat of brown paint seals the plaster.
|
|
Below left, with the plaster cloth shell now in place, the track is ballasted, ties painted brown, and rails painted rust. Below right, the farm in the bend of the track is now developed, with a farm road, ditch, stone wall and fence dividing the farm from what will be the turntable and roundhouse on the other side of the stone wall.

|
|
|
|
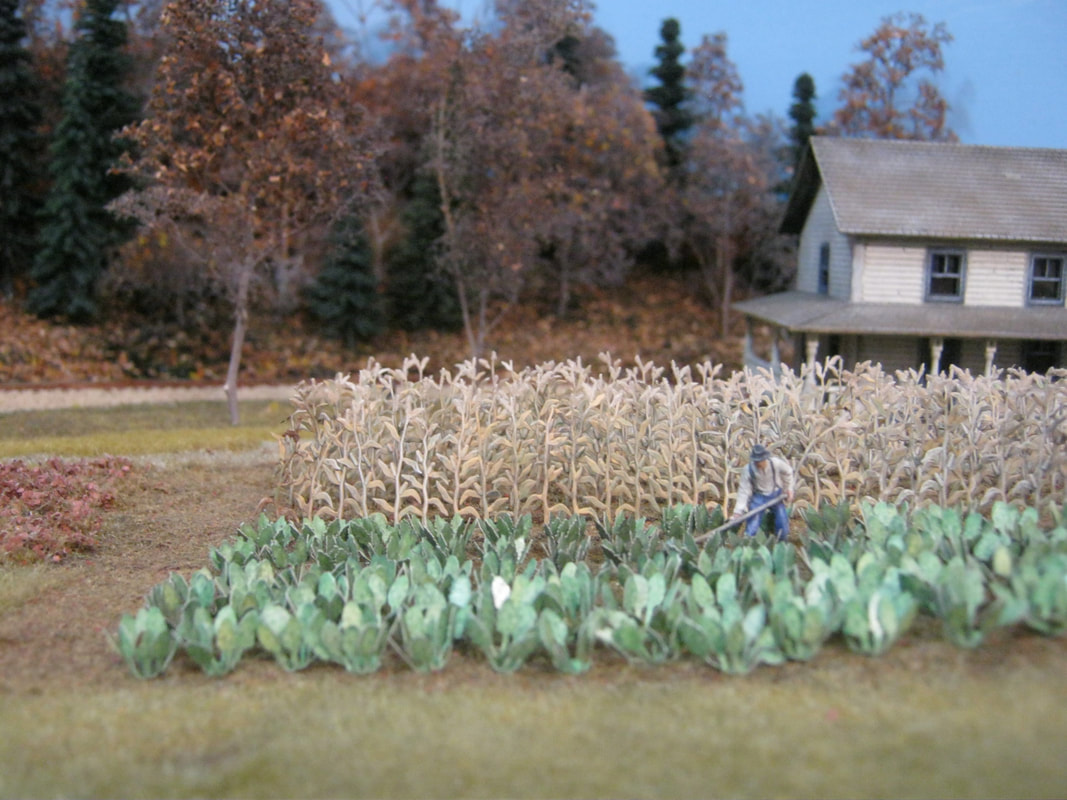
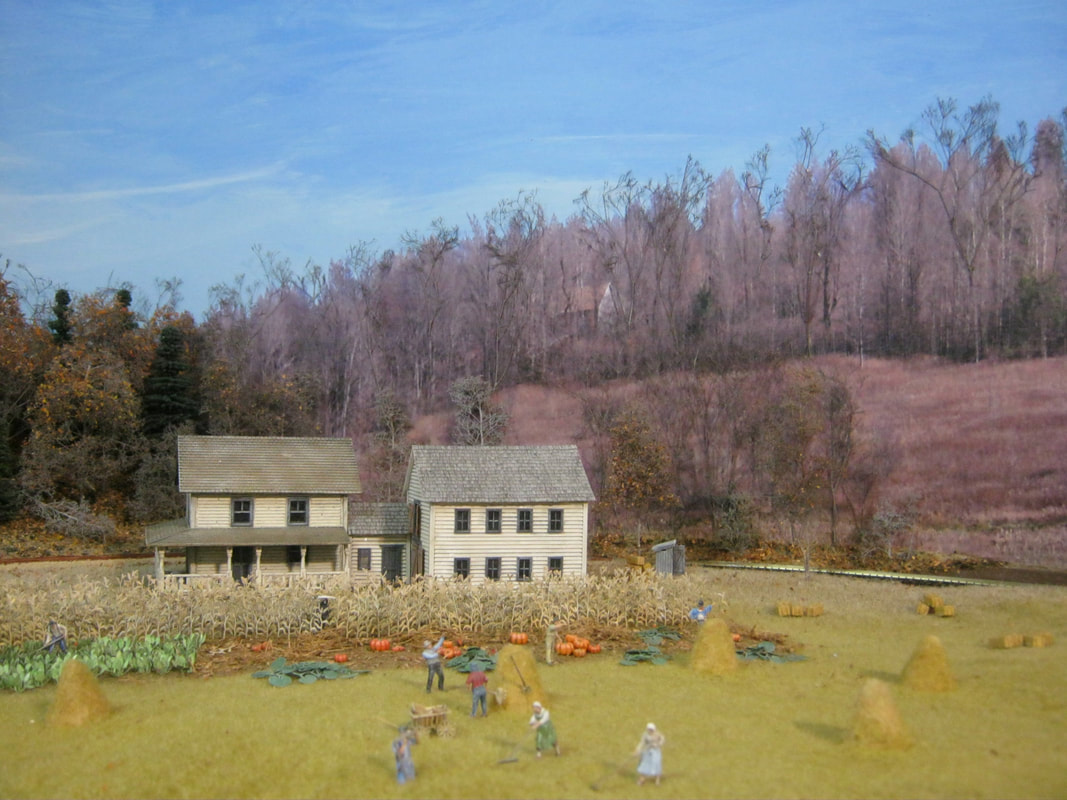
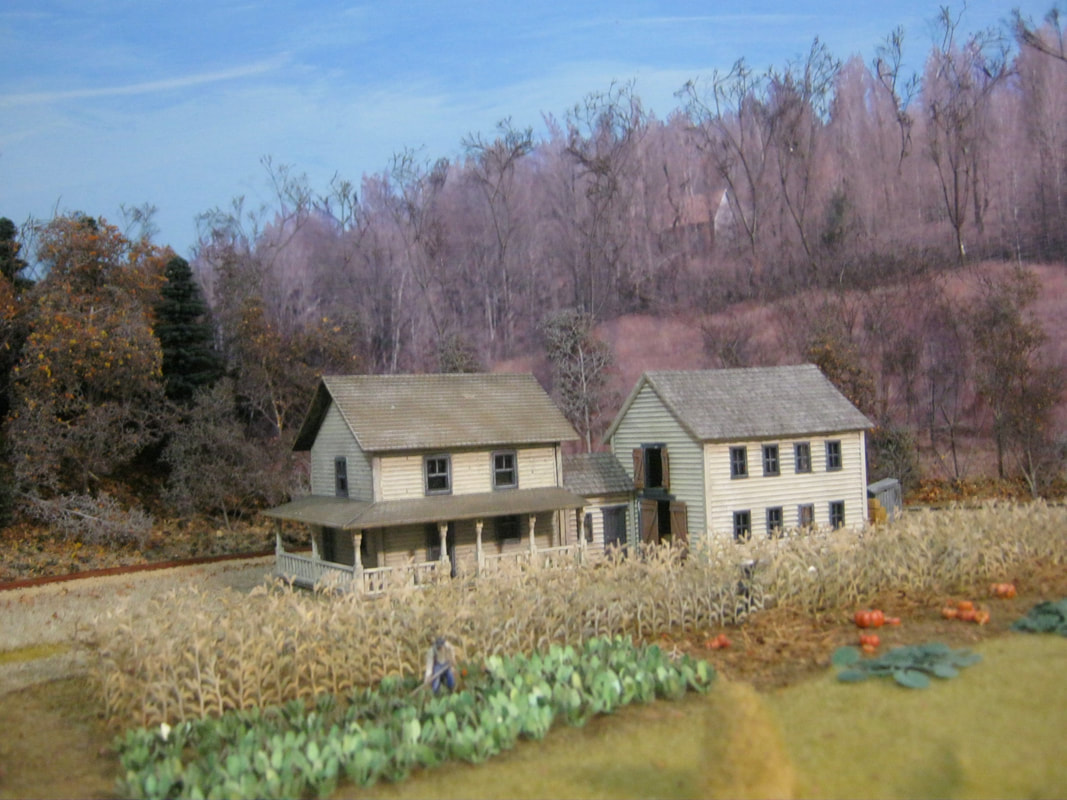
Above left and right, rows of beets are ready to be harvested, the corn has already been picked, cabbage has been planted, and pumpkins will be in the process of harvesting. The low ground between the beets and the ret of the crops will be filled with a boggy feature, and the farm will be named "Soggy Bottom".
|
|
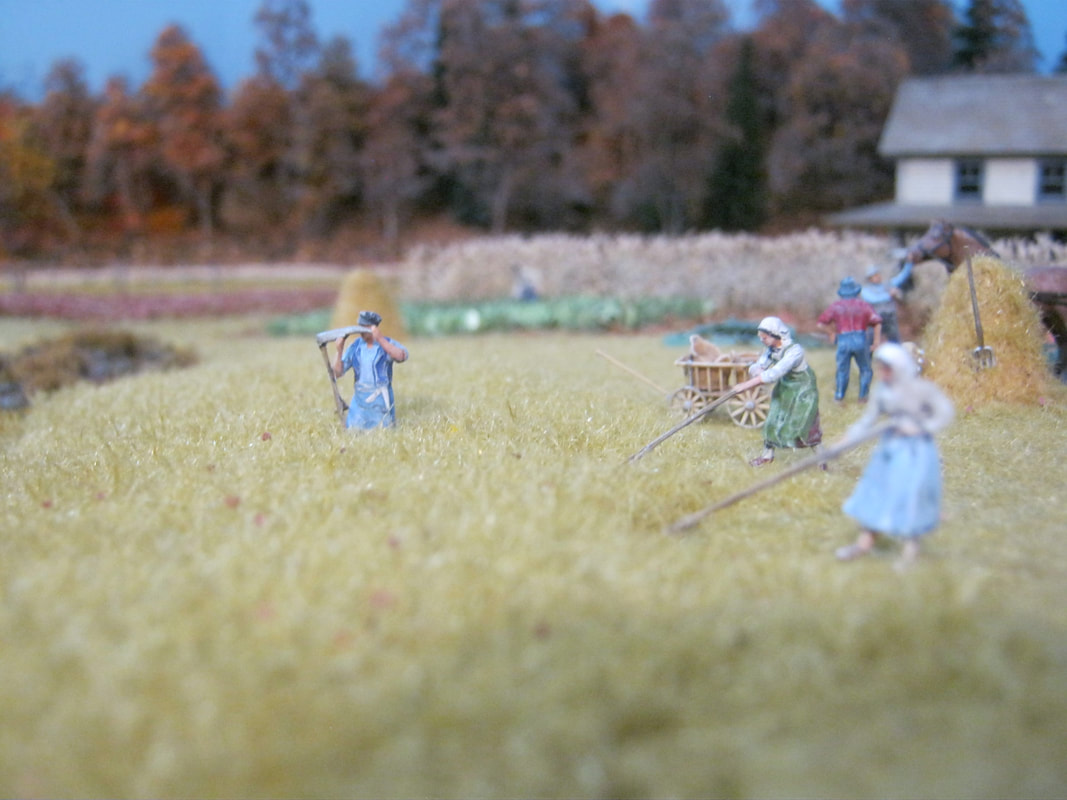
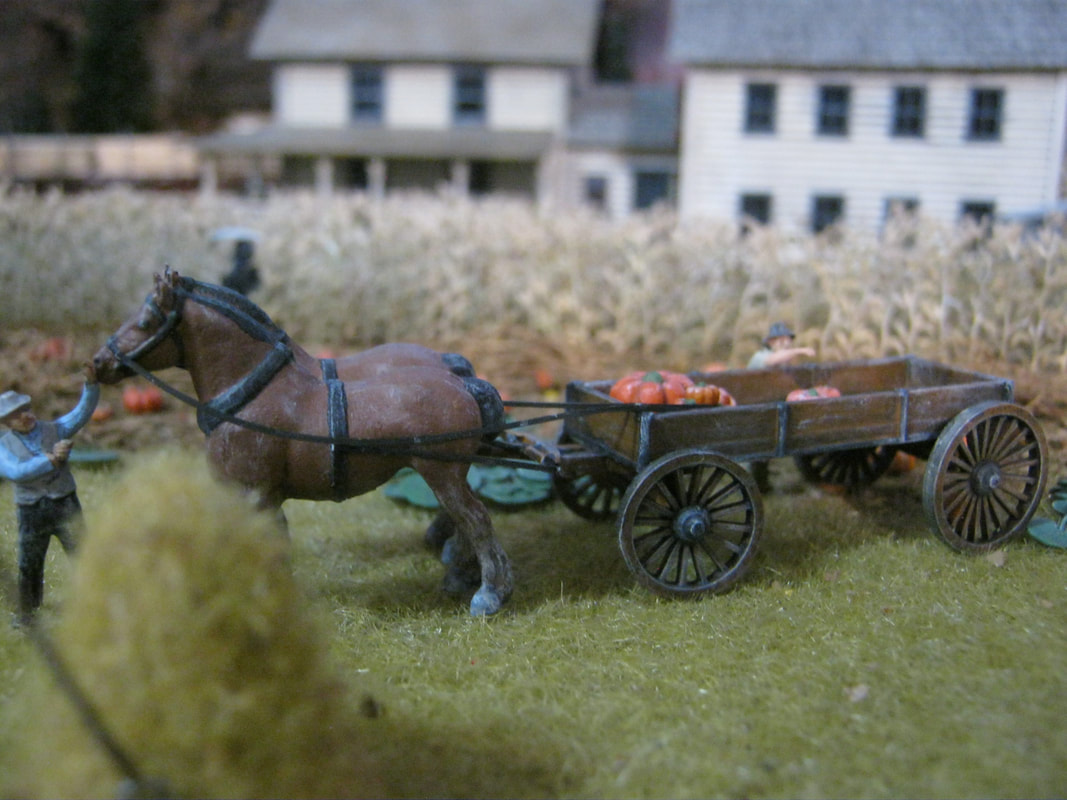
Above left is a view from the farm toward the International Mill. Above right, family and farm workers are busy cutting hay. Below left, pumpkins are loaded into a wagon to be brought to market. Below right, working the cabbages.
|
|
Below left, the Soggy Bottom boys aren't the only ones doing some reaping. Below right, the backdrop from LARC Products has arrived, and it's been applied to the sky-painted masonite backing. This goes a long way toward making the scenery complete.
|
|
The barn and mud room are both scratch built. The tops of the trees on the backdrop were rather blurry, and backdrop sky was too dark a blue to blend with the painted sky on the masonite. I took two shades of blue and blended them as I moved along the backdrop to match the painted sky, with a 000 brush, and painted lines into the photo backdrop to help define the bare branches of the tree tops and match the blue. After that, I took pressed preserved baby's breath painted gray and brown, and glued them directly onto the photo backdrop(using Gorilla spray adhesive sprayed onto the back side of the baby's breath) to add depth to the photo and improve the look of the bare tree tops, with the fine branches of the baby's breath.
|
|
To blend the photo with the 3D ground scenery, I put a wedge of foam between the tracks and the backdrop, painted it and sprinkled course turf onto the wet paint. Then I applied some of the same color static grass as that on the near side of the tracks and sprinkled ground up leaves on top of that. Then I glued more baby's breath directly onto the backdrop and added some branches and super trees to help blend the backdrop with the 3D scenery. The portion of the track that hasn't been painted or ballasted has been left unglued from the road bed, so that it can be adjusted when the girder bridge is emplaced to the right of the farm.
|
|
Above left, with the 3-way turnout arrived, the roadbed and track have been laid to link up the mainline coming in from the north with the north end of the yard. I couldn't add in the dead-storage track as a spur coming off a turnout from the north, so I decided to wait on laying that track on the lower left that leads into the car shop, and ordered a right-hand curved turnout to add the dead storage as a cut-back coming off the car shop track.
Upper right, I have switched around my "story board" on the wall and backdrop with new photos from the prototype for reference while installing the remaining components of the Phillips yard and facilities. The candlestick phone is a functioning replica that I bought to dress up the dispatcher's desk with a period look when the time comes to install it.
Below left and right, I've moved back over to finish up South Main Street to work my way toward to the rail yard. The road work with ditches is finished, the cornfield added, the house under construction with the work crew is in place, and the vegetation along the roads and around the covered bridge finished up. I didn't like that tree with the red/orange leaves blocking the view of the entrance to the covered bridge, so I moved it after taking these photos.
|
|
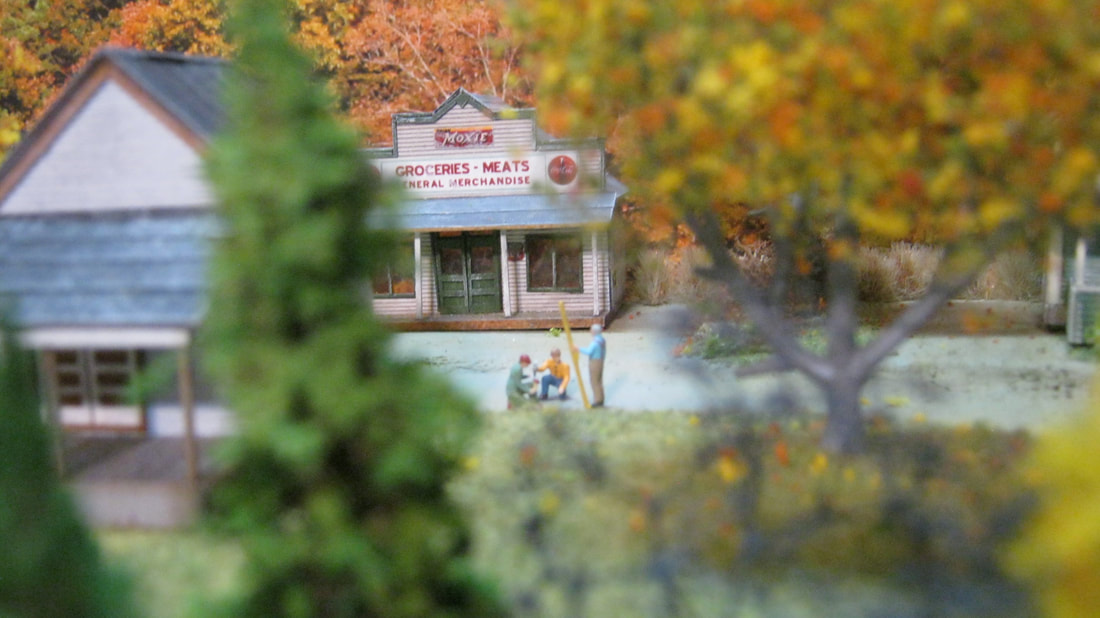
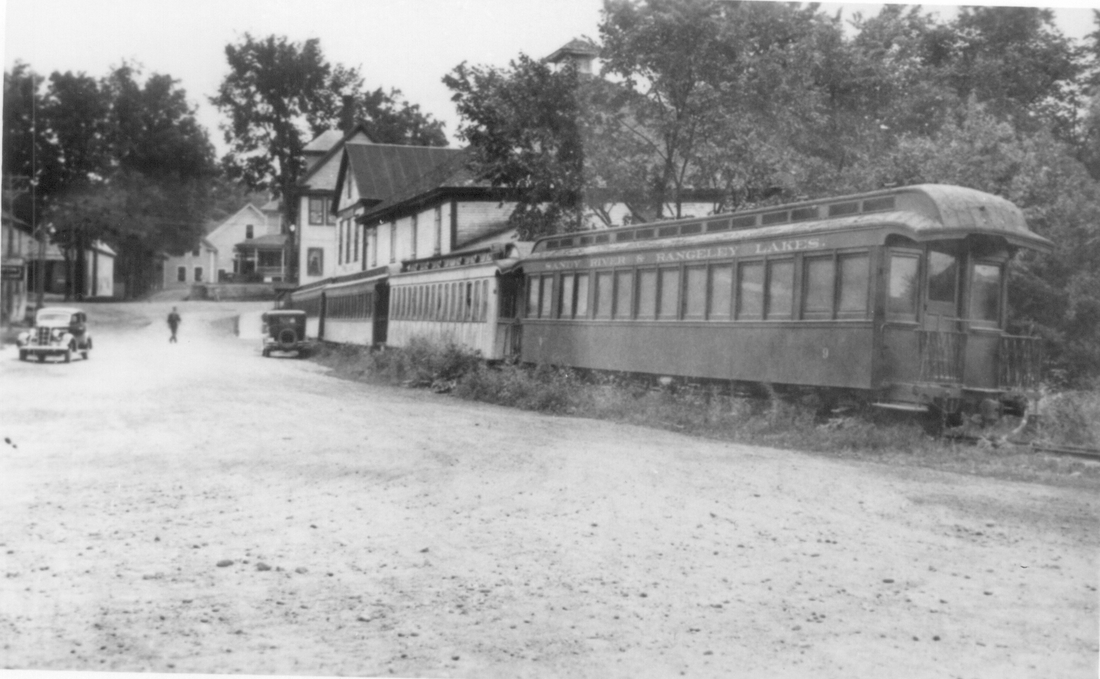
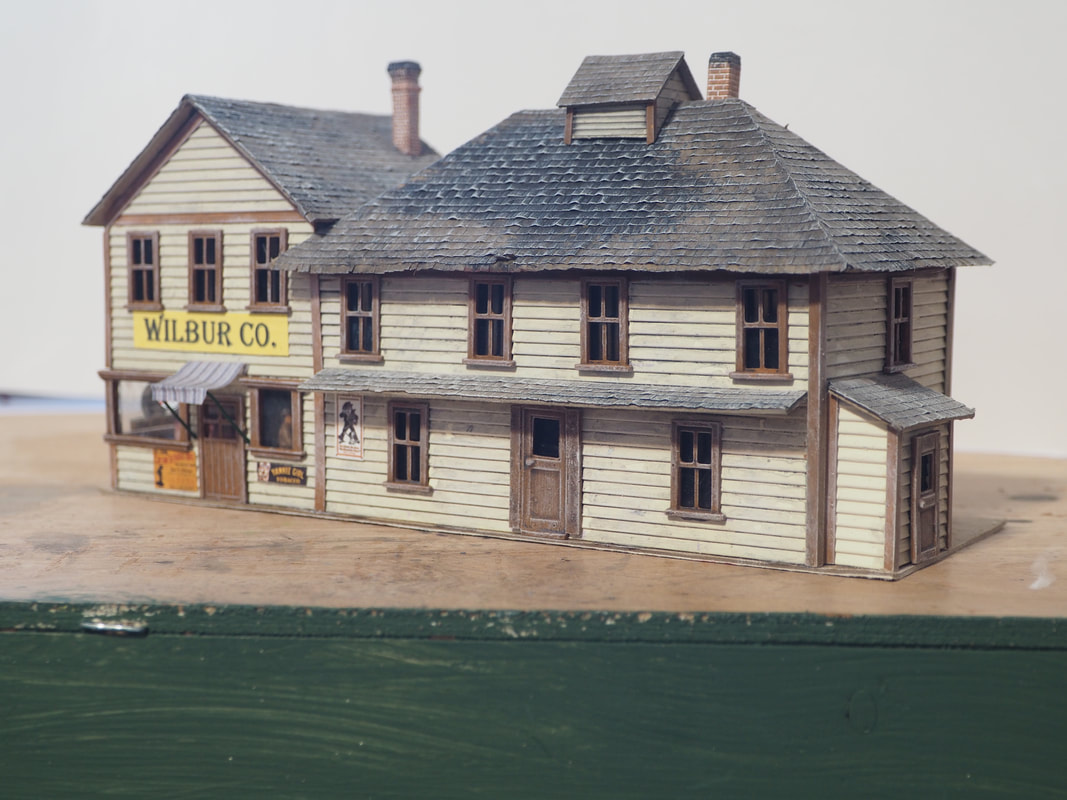
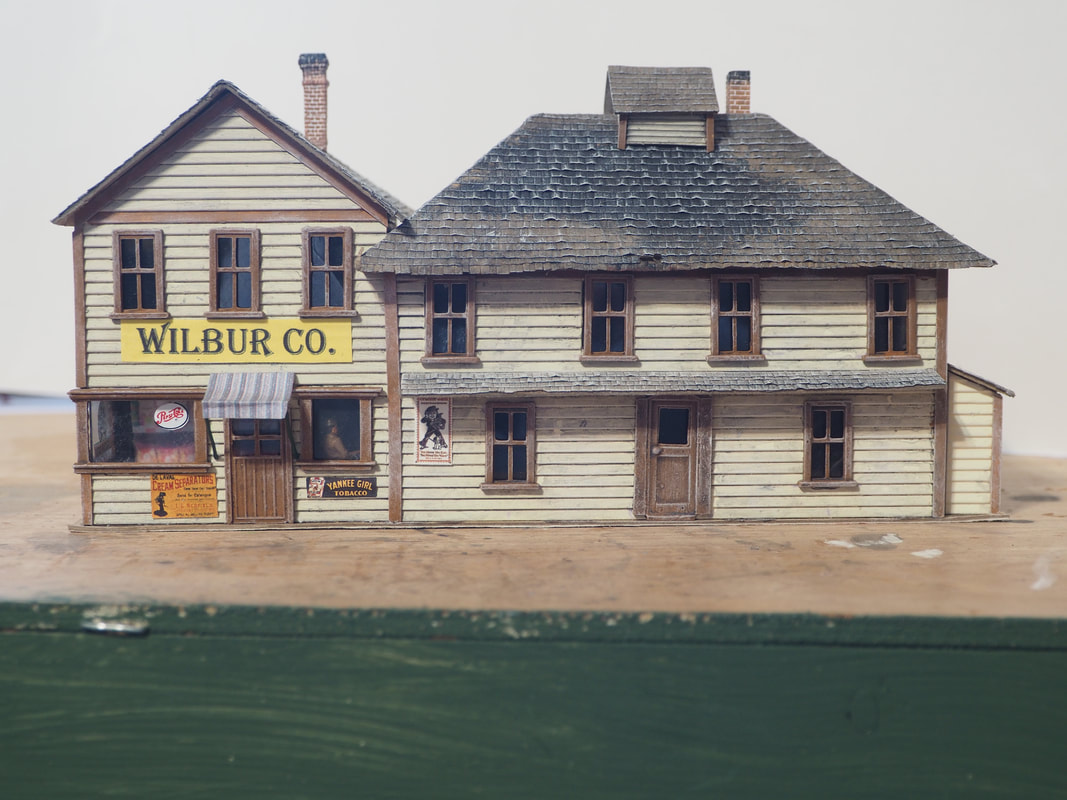
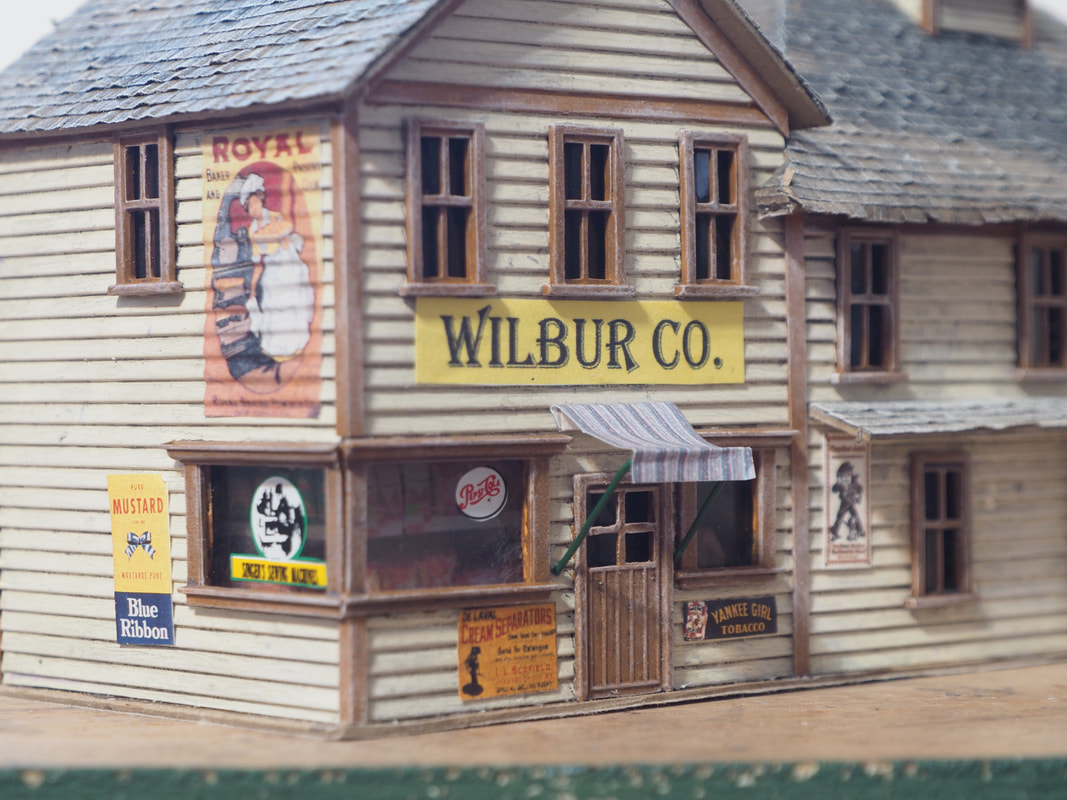
Below left is a period photo of the Wilbur Store in its later days when, as you can see, the service spur to it was used for storing un-needed coaches. During the good years, enough revenue was generated by the store to need it's own spur, known as the "Wilbur Track", and I'm modeling the good years. There is no commercially available kit for the Wilbur store, so I scratched my interpretation of it from the few partial photos that exist.
|
|
The advertising posters are paper available from Dave's Decals, and the dry transfers on the windows are from Woodland Scenics.
|
|
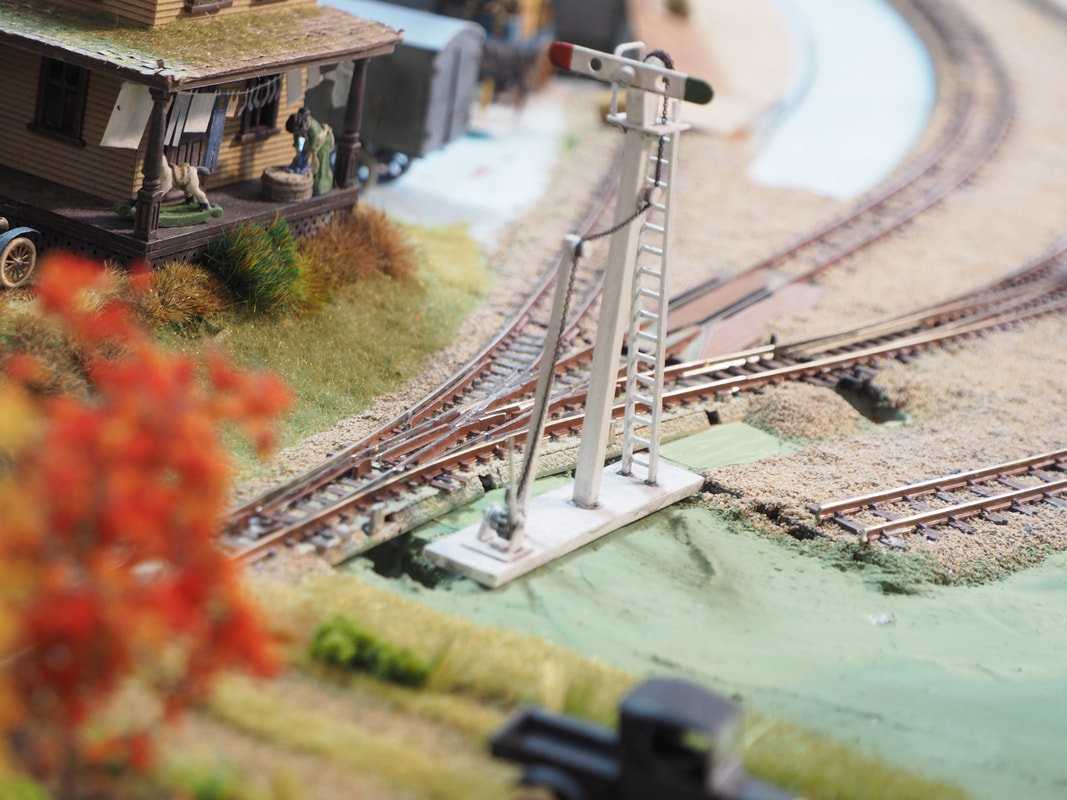
In the lower left photo, right next to the house on the left on the far side of the boiler sitting on the flat car, is the Semaphore signal on the north/west end of the Phillips yard. There's not kit for this either, so this was scratched from line drawings of this semaphore on Gary Kohler's Box site. The white posts with dark bottoms extending from the semaphore to the Phillips depot in the lower right corner of that same photo are said to be for a line that could operate the semaphore from the depot building remotely. Below center and right are the scratched Semaphore. To operate the semaphore at its base is a winch operated drum with a chain the was guided up to the drum at the head of the signal and wrapped around the drum with a counterweight on the other side of the drum. During the night, when the semaphore was rotated, either the green lantern would show through its hole or the red through its hole depending on which direction you rotated the drum.
|
|

|
|
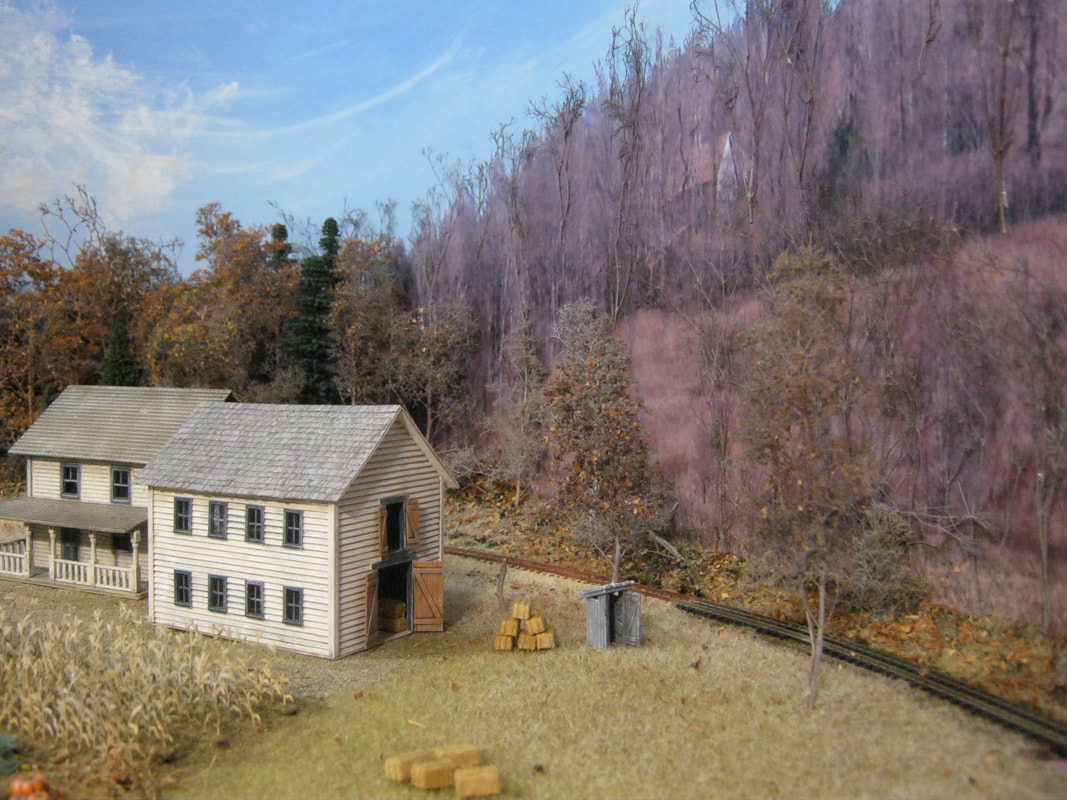
To the left is the hose house that was located along the Wilbur track on the north side of the yard. The Wilbur Store can be seen directly behind the hose house in the distance and the depot is just out of the photo to the left.
Above is my scratched hose house, in the good years when it had a shingled roof and a decent paint job. |
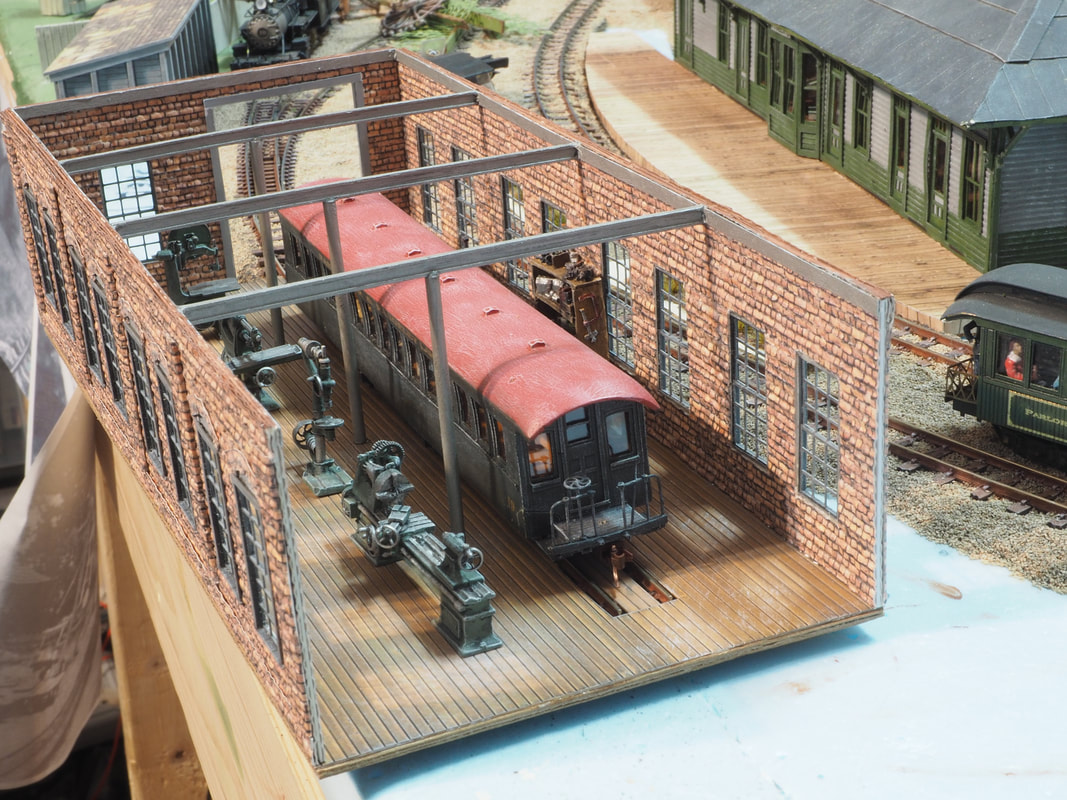
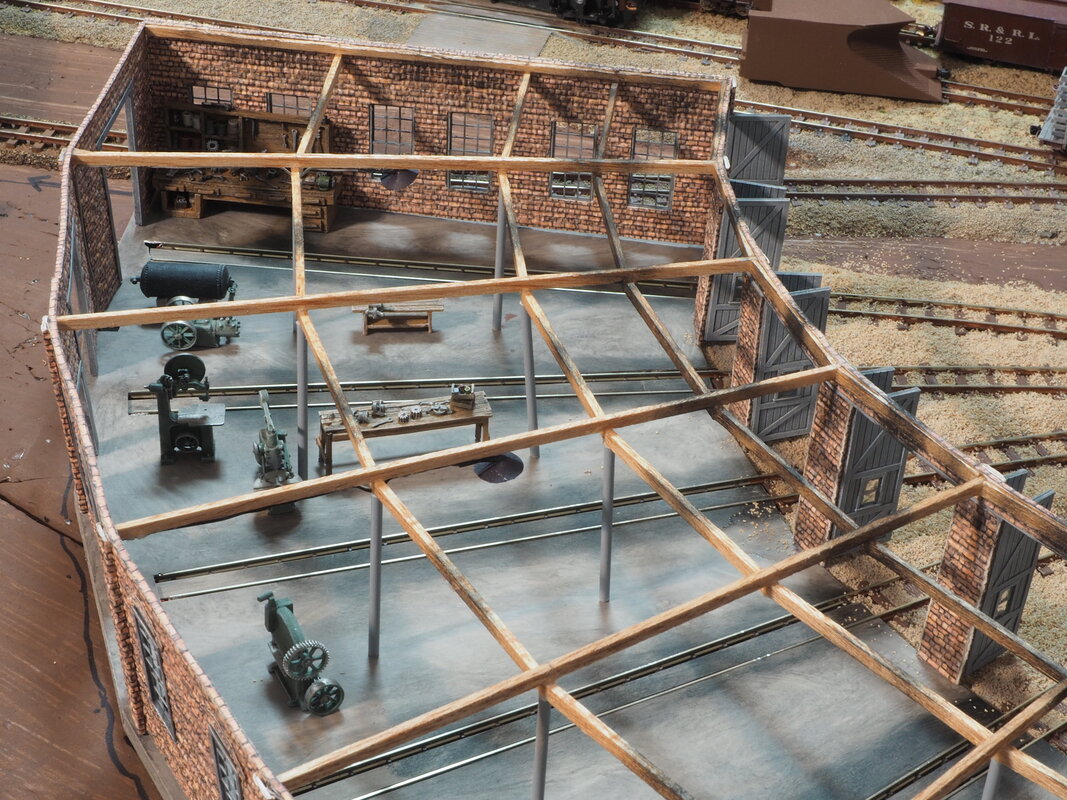
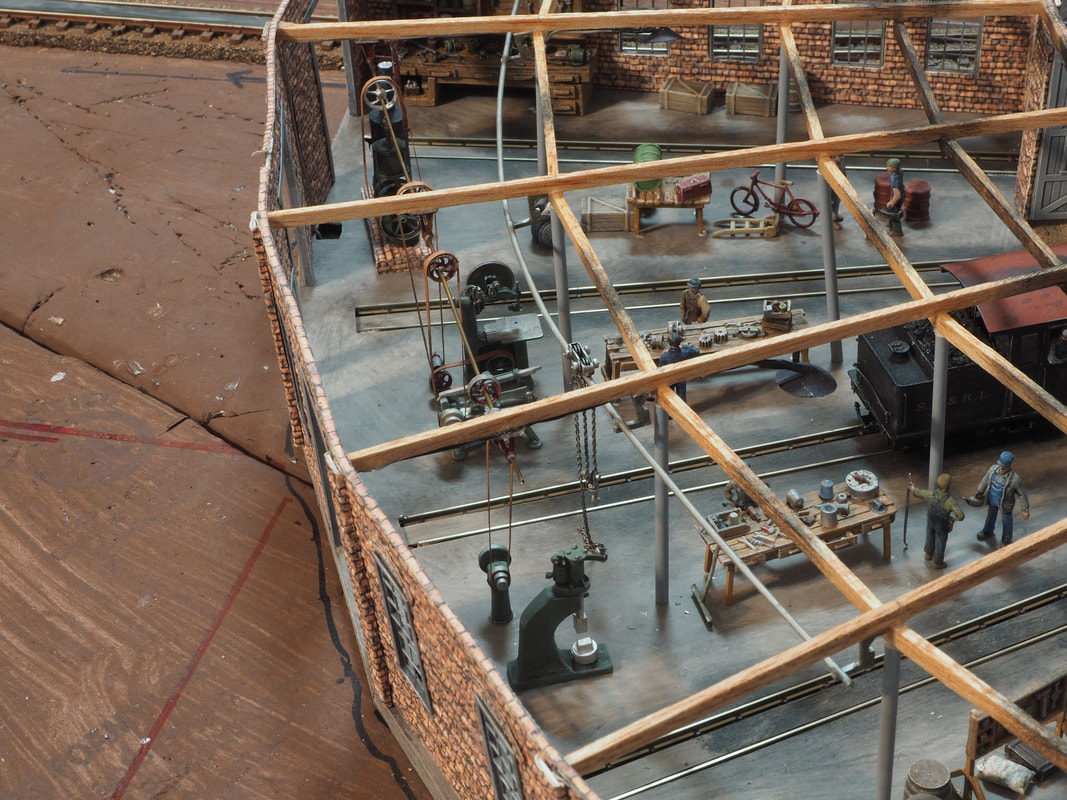
Below left, the car shop, the first section of the facilities is put together to get a feel for how the bigger picture will go, as the complex will be quite an undertaking, with the roundhouse, machine shop, blacksmith shop, office, stock room and car shop being the largest and most detailed structure on the layout. All will have detailed interiors.
Below right, the hose house is now installed, along with storage of rails, ties and wheelsets.
Below right, the hose house is now installed, along with storage of rails, ties and wheelsets.
|
|
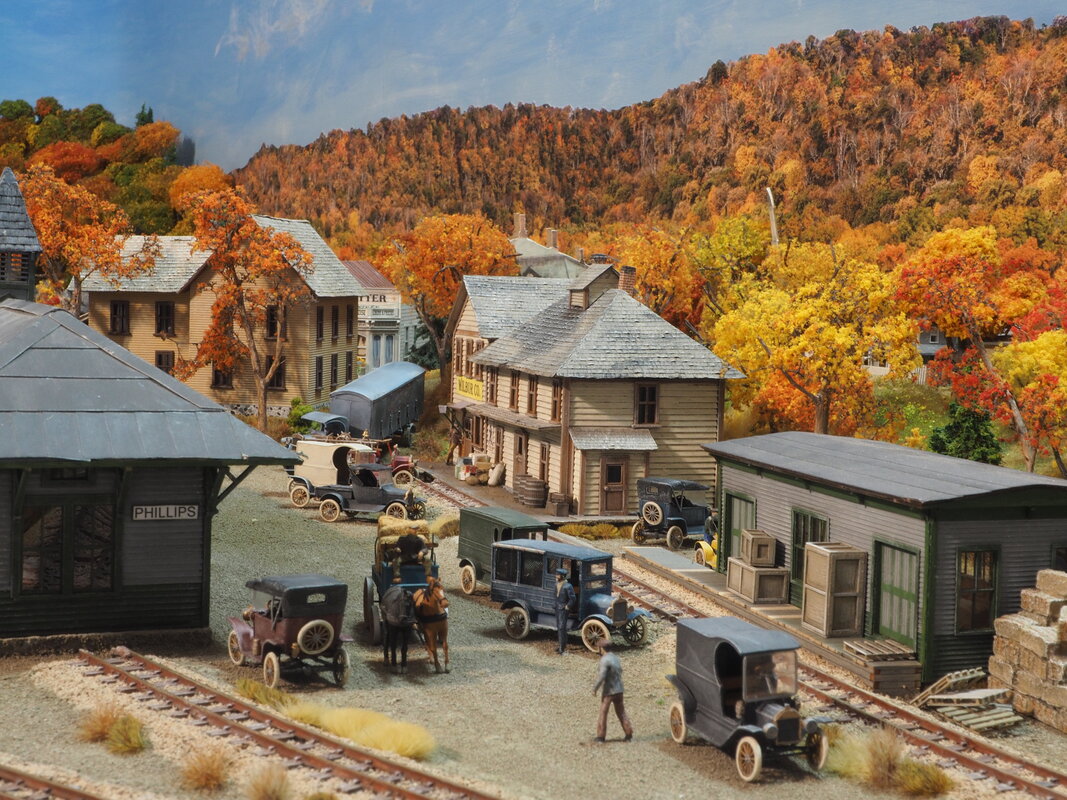
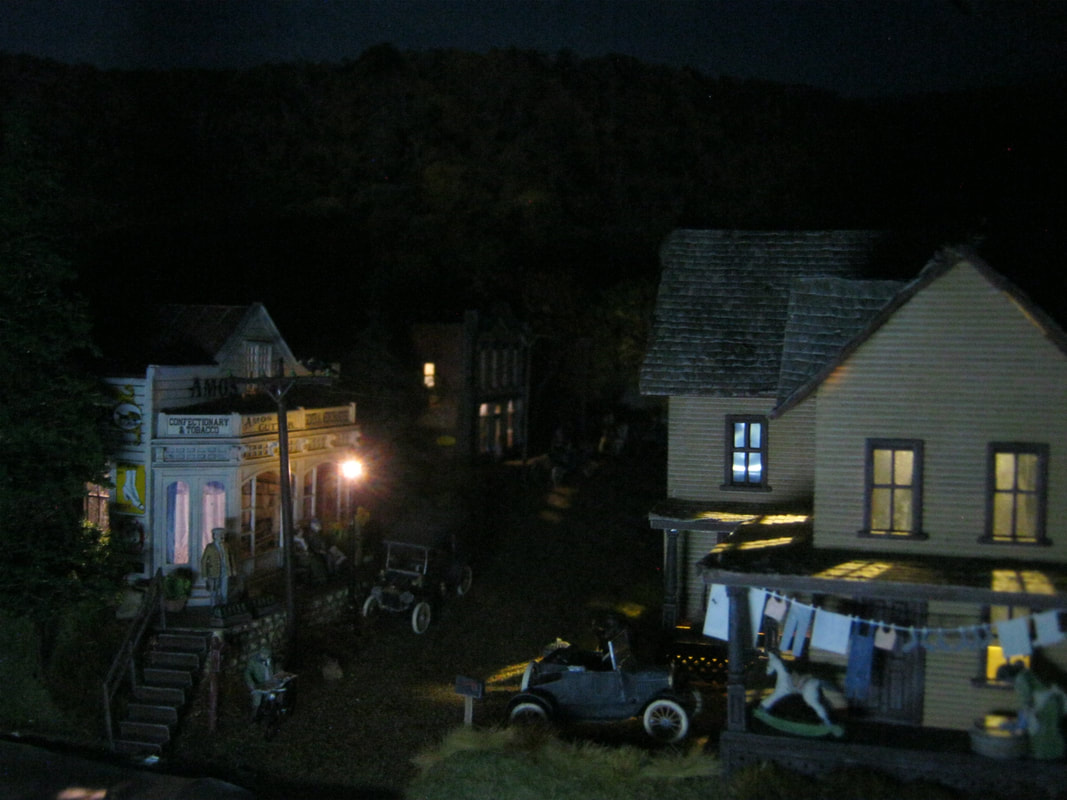
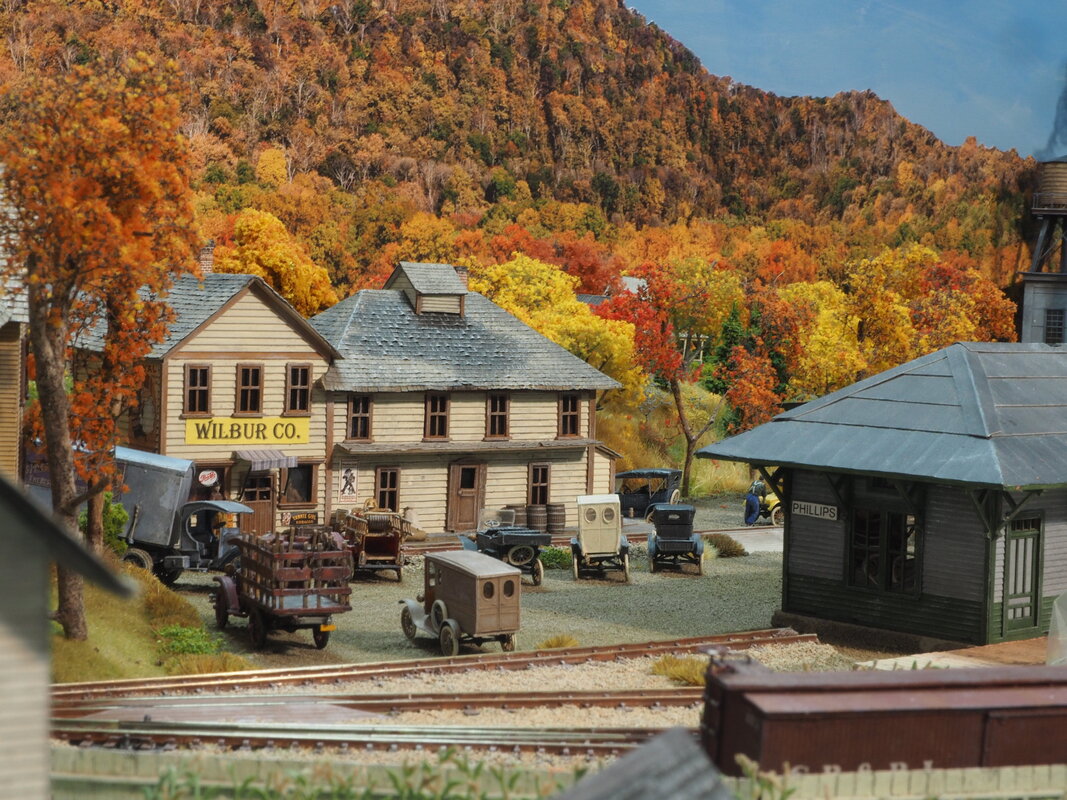
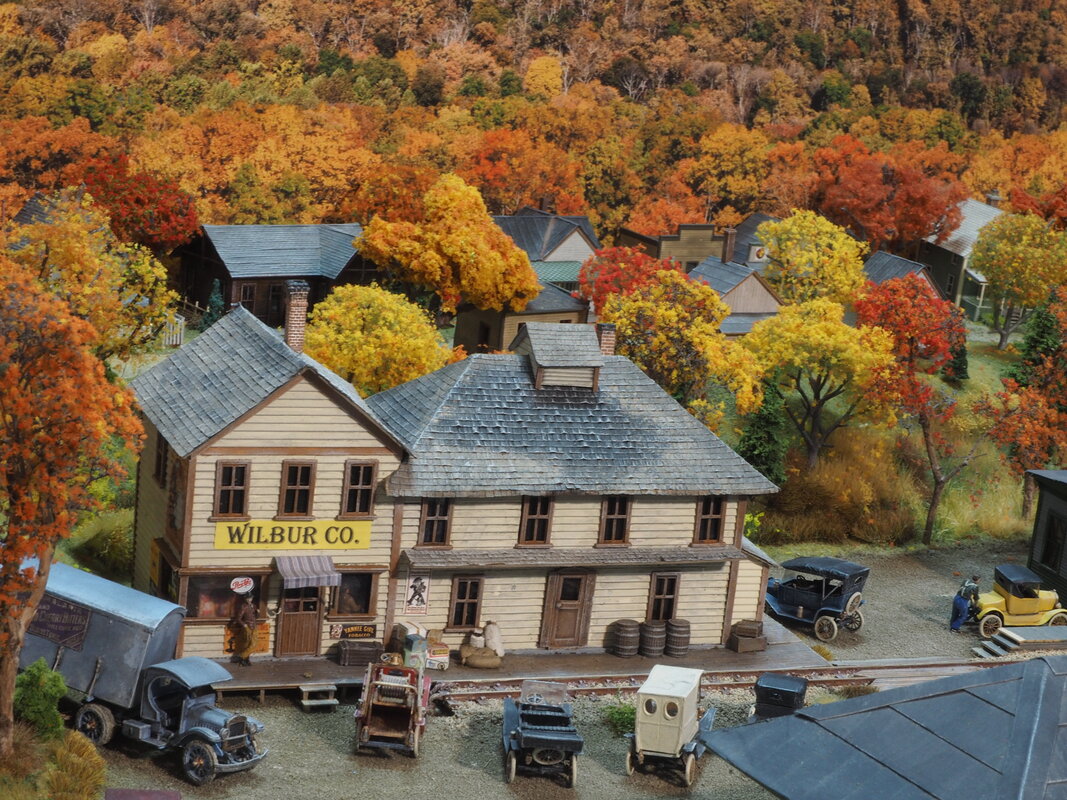
Above and below, area is taking shape, with the station, freight house, and Wilbur store installed with the parking area and ground cover completed. It's a busy time at the station, as train time is nearing, so there's a bustle of vehicles and people gathering for the arrival time. Freight to be loaded and unloaded, mail to be picked up and dropped off, passengers leaving and passengers arriving to be picked up by friends and family.

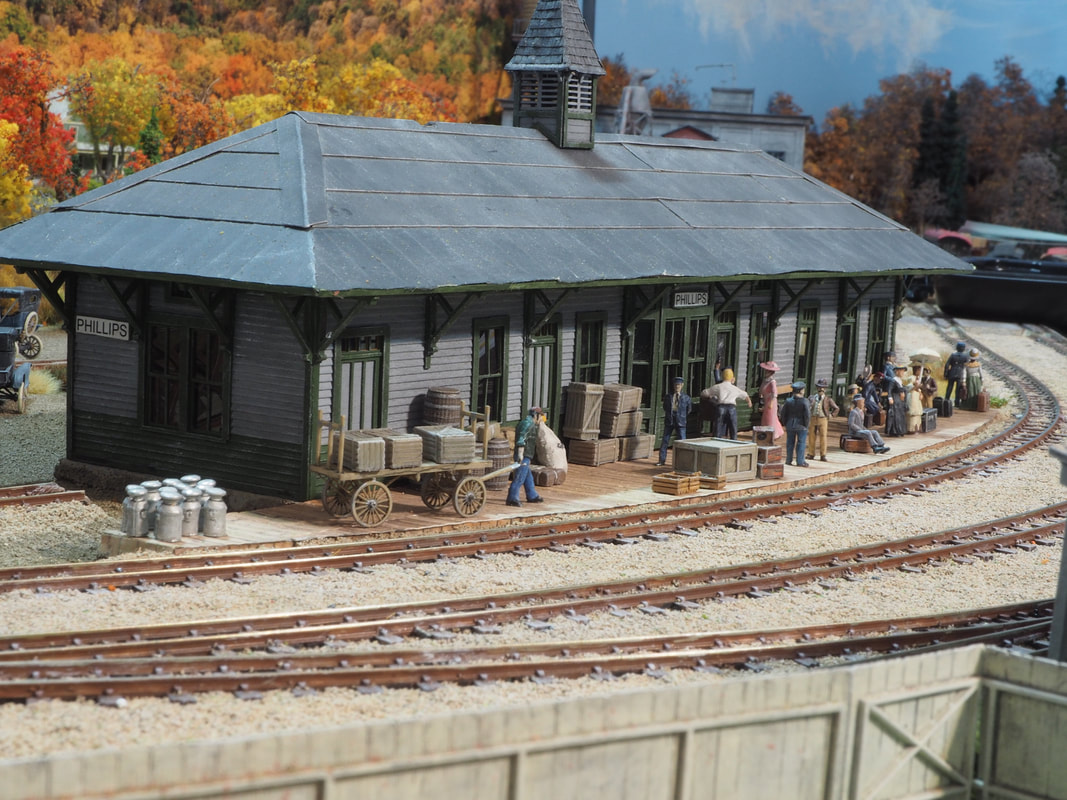
Below left is a slightly above ground level view of the Phillips yard north of the station. Below right is an elevated view from the same point, showing roughly the level operators will see the scenery while sitting on rolling swivel office chairs. This gives a really good impression of the illusion of distance of the buildings and details on Pleasant Street behind the station.
|
|
|

|
|
|
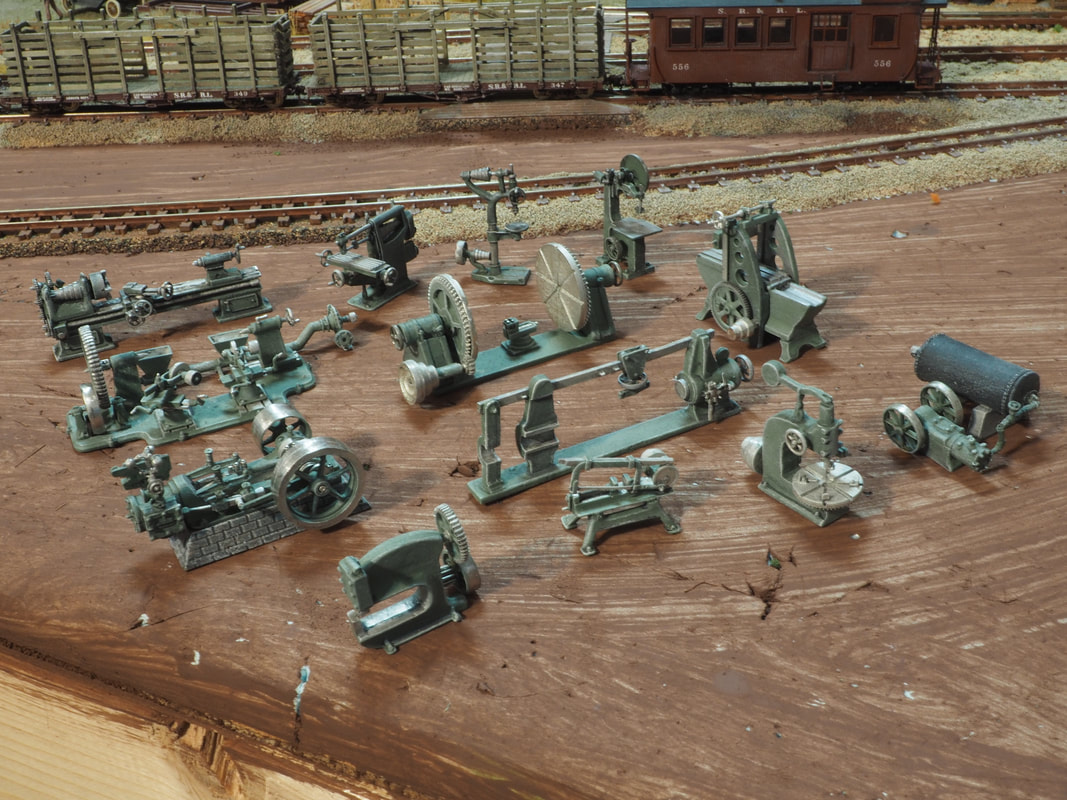
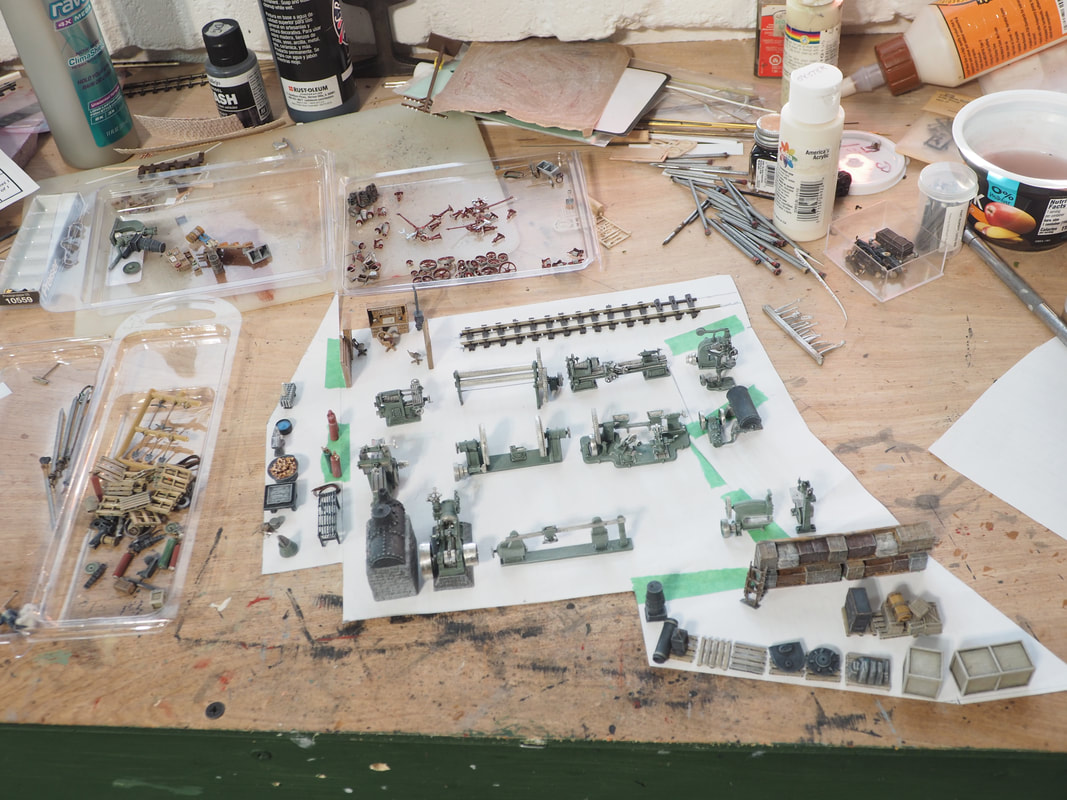
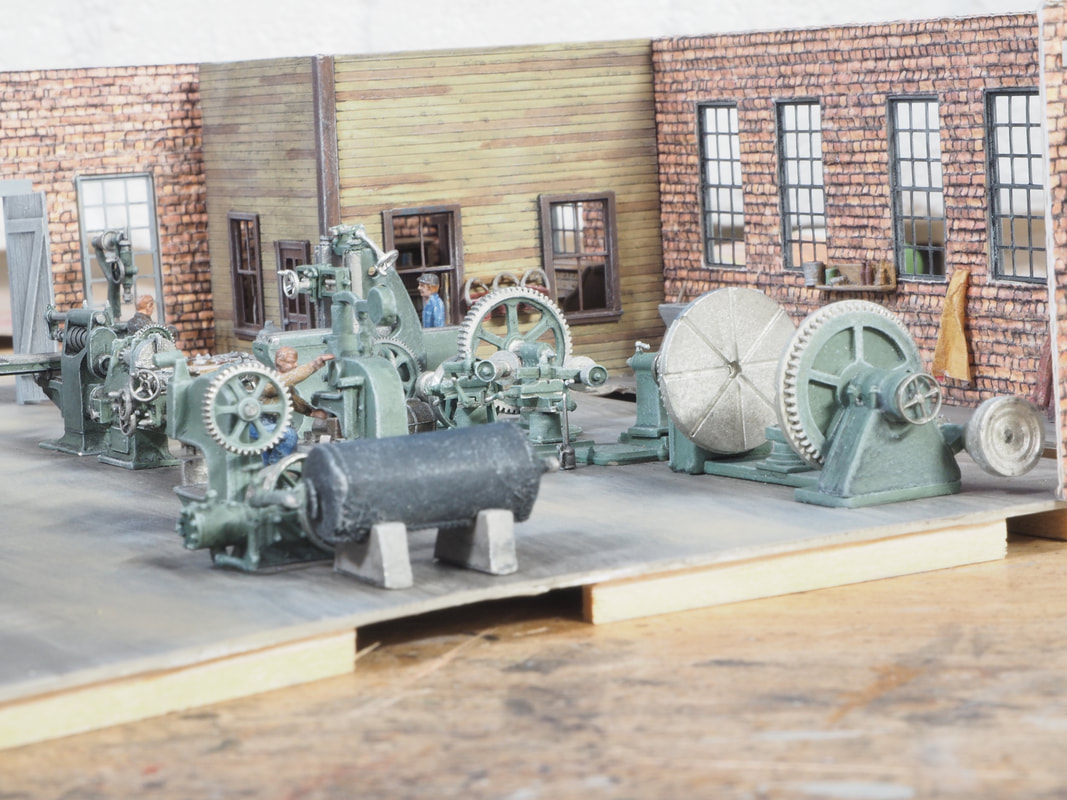
Below are completed kits of belt operated machine tools that will be going into the railroad's machine shop located between the roundhouse and car shop. These are from Scale Structures Limited and Rio Grande Models, and will be hooked up in the machine shop to an overhead belt drive system powered by a steam engine with boiler.
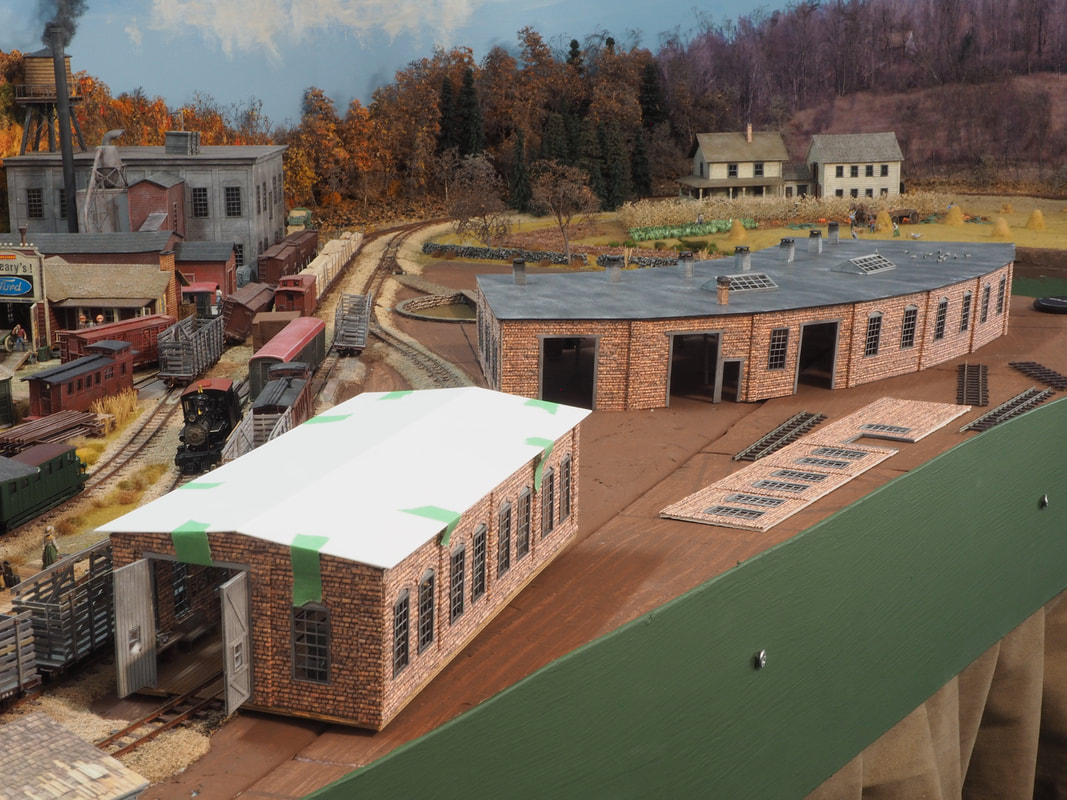
Below, the bumpout for the roundhouse and shops has been added and the fascia and valance added to make things more presentable.
|
|

|
|
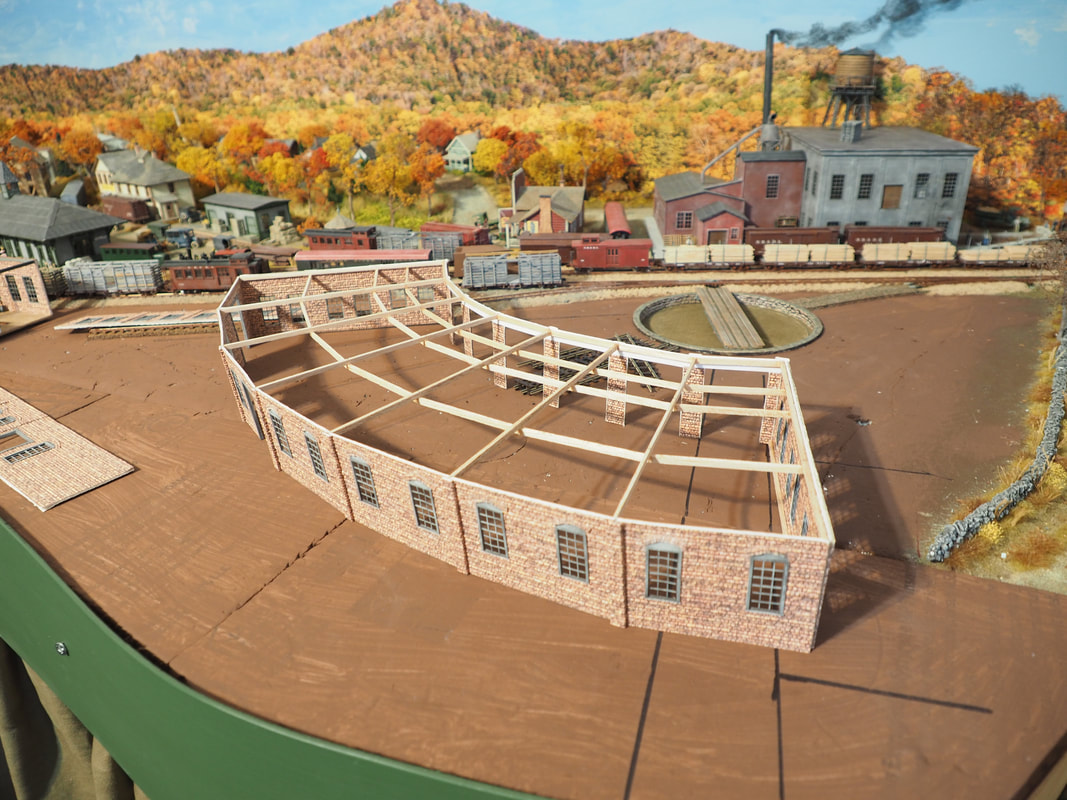
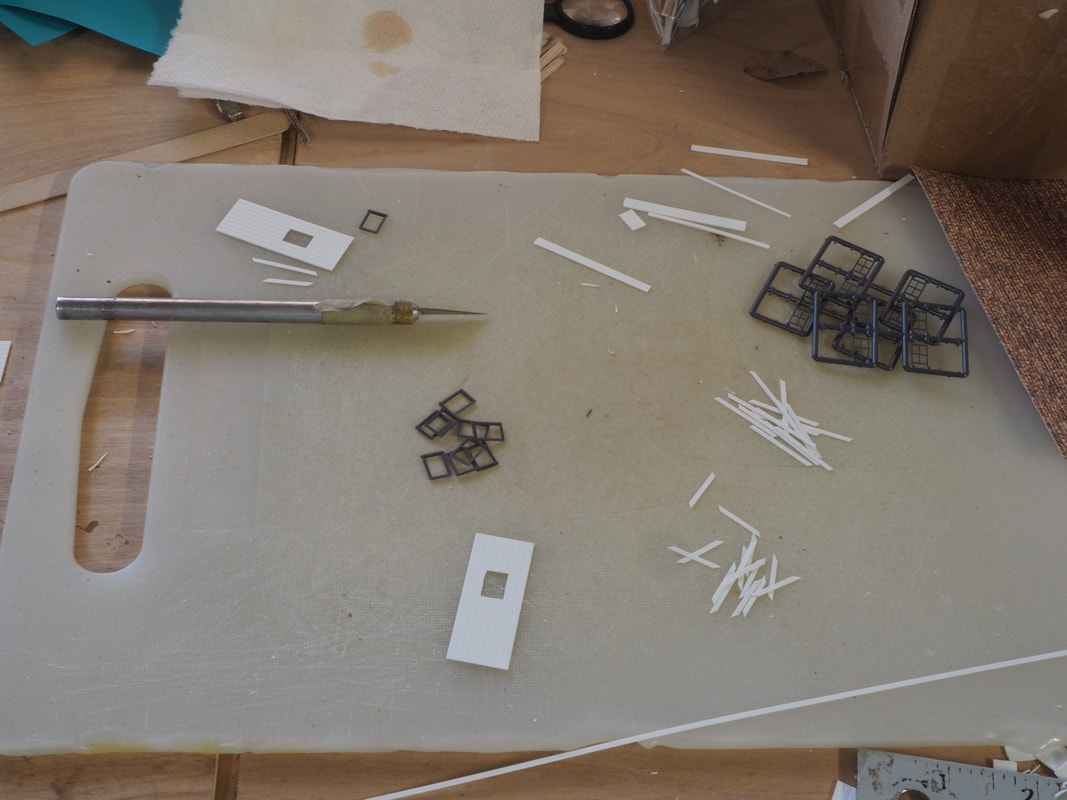
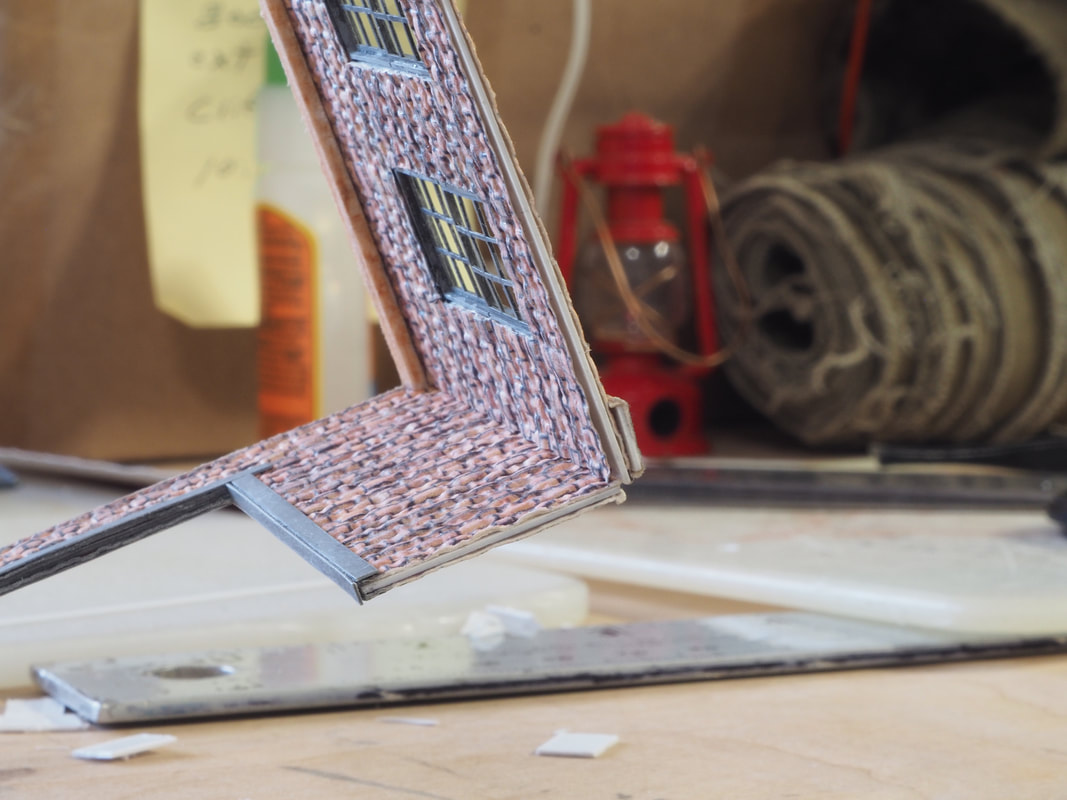
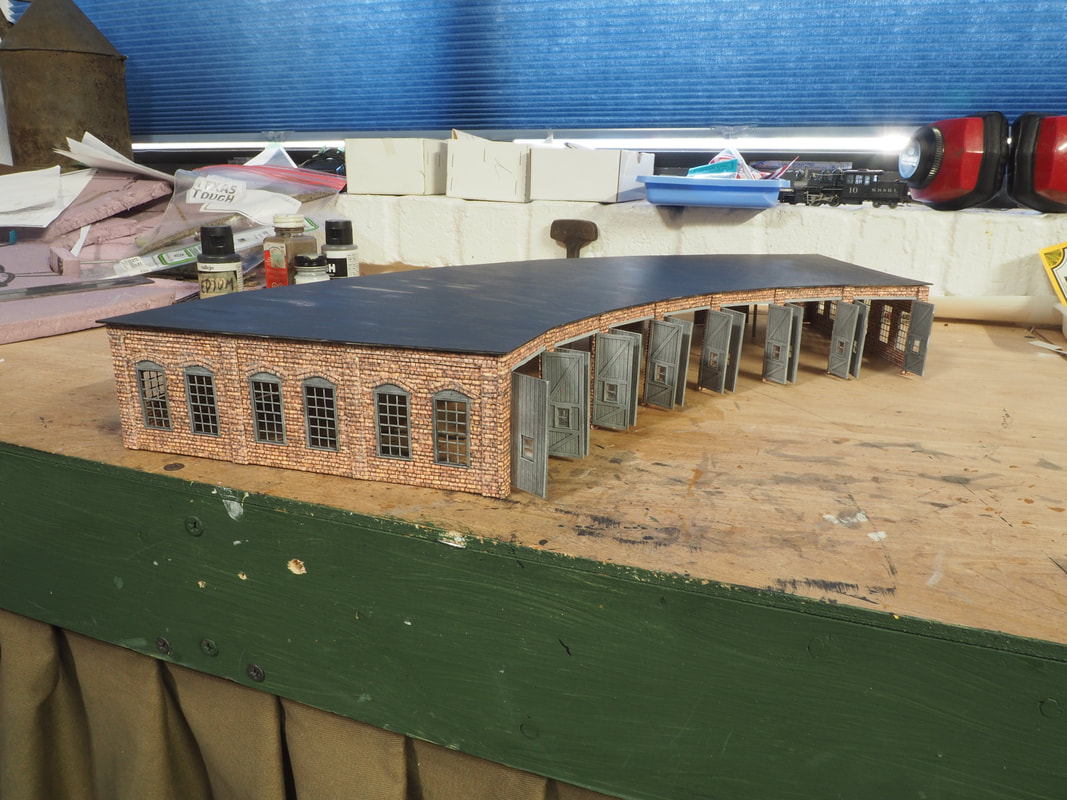
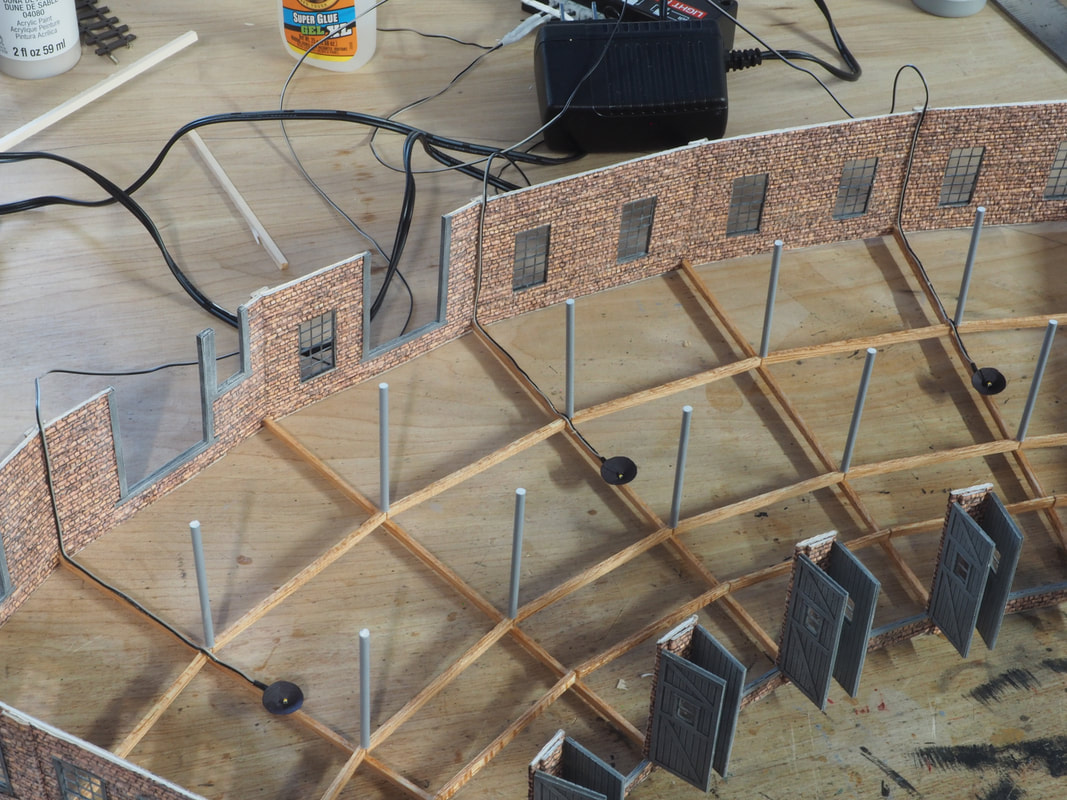
Above left, the roundhouse walls are assembled and the rafters are in place. The rafters are bass wood. Above right, the bay doors are cut out and assembled. The doors are Evergreen V-Groove, with a front and a back so that the 'boards' are visible from both the front and back of the doors. The windows are Grandt Line. Below left, the door fronts and backs are all assembled, and the first coat of paint is applied. I painted and weathered the doors before glueing the fronts and backs together to make the painting and weathering easier. After weathering, the windows were glazed with Micro Kristal Klear. Below right, you can see the raw edges of the walls where the brick paper is laminated to the plastic sheet. I didn't want this to be visible when the roof is off, so I glued single and double rows of brick paper on the top so the top of the walls also looks like brick.
|
|
|
|
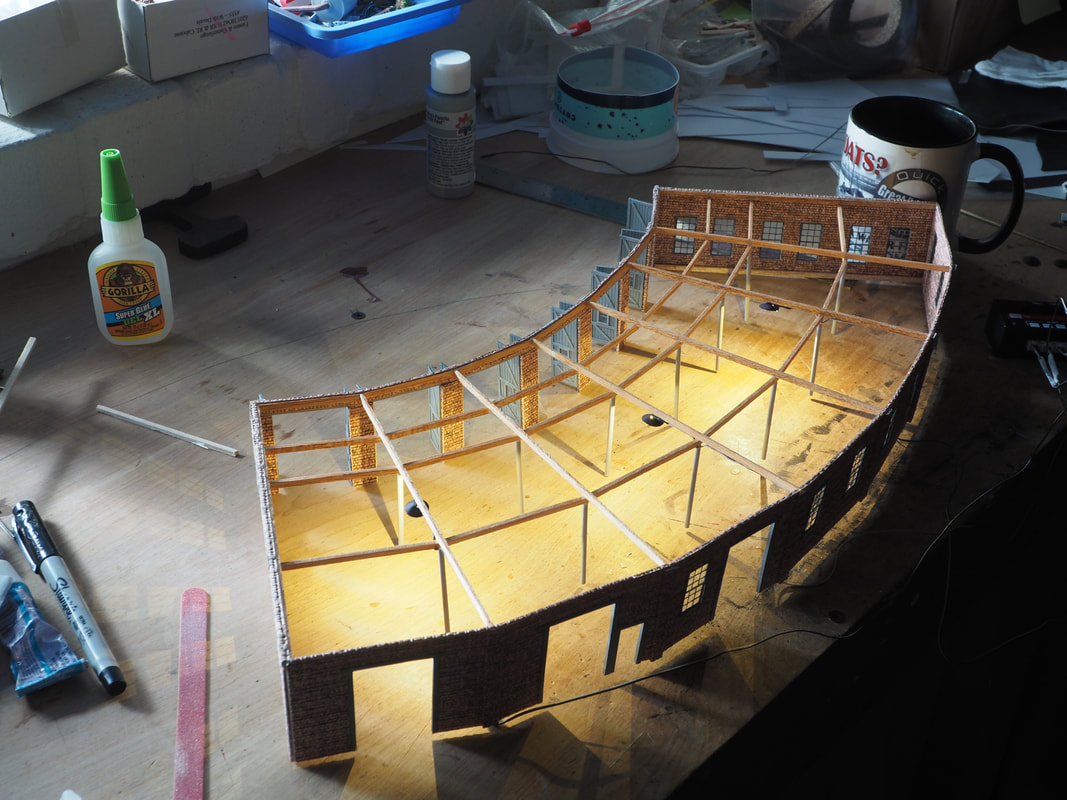
Above left, the bass wood has been stained with Golden Pecan, the tops of the walls are now 'bricked', and the 'steel' head frames have been added to the bay door openings. Above right, the roof panels are being cut out of sheet styrene. The roundhouse is set upside down as a template to make tick marks where the cuts need to be made, with the tape holding it in place while I work to make sure it's accurate as I cut each piece.
Below left, a second layer is cut out and the pieces glued together and laminated to the first layer, staggering the joints for strength. Below right, the doors are glued on, and the roof-supporting 'steel' posts are added.
Below left, a second layer is cut out and the pieces glued together and laminated to the first layer, staggering the joints for strength. Below right, the doors are glued on, and the roof-supporting 'steel' posts are added.
|
|
Below, the roof has been painted with the first coat of paint and it has been placed on the roundhouse to get a good idea of where I'm going next.
|
|
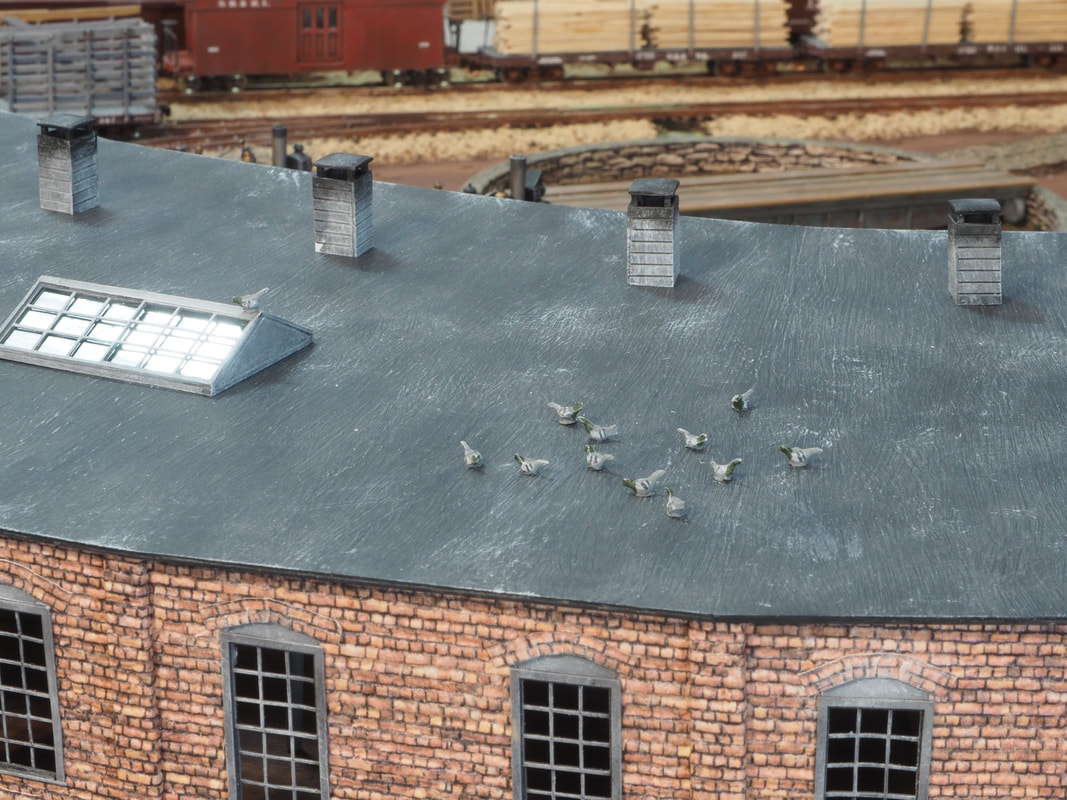
Above left, skylights and smoke jacks have been added, the roof has been weathered, and a flock of pigeons added for extra detail. Above right, the roof for the car shop is being built, and the next major project will be the machine shop that connects the roundhouse to the car shop.
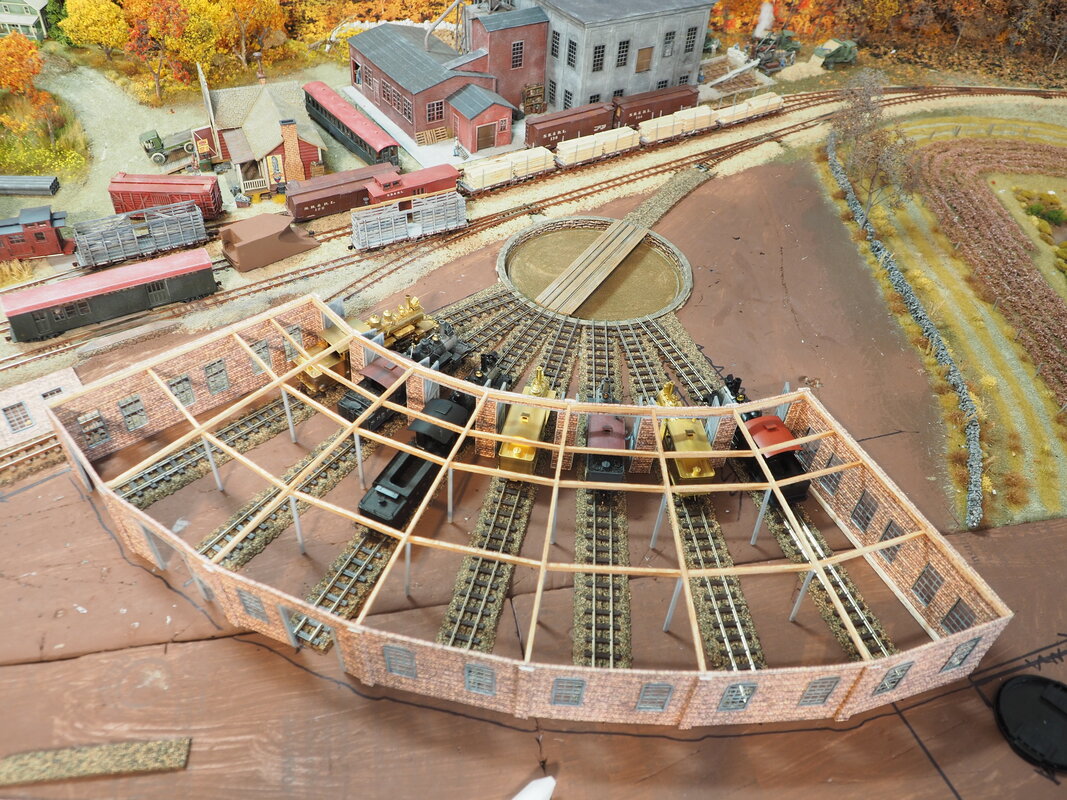
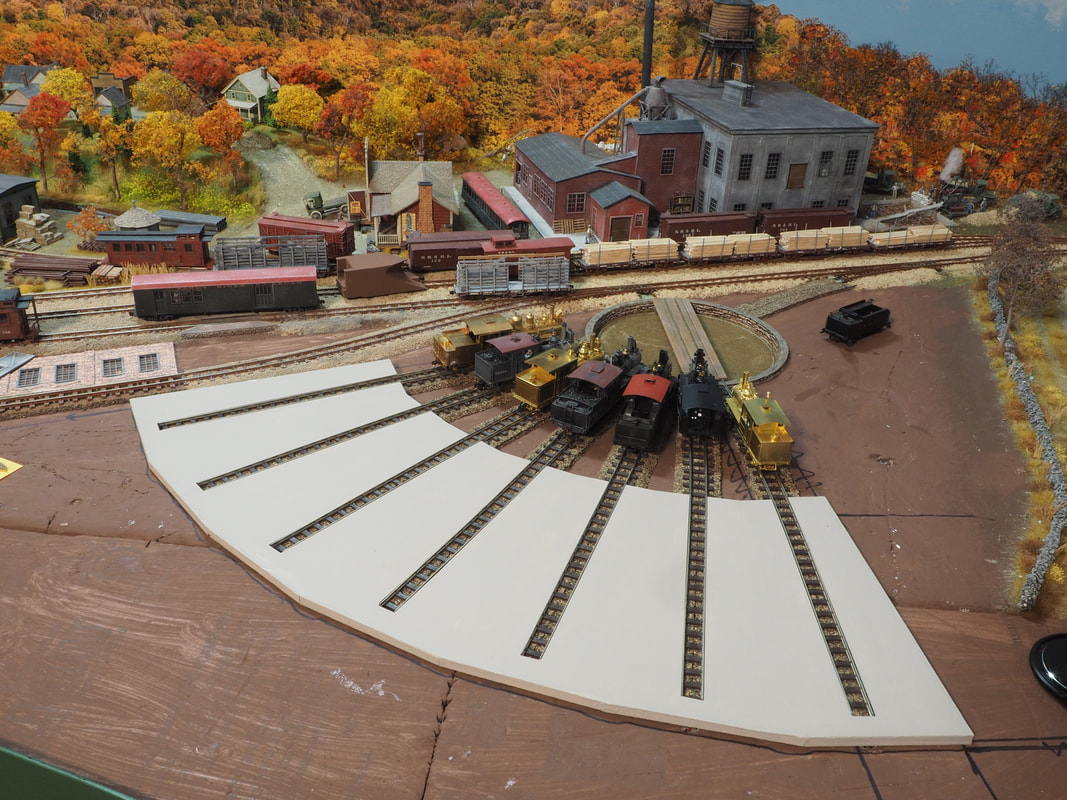
Below left, the turntable has now been permanently installed including the gear box and control rod for rotating it. The roadbed and track has been installed, with repeated checking and adjusting to make sure that each stall door has equal clearance on both sides of the locomotives. Next step will be the roundhouse floor.
Below right, the floor/foundation is cut out and assembled, and test fit in place. I did the floor by placing paper over the rails and running the edge of a pencil over the rails. Then I placed the paper on the plastic sheet, and cut out the gaps for the track by running an x-acto down a steel straight edge 1/16" to the outside of the pencil marks. Worked better than I had hoped.
|
|
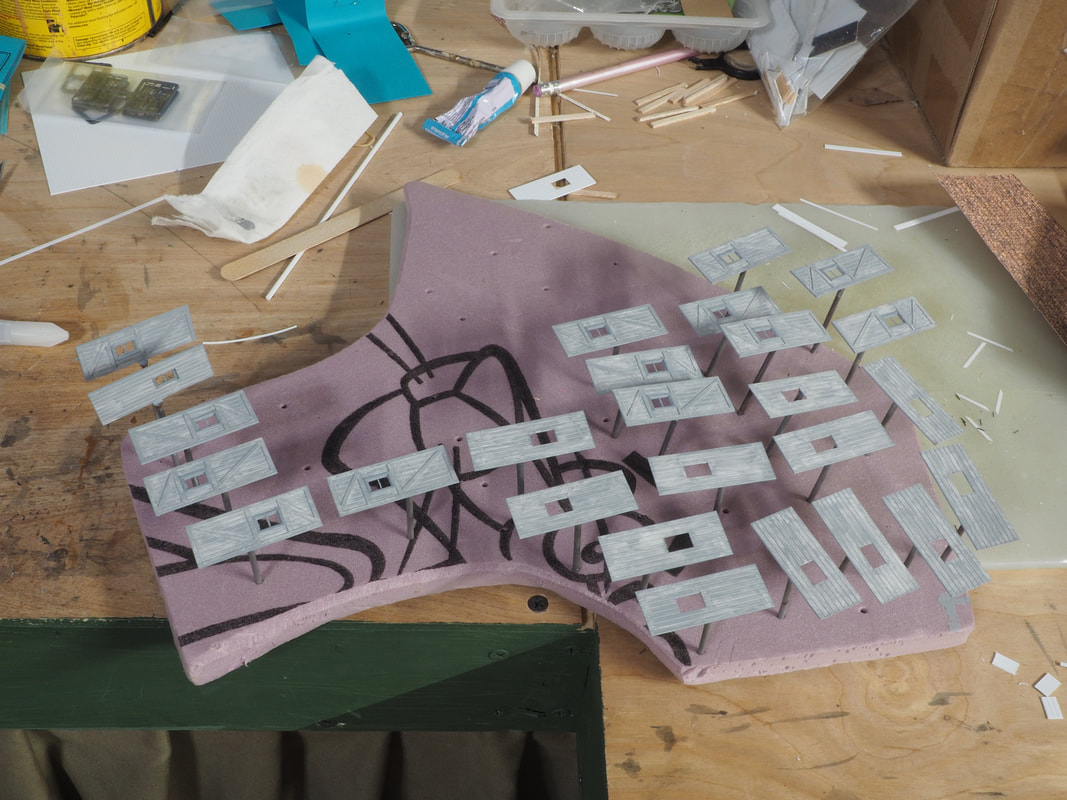
Below left and right, while the paint was drying on the concrete floor, I made some simple lights by cutting out disks of craft paper, cutting a slit in them and forming them into a cone with a dot of super glue. Then I cut a hole near the point of the cone and ran some Woodland Scenics Just Plug mini LED's through the hole. Then I glued them to the rafters with the wires running underneath the rafters and down the back walls of the stalls.
|
|
Below left and right, the floors are now done, and black paint has been dry-brushed onto the floors, the upper walls, the rafters near the smoke jacks, and the inside and outside of the walls above the bay doors to add 'soot' to the roundhouse. The tracks from the turntable into the stalls has been ballasted, and some work tables and whatnot just placed in the roundhouse to get the feel of where this is going. None of it will be permanently placed in until after the machine shop and blacksmith shop have been built.
|
|
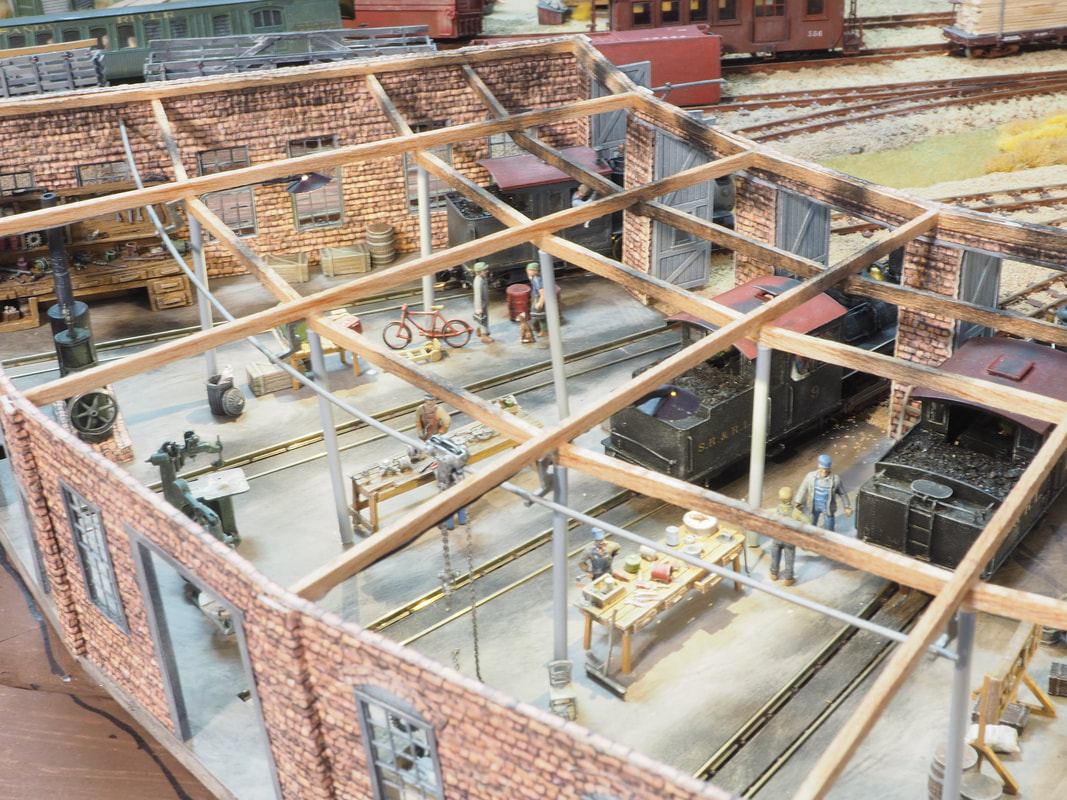
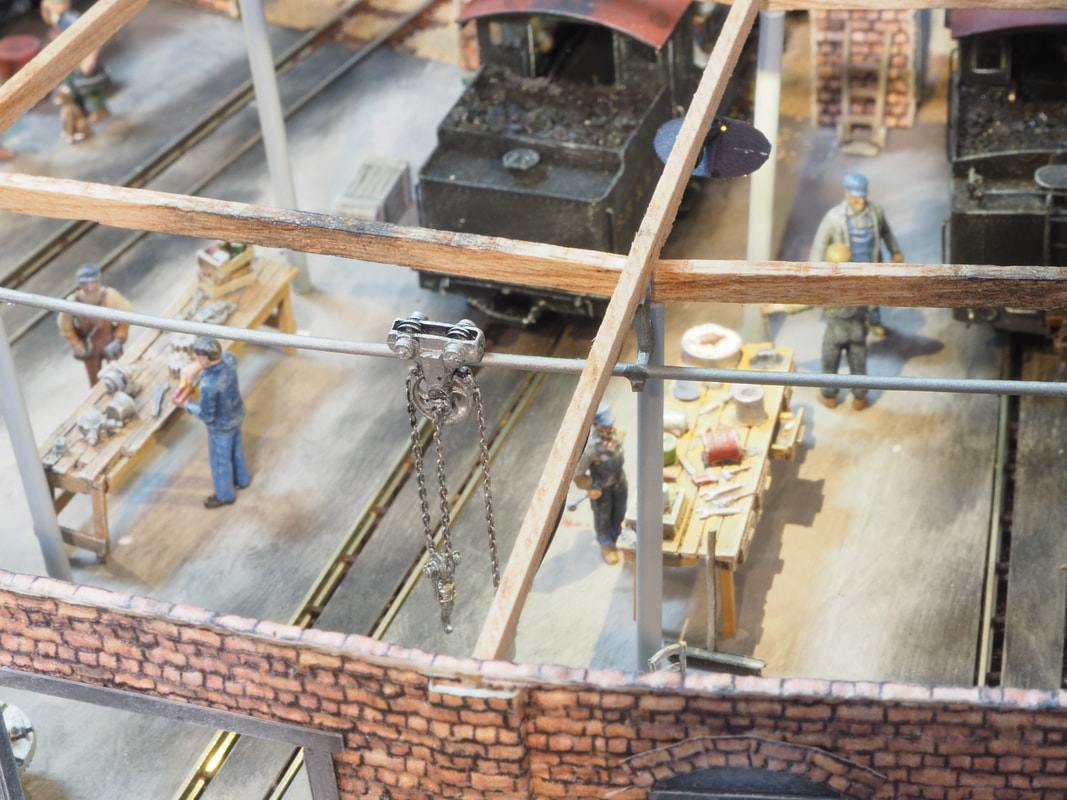
Ok, I lied. I went ahead and installed all of the roundhouse detail except for the machinery at the rear of the roundhouse. Some of it might end up in the machine shop so that will wait. Below left and right are the northern stalls in the roundhouse, ready for servicing locos. Plenty of work spaces filled with tables, tools, shelving work benches, supplies, etc., and the gantry crane installed.
|
|
|
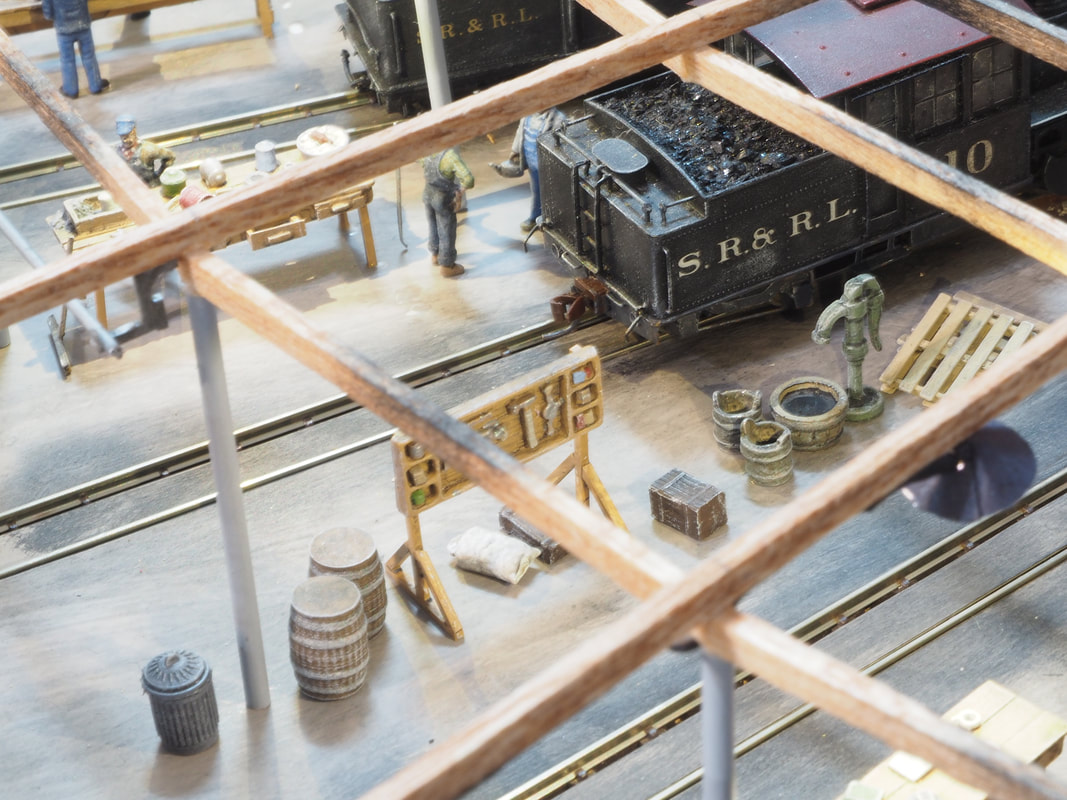
|
Above left and right are some closeups of the details. Below left is the south end of the roundhouse, with Joe Blow doing what he does best, taking a hammer to it. Below right is a close up of the gantry crane, just because I really like it.
|
|
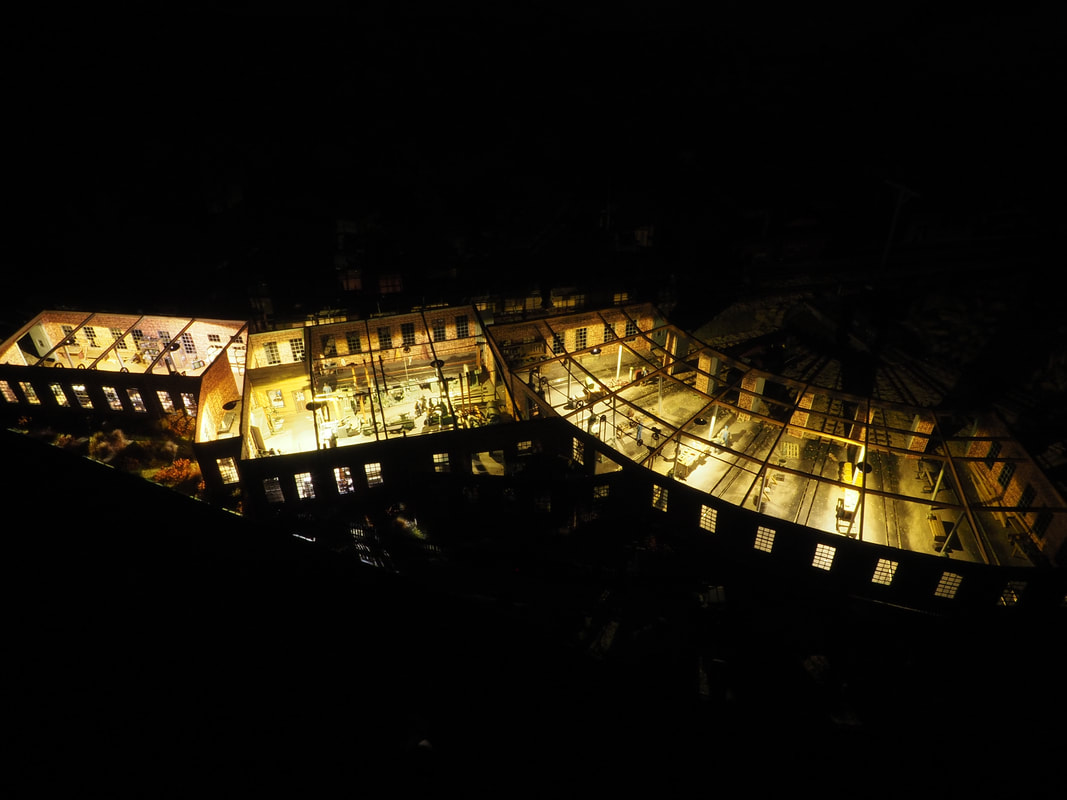
Below is the roundhouse lit up at night. The idea is that at future operation sessions, the operators can start bright and early getting ready for the day before dawn, operate 'all day', and then service and put everything to bed for the day after the sun's gone down.
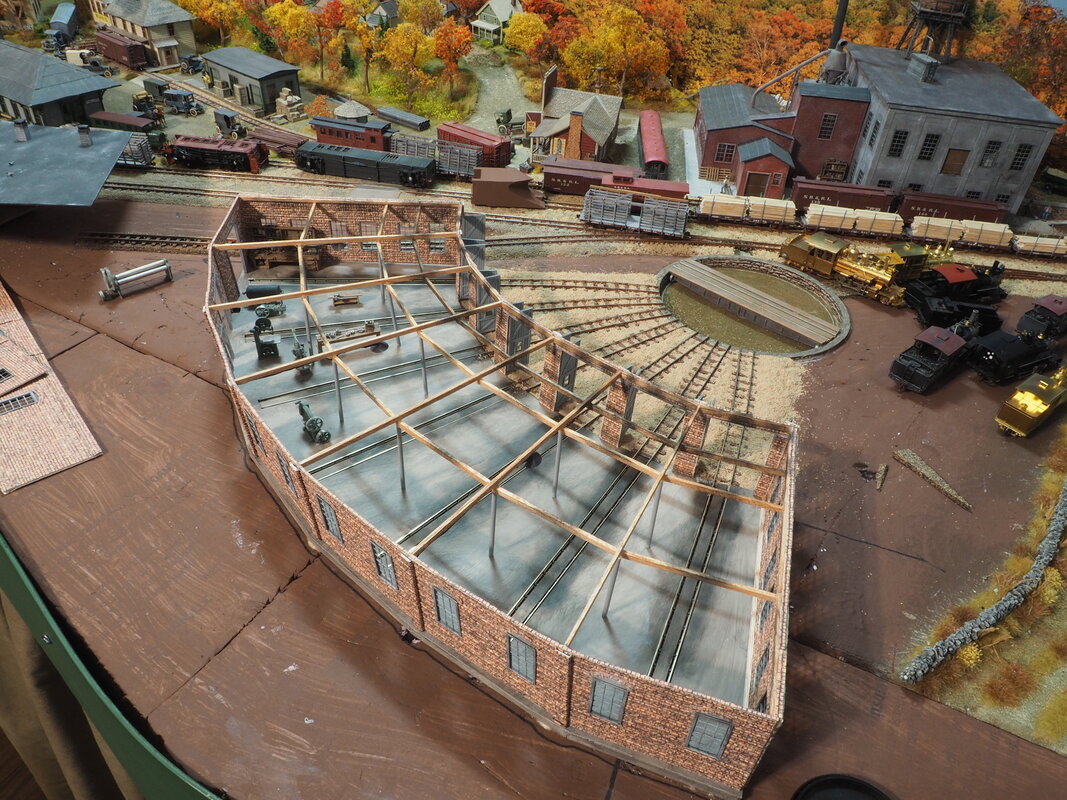
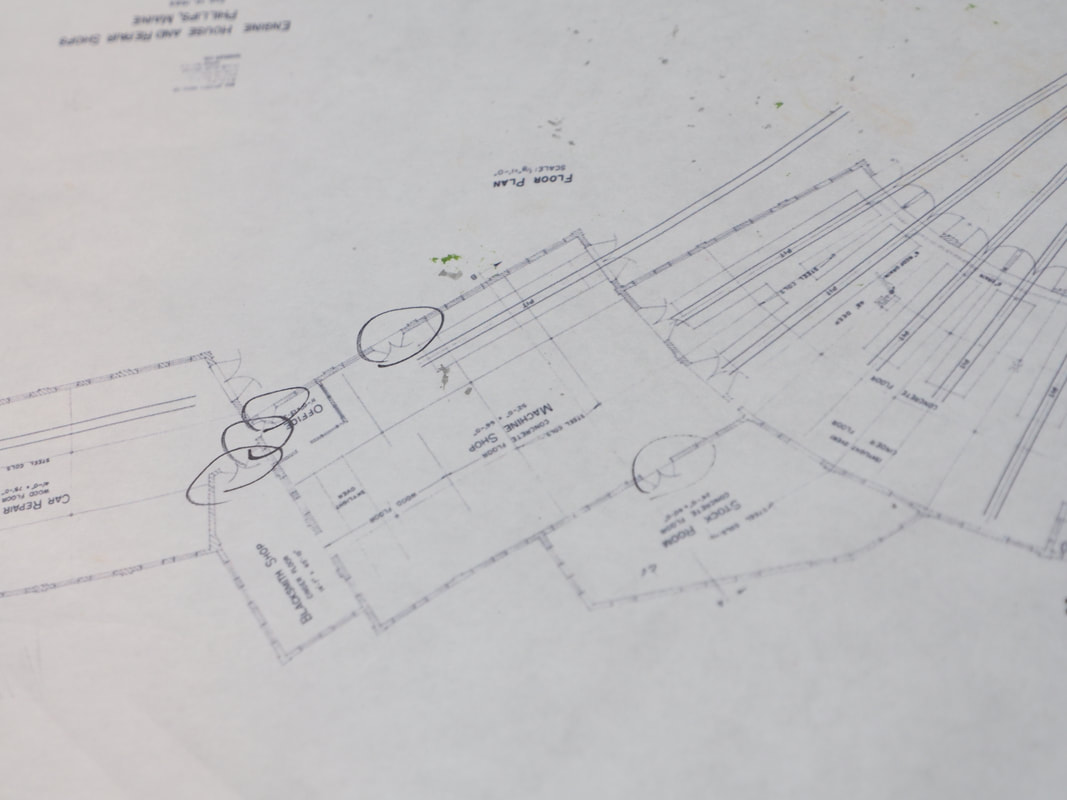
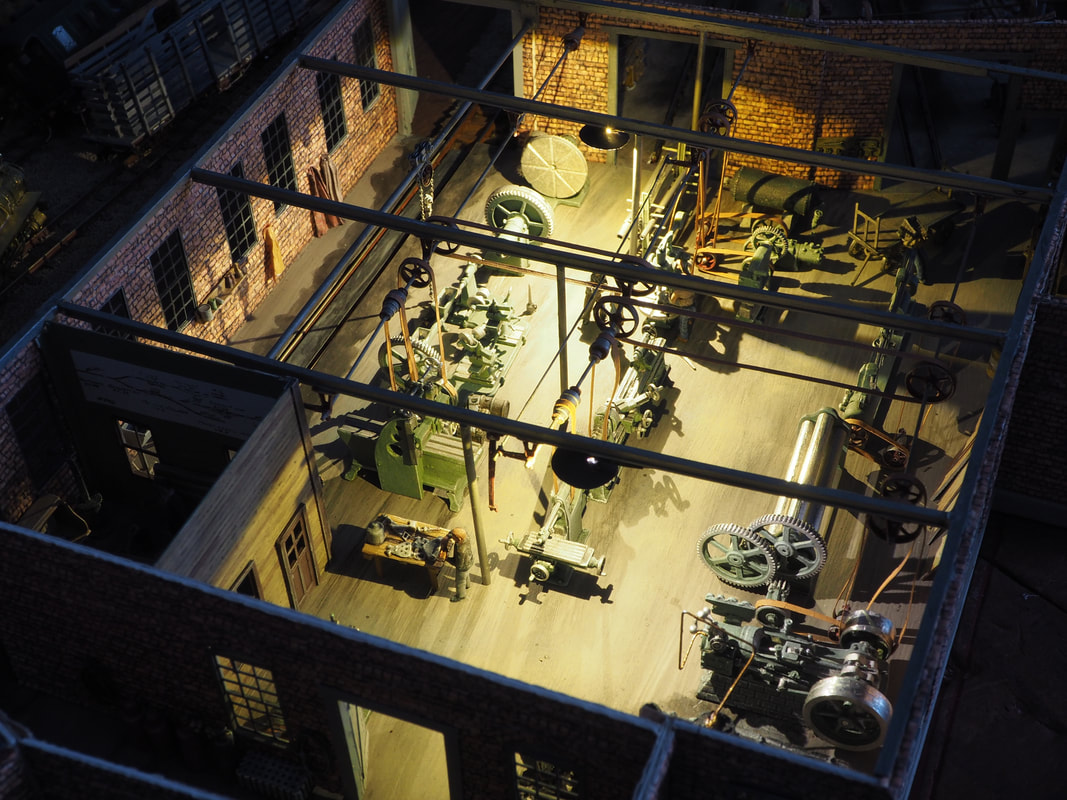
Below right is the floor plan of the prototype, with the roundhouse on the right, the car shop on the left, and the machine shop, office, blacksmith shop and stock room in the middle. That middle section is the next step to conquer. Below right, the floor of the middle shops is put together from overlapping laminated sheets of styrene for strength.
|
|
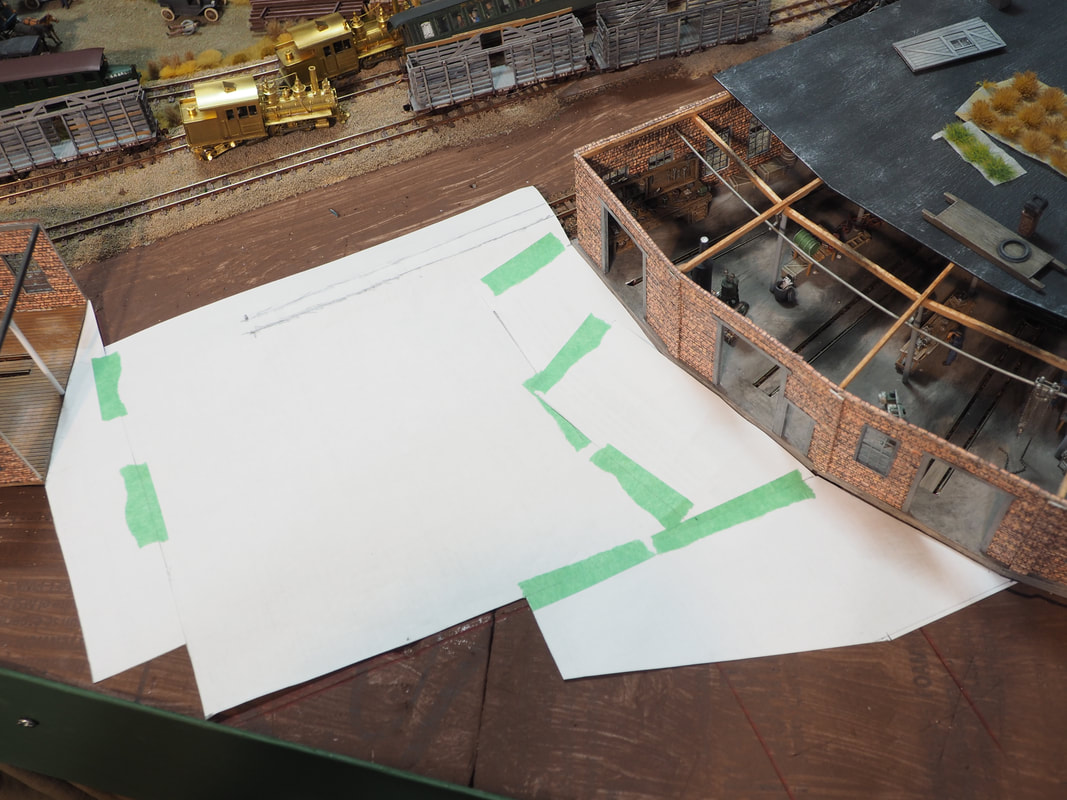
Below, a test fit of detail components is placed in the various parts to figure out how best to lay out the floor plans, and the walls of the shops are installed. The floor/foundation isn't glued down to the layout at this point and the walls of the blacksmith shop are only put in place to ensure the fit, so that the whole assembly can be taken out and worked on separate on the bench.
|
|
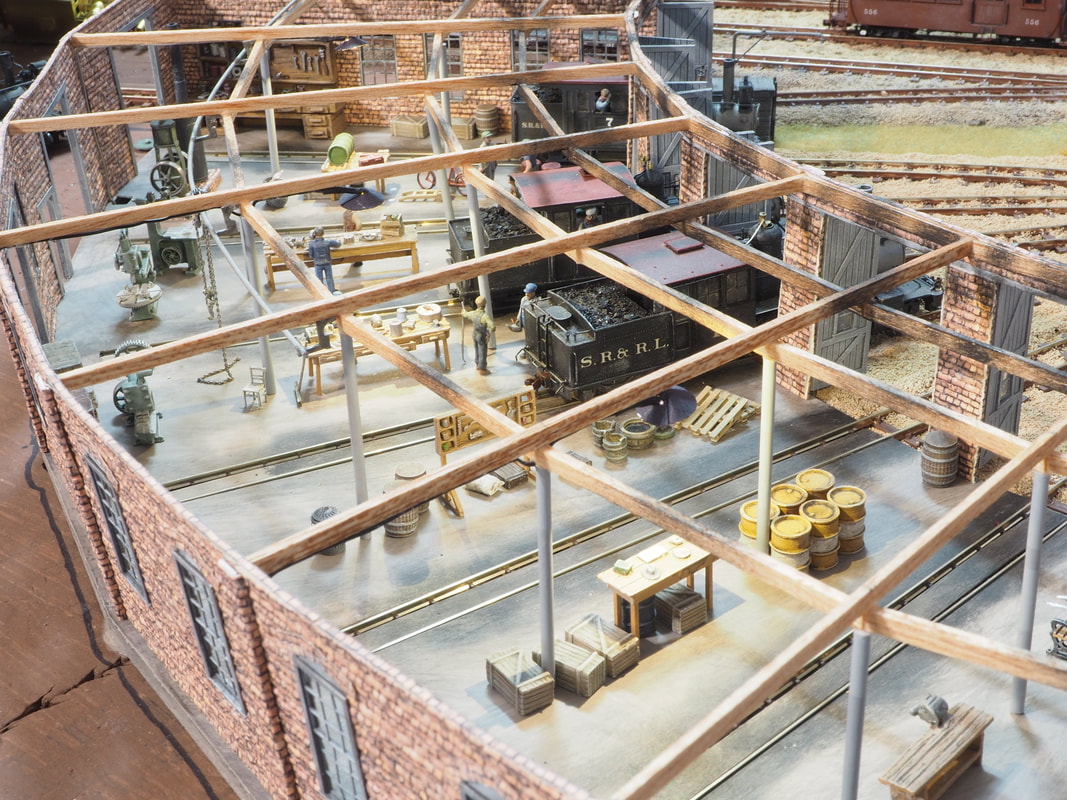
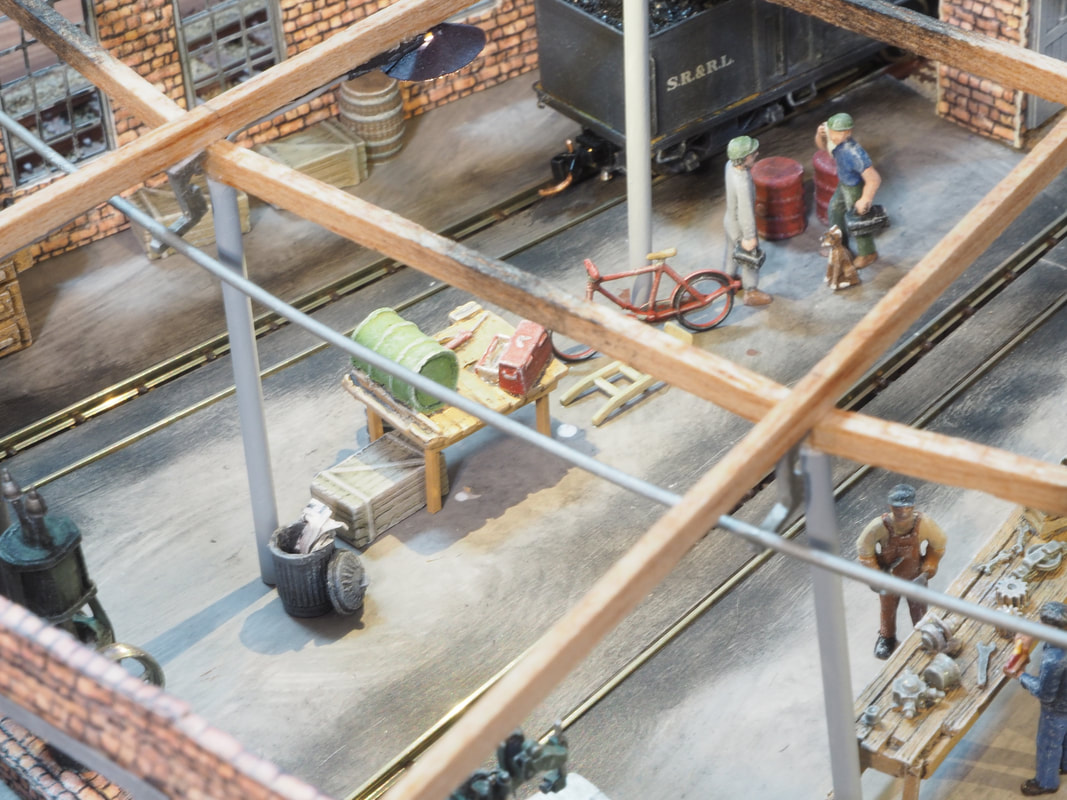
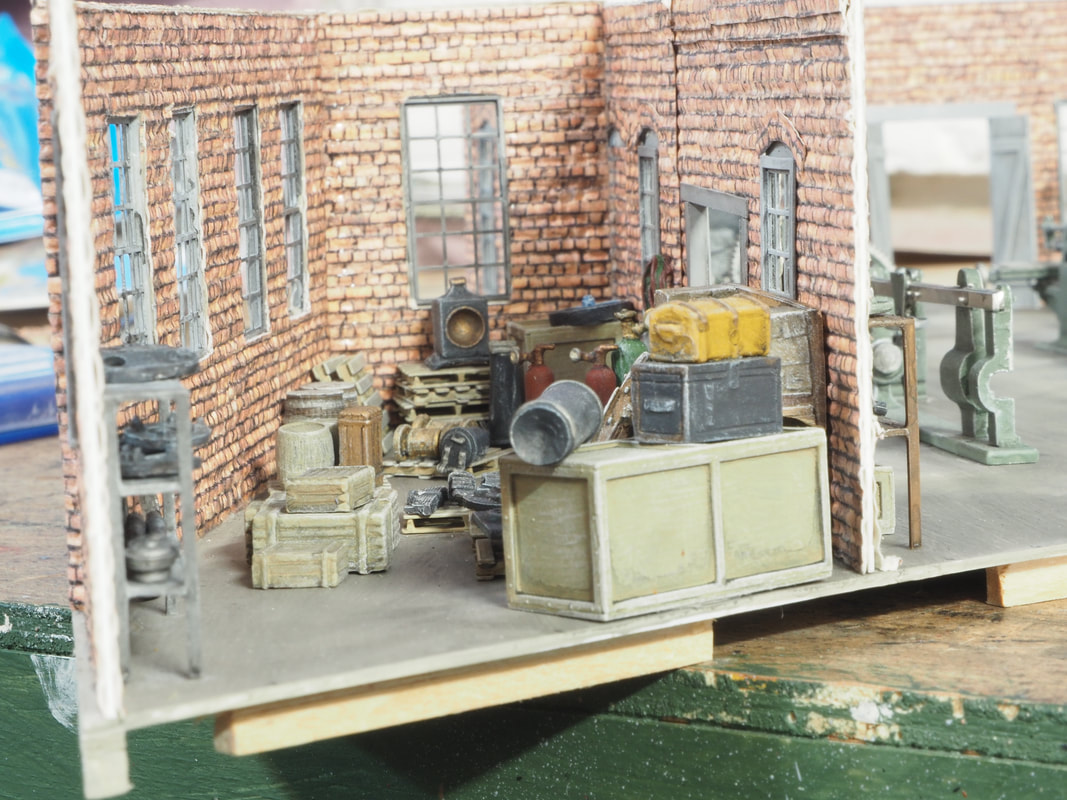
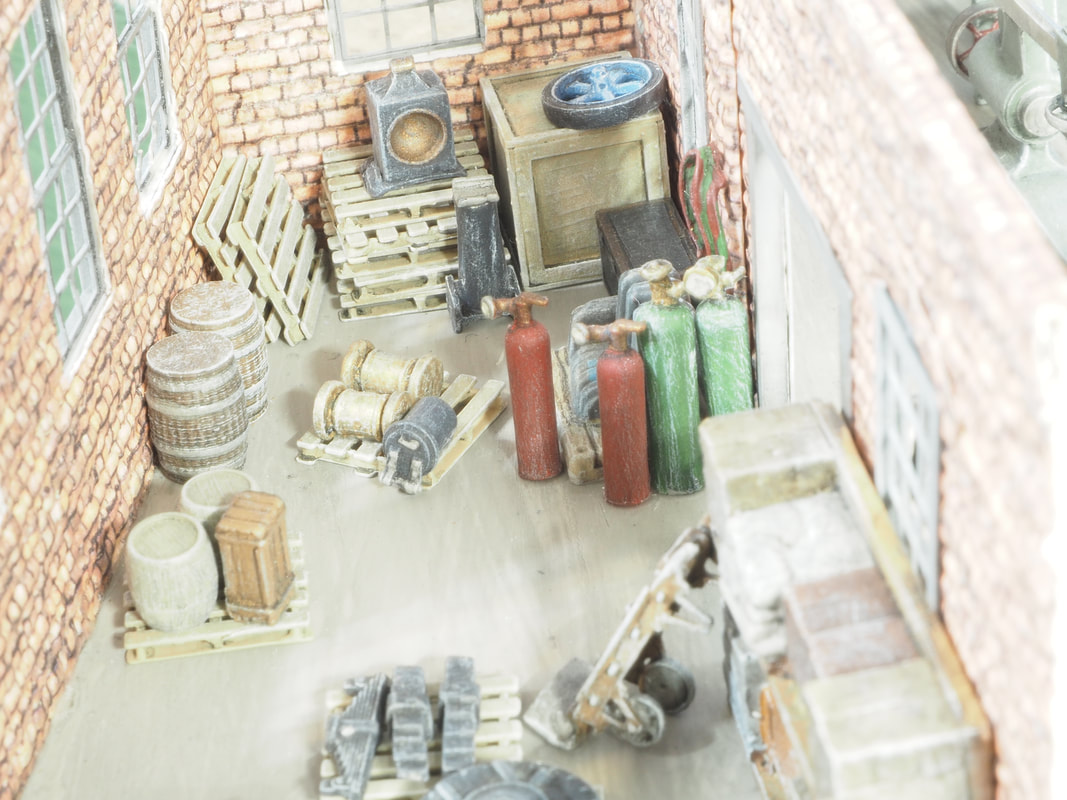
Below are two shots of the stock room, with extra rolling stock and loco components, gas and oxy bottles for the blacksmith, gets of RR spikes, crated components, and other odds and ends.
|
|
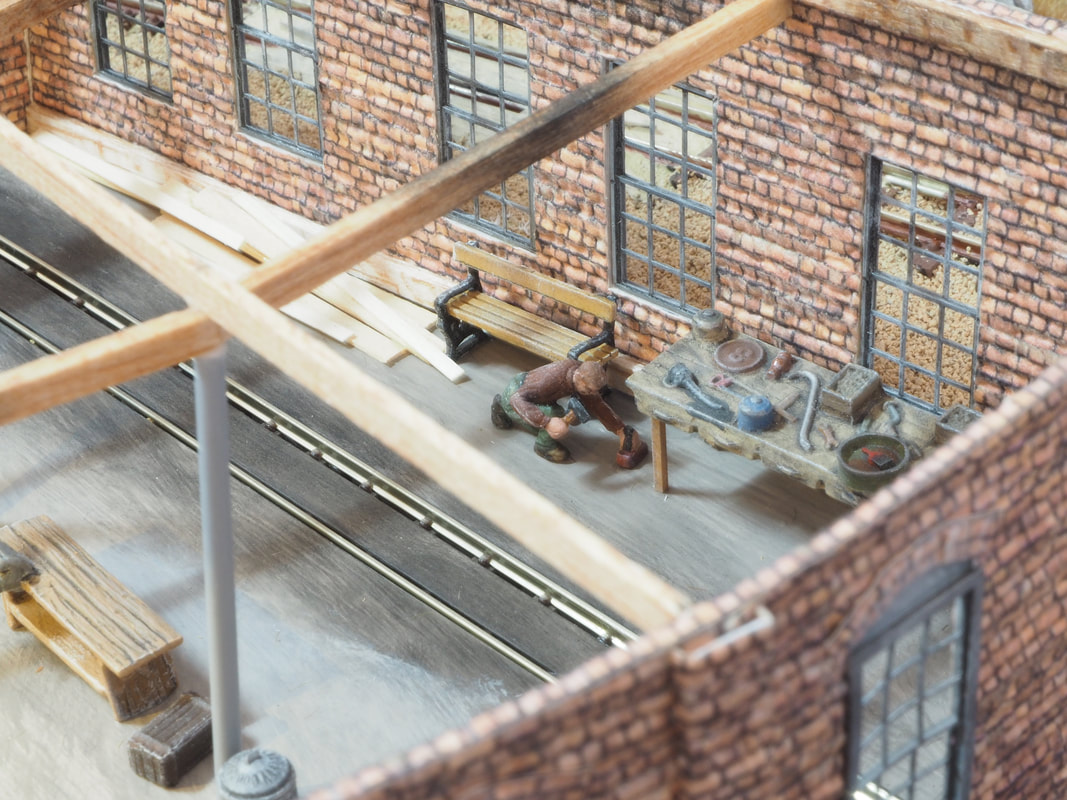
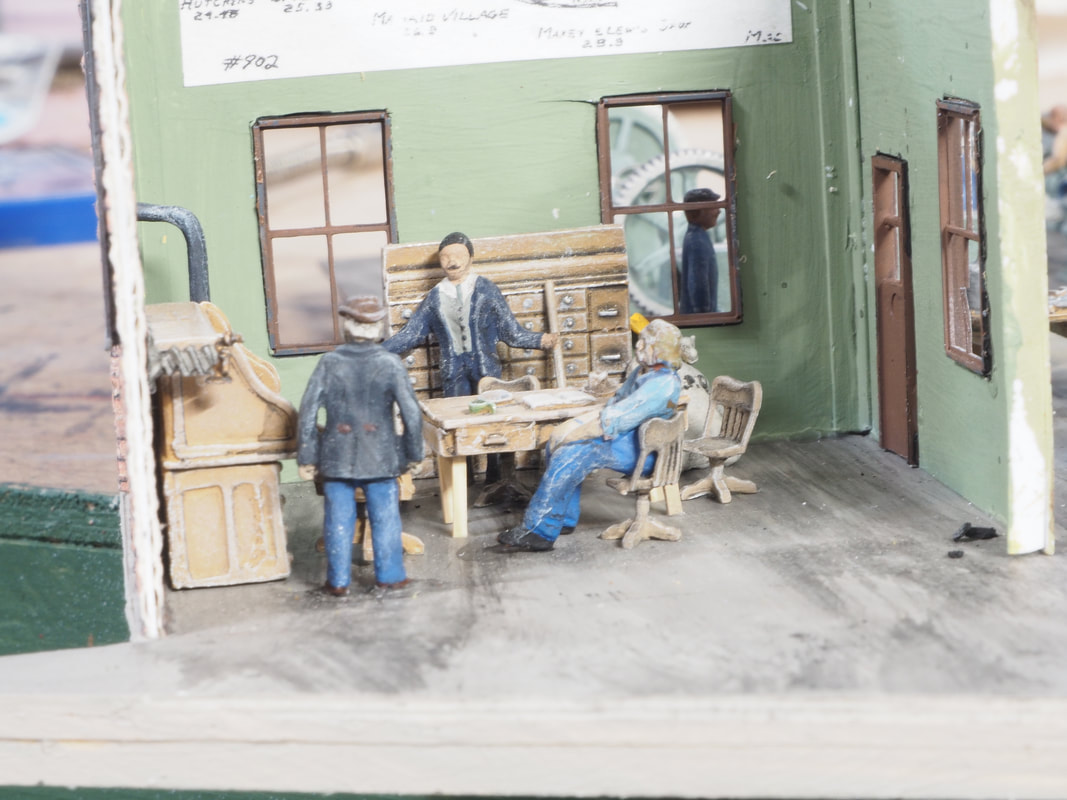
Below left, you can see the office walled off in the northwest corner of the machine shop. Note that when I'm doing this stuff, I'm constantly referring back to photos of the prototype to at least get the flavor of what was there if not enough to reproduce exact details. I haven't found any photos inside the office, so that I had to make up, but the machine shop really gets the flavor of the original. Below right is the interior of the shop, with what appears to be an animated discussion about something going on.
|
|
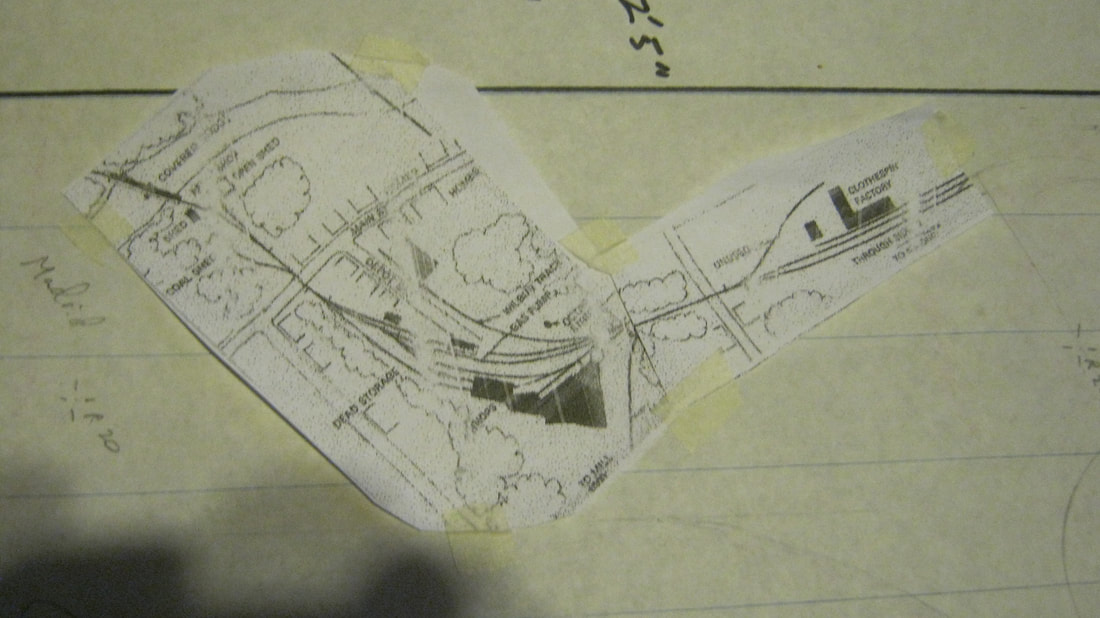
Below are two more views of details of the office. The map on the wall is a shrunk photocopy of a survey of the Madrid branch of the SR&RL RR.
|
|
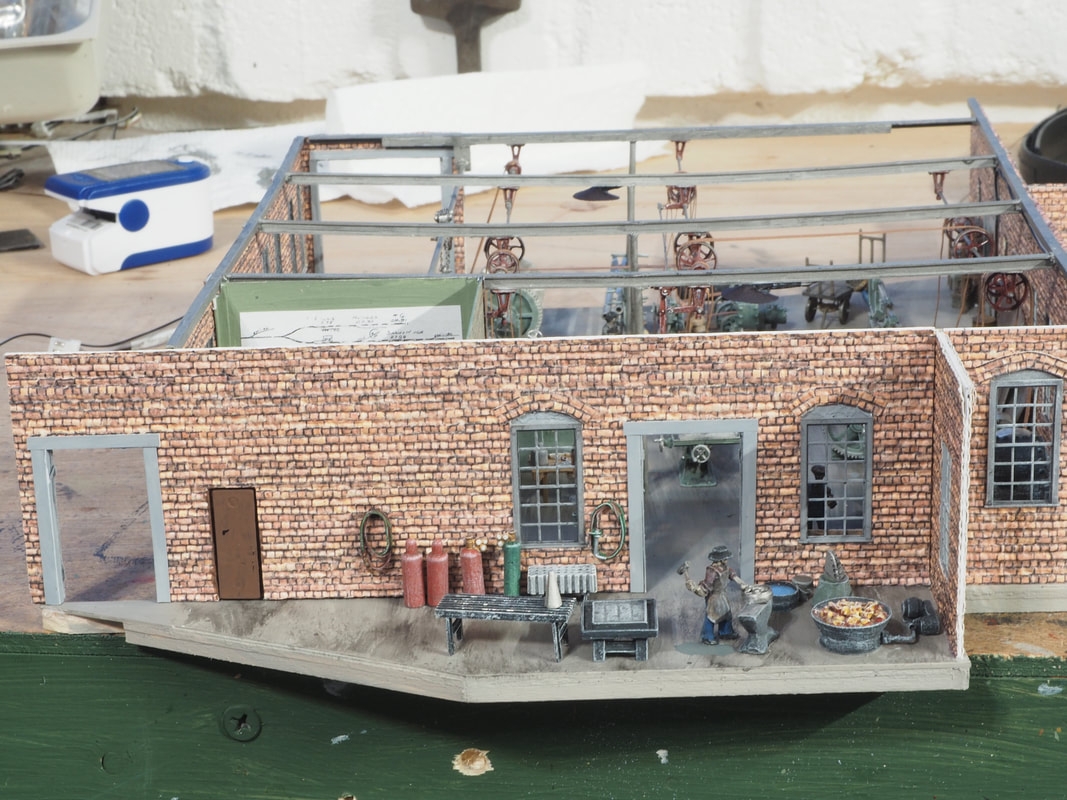
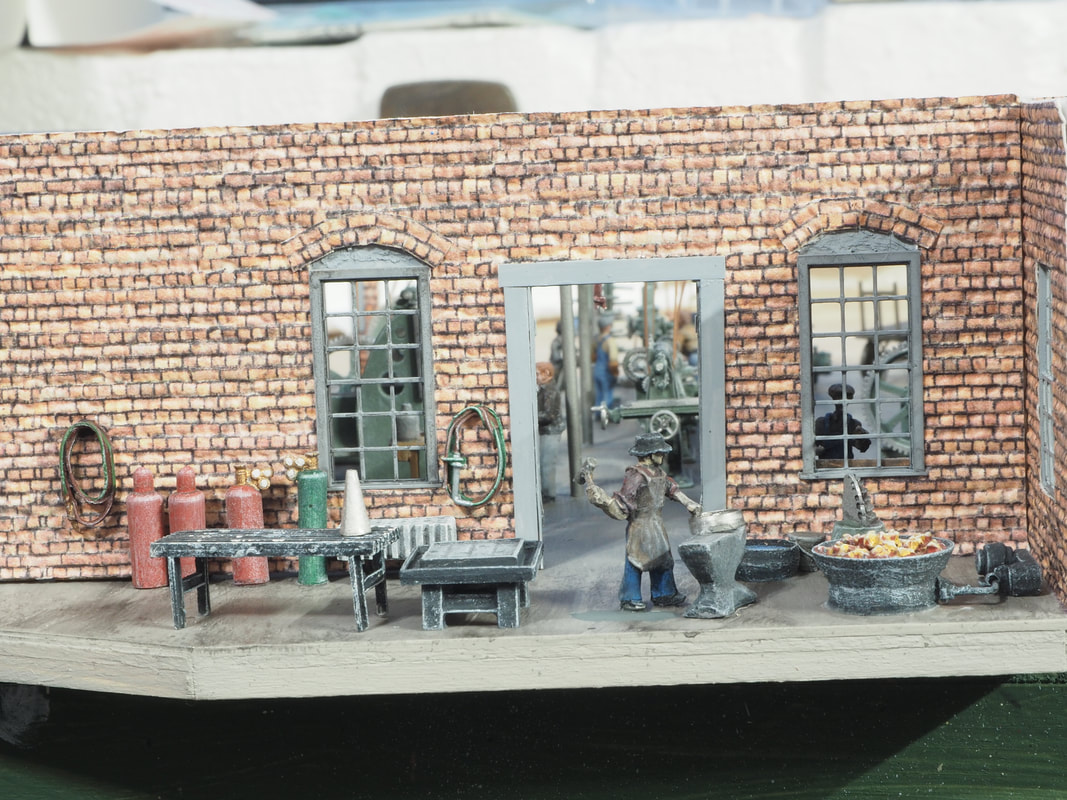
Details in the below left photo include fire buckets, a phone on the wall, a slate sink with towel and an empty box on the floor for trash, a push broom for cleaning the shop floor, oil cans and other things on the shelf, and coats and tarps hanging on the wall. Below right is the boiler and steam engine for running the pulley and belt drive system for the machinery. Coal bin for the boiler, shovel, and wheelbarrow with coal. All the crushed coal I use on my layout, in my loco tenders and gondolas is all coal from the current day SR&RL RR in Phillips, Maine.
|
|
Below, more details. Shelves full of stuff, sheet metal stock against a wall, workers doing various things, etc.
|
|
Below left, details of the shop floor and walls are now in place, and that needed to be finished first because once the belt drives go in place, getting under that for work would be tough. Below right, all the belts are added to the machines and left with loose long ends to be easier to work with when adding the drive system above.
|
|
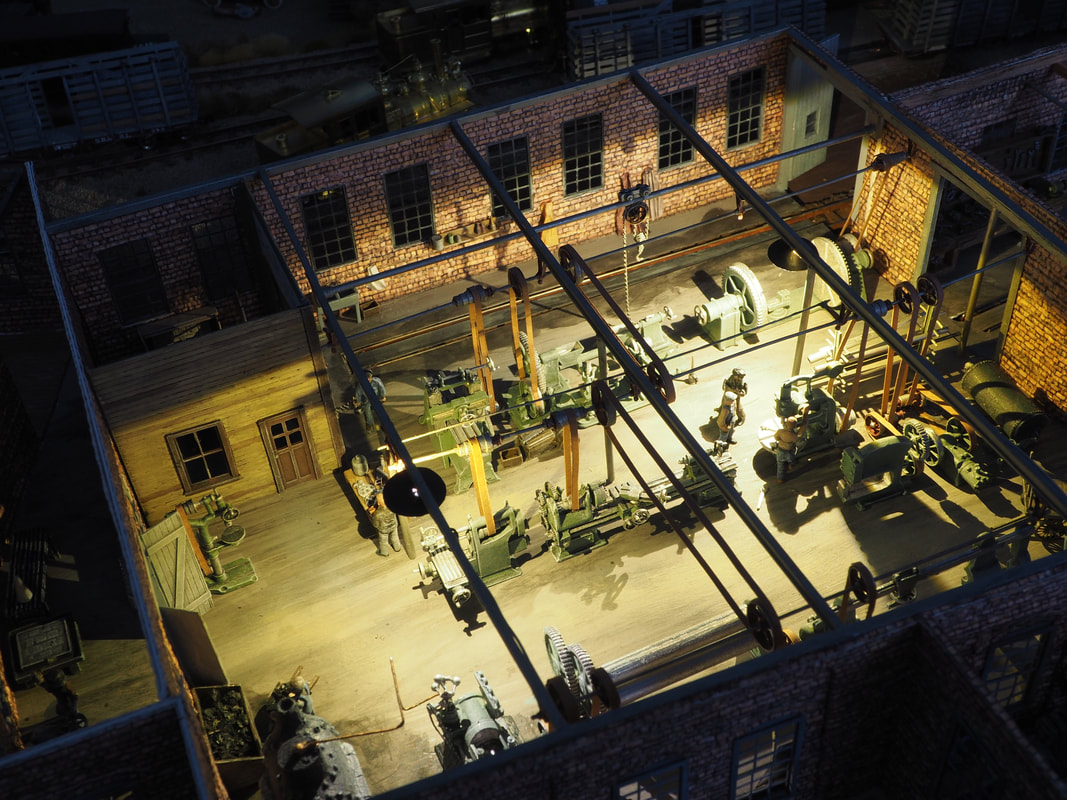
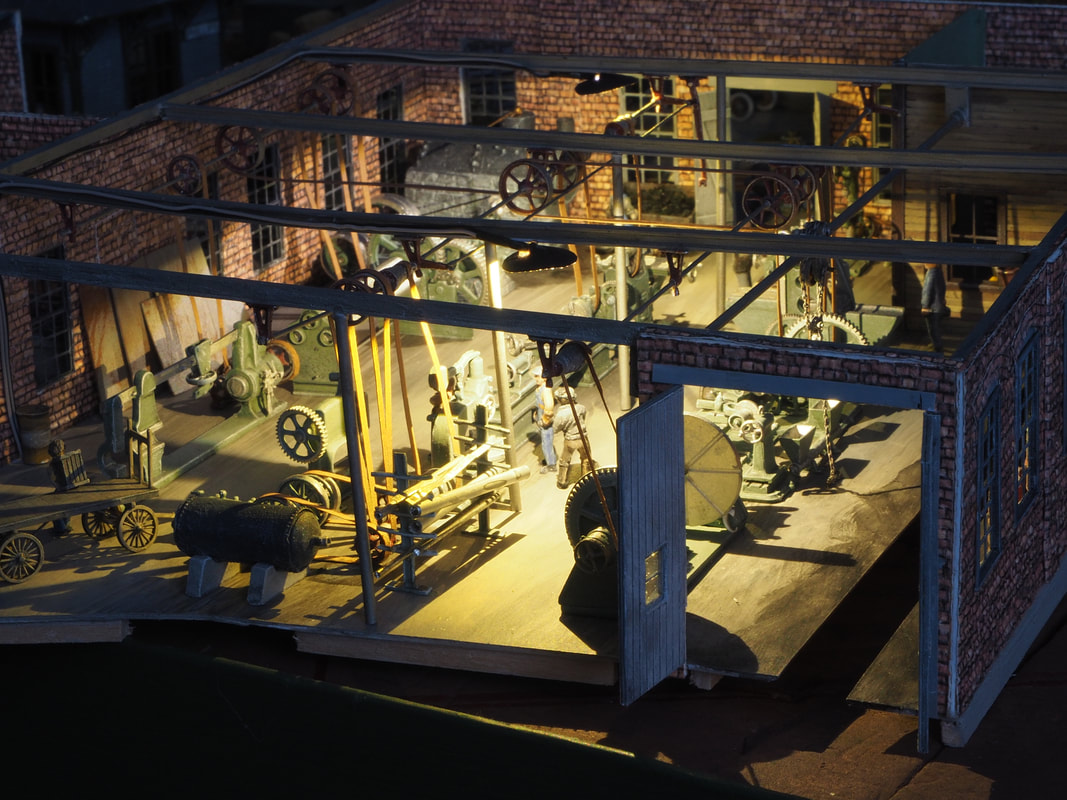
Below, the belt drive and pulley system are installed, and all that's left to do for the machine shop is install the gantry crane parallel to the rail tracks entering the shop.
|
|
The last thing to do to finish up the shop details is the blacksmith shop, which is done below.
|
|
Below left, with the machinery and belt drive components left over from the machine shop, the details for the roundhouse are finished up.
|
|
Above right and below, I photographed the finished machine shop at night with the lighting installed before putting it permanently in place on the layout.
|
|

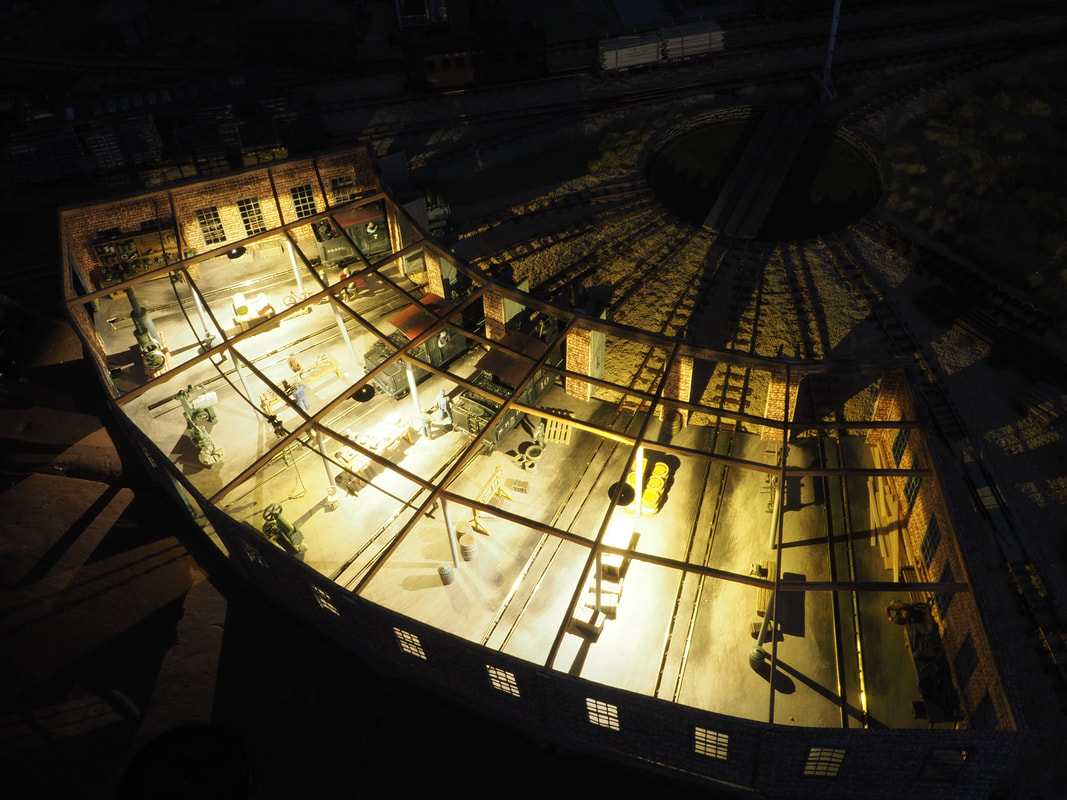
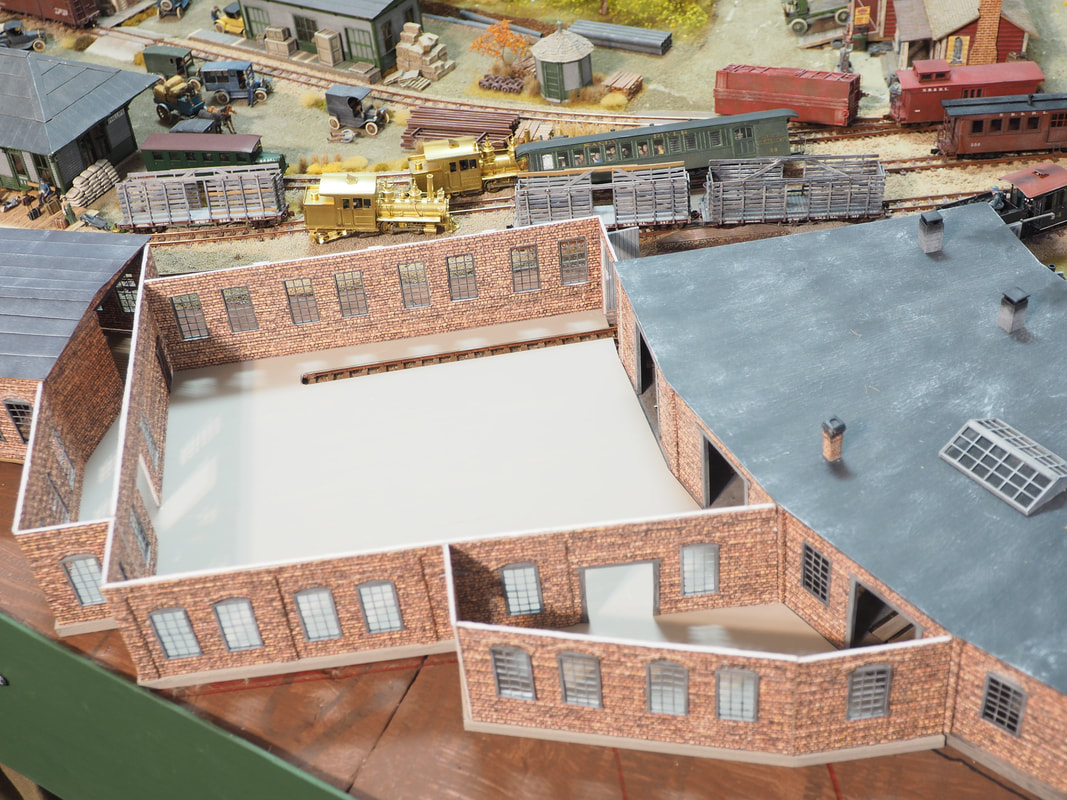
Above, all the various shops are now connected, and the complex is for the most part complete. All the roofing is in place. Some chimneys, vents and a couple of skylights still need to be added.
Below, with roofing removed, the complex is fully lit. The light in the stock room is turned off. Gotta save on the electric bill you know. The railroad runs on a financial shoestring as it is.
Below, with roofing removed, the complex is fully lit. The light in the stock room is turned off. Gotta save on the electric bill you know. The railroad runs on a financial shoestring as it is.
|
|
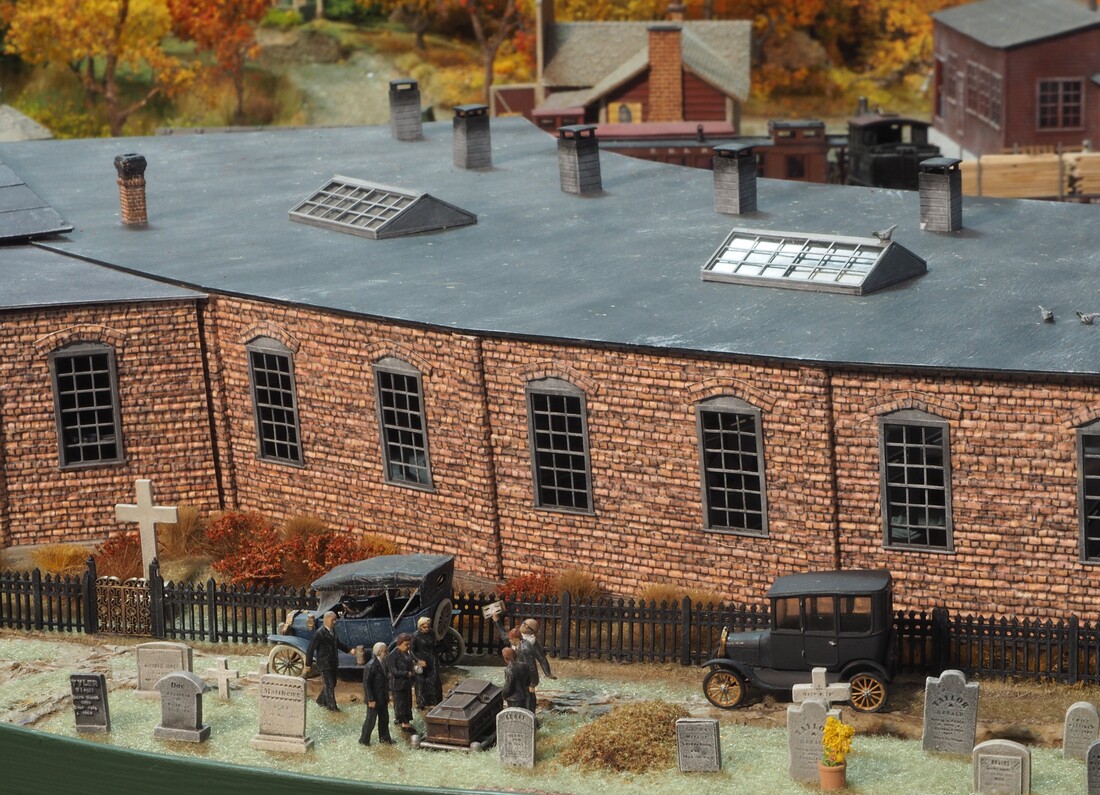
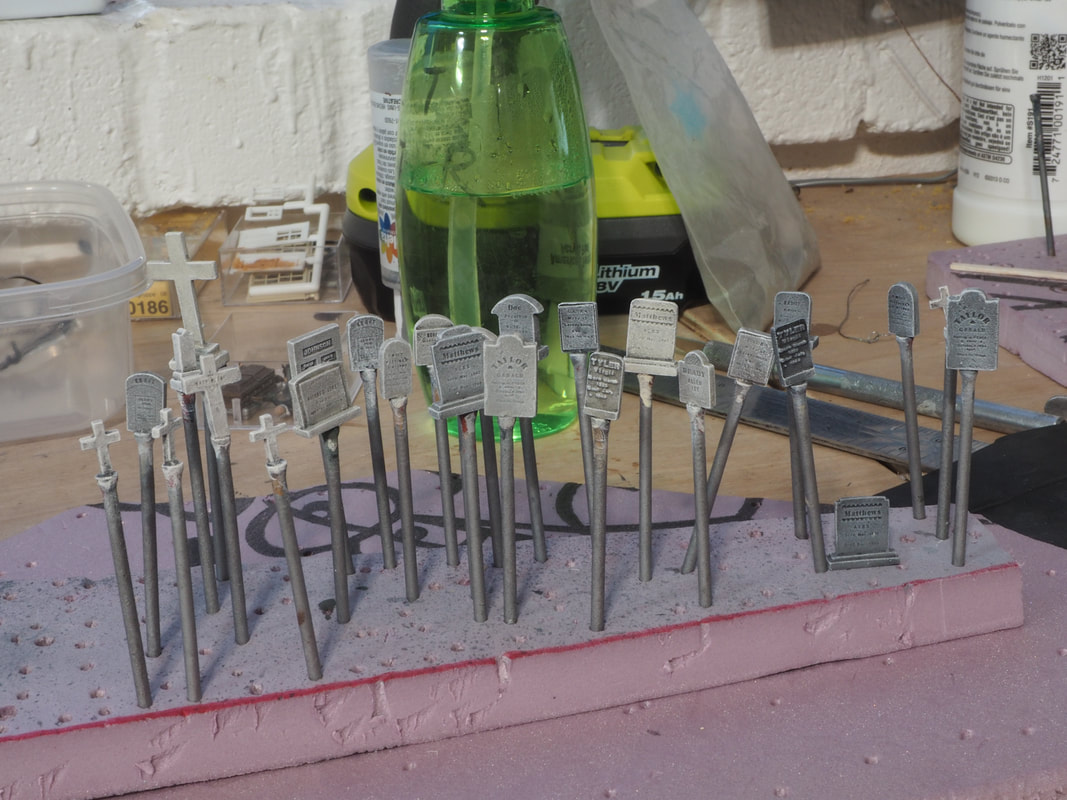
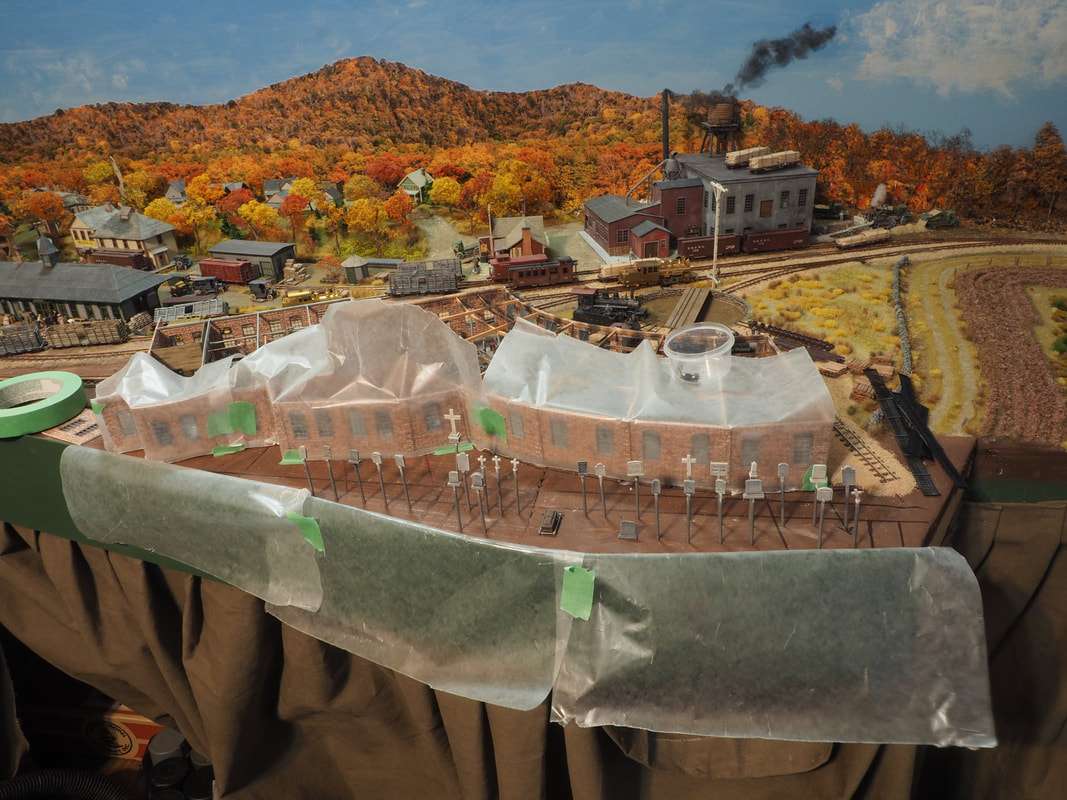
Above left, two packs of Woodland Scenics gravestones are painted and weathered, ready to populate the cemetery that was and is still located immediately behind the railroad roundhouse and shop complex site. Above right, with facia and structures covered in wax paper, the stones are laid out to get an idea of how to arrange them in the finished scene.
Below, the finished cemetery is in place. I have two different hearses, one horse drawn and the other a period auto hears that can be put in the scene, switching one for the other whenever I'm pondering the layout with a cocktail.
Below, the finished cemetery is in place. I have two different hearses, one horse drawn and the other a period auto hears that can be put in the scene, switching one for the other whenever I'm pondering the layout with a cocktail.